🆕 What's New in v1.114 — June 2026
This version makes InterventionLogic fully multilingual: the entire interface, the AI generation and the whole project can run in 8 languages (English, Slovenian, German, French, Italian, Spanish, Croatian, Greek). Translation is now smarter, faster and works between any two languages. All changes are backwards-compatible — existing projects automatically benefit.
Multilingual UI & AI — 8 languages
The whole app, every modal and notification, and the AI-generated content now follow your selected language. Switch language anytime from the top-right picker — EN, SI, DE, FR, IT, ES, HR, EL.
Translate between any languages
Build a project in one language and translate it into any other — not just EN↔SI. Switch the language and, if a translation does not yet exist, the app offers to translate the whole project for you.
Continue & sync translations
Edit something in one language and, when you switch to another, the app detects the differences and offers to translate just the changes. A partial translation can be resumed to the end — only the missing fields are translated.
Live translation progress
Translation now shows a live per-chapter progress window (just like generation): which chapter is being translated, elapsed time, the model in use, and a Cancel button.
Faster, cheaper translation
Translation runs on the light AI model (much higher rate limit), so it finishes in seconds instead of minutes. If the API quota is reached, it stops immediately with a clear notice instead of hanging.
Country-aware national projects
A national (decentralised) consortium now uses the applicant's own country instead of always defaulting to Slovenia — important because language is not country (a German speaker may apply in DE, AT or CH). Always editable.
Collaboration → | References → | Branding → | Gantt → | Finance Breakdown →
🆕 Novosti v1.114 — Junij 2026
Ta verzija naredi InterventionLogic popolnoma večjezičen: celoten vmesnik, AI generiranje in cel projekt lahko tečejo v 8 jezikih (angleščina, slovenščina, nemščina, francoščina, italijanščina, španščina, hrvaščina, grščina). Prevajanje je zdaj pametnejše, hitrejše in deluje med katerimakoli jezikoma. Vse spremembe so združljive nazaj — obstoječi projekti samodejno pridobijo novosti.
Večjezični vmesnik in AI — 8 jezikov
Celotna aplikacija, vsa modalna okna in obvestila ter vsebina, ki jo ustvari AI, zdaj sledijo izbranemu jeziku. Jezik preklopite kadarkoli v izbirniku zgoraj desno — EN, SI, DE, FR, IT, ES, HR, EL.
Prevod med katerimikoli jeziki
Projekt ustvarite v enem jeziku in ga prevedete v katerega koli drugega — ne le EN↔SI. Ob preklopu jezika, če prevod še ne obstaja, aplikacija ponudi, da prevede celoten projekt.
Nadaljevanje in usklajevanje prevodov
Če nekaj popravite v enem jeziku, vas aplikacija ob preklopu na drugega opozori na razlike in ponudi prevod le sprememb. Delni prevod lahko nadaljujete do konca — prevedejo se samo manjkajoča polja.
Živ prikaz napredka prevoda
Prevajanje zdaj prikazuje živo okno napredka po poglavjih (kot generiranje): katero poglavje se prevaja, pretekli čas, uporabljeni model in gumb Prekliči.
Hitrejše, cenejše prevajanje
Prevajanje teče na lahkem AI modelu (mnogo višja kvota), zato se zaključi v sekundah namesto minutah. Če je kvota dosežena, se takoj ustavi z jasnim obvestilom, namesto da obtiči.
Nacionalni projekti glede na državo
Nacionalni (decentralizirani) konzorcij zdaj uporabi državo prijavitelja namesto privzete Slovenije — pomembno, ker jezik ni država (nemško govoreči lahko prijavlja v DE, AT ali CH). Vedno urejljivo.
Sodelovanje → | Reference → | Znamčenje → | Gantt → | Finance Tabela →
1. Registration & Login
1.1 Registration
- Open your browser and navigate to https://interventionlogic.eu
- Click "Register here" at the bottom of the login form
- Fill in: First Name, Last Name, E-mail Address, Organisation Name, Password (min. 8 characters — must include uppercase, lowercase, number, symbol), Confirm Password
- Click "Register"
- Check your email inbox for a confirmation email and click the activation link
- Return to https://interventionlogic.eu and log in with your credentials
When you register, your Organisation is created automatically and you become its owner and administrator. You can invite other users to your organisation later from the Admin Panel.
1.2 Login
- Enter your E-mail Address and Password
- Click "Login"
- If 2FA is enabled, enter the 6-digit verification code from your authenticator app
- You will be taken to the Home Screen with your project list
1.3 Language Selection
In the top-right corner, click SI or EN to switch the interface and AI generation language. The active language is highlighted in blue. This language also controls which language the AI generates content in.
1. Registracija in prijava
1.1 Registracija
- Odprite brskalnik in pojdite na https://interventionlogic.eu
- Kliknite "Register here" na dnu prijavnega obrazca
- Izpolnite: Ime, Priimek, E-poštni naslov, Ime organizacije, Geslo (min. 8 znakov — mora vsebovati velike/male črke, številko, simbol) in Potrditev gesla
- Kliknite "Register"
- Preverite svojo e-pošto za potrditveno sporočilo in kliknite aktivacijsko povezavo
- Vrnite se na InterventionLogic in se prijavite s svojimi podatki
Ko se registrirate, se vaša Organizacija samodejno ustvari in postanete njen lastnik in administrator. Pozneje lahko iz Administracijske plošče povabite druge uporabnike.
1.2 Prijava
- Vnesite e-poštni naslov in geslo
- Kliknite "Login"
- Če je omogočena dvostopenjska avtentikacija (2FA), vnesite 6-mestno kodo iz aplikacije za avtentikacijo
- Preusmerjeni boste na Domačo stran s seznamom projektov
1.3 Izbira jezika
V zgornjem desnem kotu kliknite SI ali EN za preklop vmesnika in jezika AI generiranja. Aktiven jezik je označen z modro. Ta jezik določa tudi, v katerem jeziku AI generira vsebino.
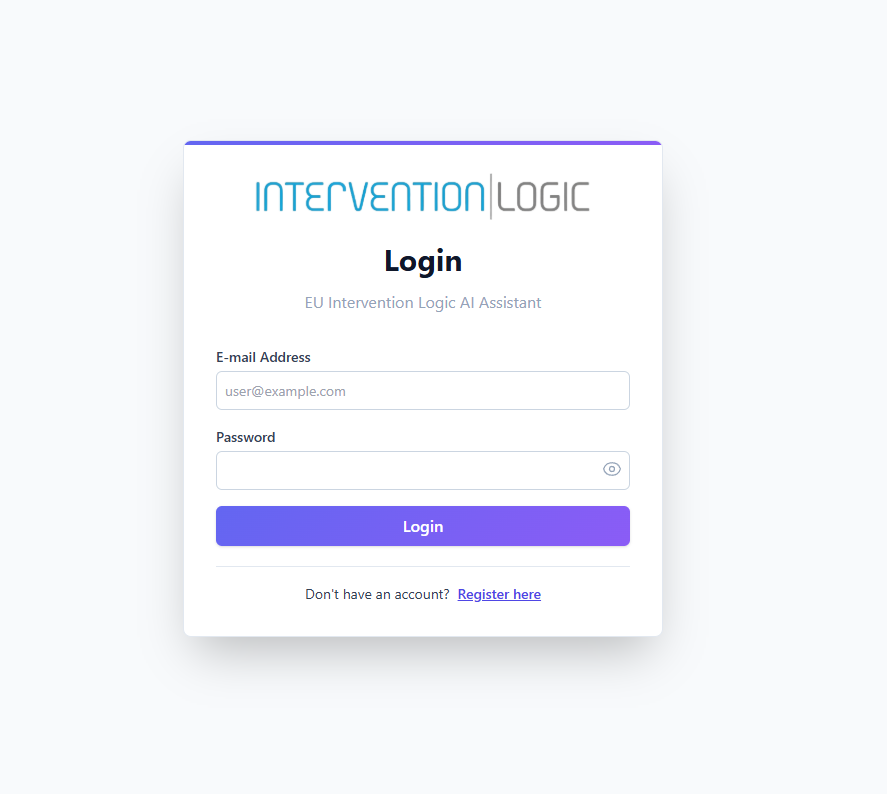
Login — e-mail, password, login button
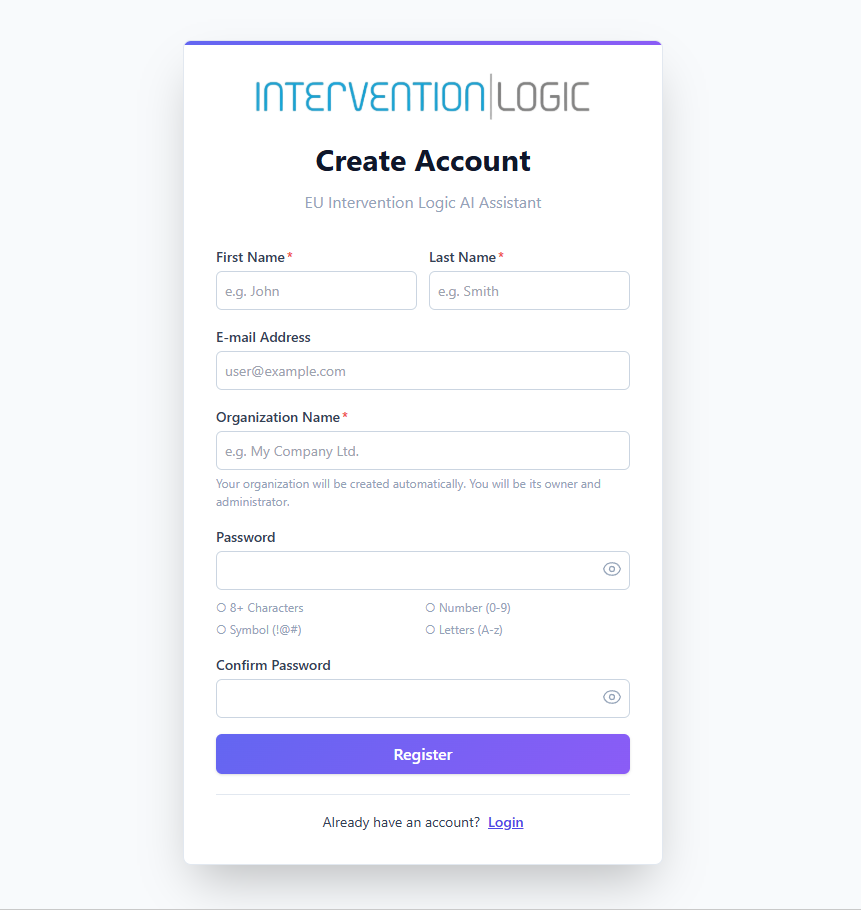
Registration — First Name, Last Name, Organisation, Password with strength rules
2. Application Overview
2.1 Main Layout
| Area | Position | Purpose |
|---|---|---|
| Sidebar | Left | Navigation menu with all project chapters and sub-sections |
| Editor | Centre | Main workspace for viewing and editing project content |
| Dashboard | Right | Statistical overview with auto-generated charts (collapsible) |
2.2 Sidebar Navigation — Intervention Logic Framework
The sidebar follows the Intervention Logic Framework — the structured cause-and-effect chain from problem to impact that is the backbone of every EU project proposal:
| Chapter | Section | Description |
|---|---|---|
| Ch.1 | Problem Analysis | Core problem, causes, consequences |
| Ch.2 | Project Idea | Title, acronym, aim, state of the art, solution, policies, readiness |
| Ch.3-4 | Objectives | General objectives & specific S.M.A.R.T. objectives |
| Ch.5 | Activities | Work packages, project management, risks, partnership, finance |
| Ch.6 | Expected Results | Outputs, outcomes, impacts, KERs |
Every chapter logically flows from the previous one: Problem → Solution → Objectives → Activities → Results. EU evaluators check this chain for consistency. InterventionLogic enforces this through AI cross-referencing.
2. Pregled aplikacije
2.1 Glavna postavitev
| Področje | Položaj | Namen |
|---|---|---|
| Stranska vrstica | Levo | Navigacijski meni z vsemi poglavji in podsekcijami |
| Urejevalnik | Sredina | Glavni delovni prostor za urejanje vsebine |
| Nadzorna plošča | Desno | Statistični pregled z avtomatsko generiranimi grafi (zložljivo) |
2.2 Navigacija — Okvir intervencijske logike
Stranska vrstica sledi Okviru intervencijske logike — strukturirani verigi vzrokov in posledic od problema do vpliva:
| Poglavje | Sekcija | Opis |
|---|---|---|
| Pgl.1 | Analiza problema | Osrednji problem, vzroki, posledice |
| Pgl.2 | Projektna ideja | Naslov, akronim, cilj, stanje tehnike, rešitev, politike, pripravljenost |
| Pgl.3-4 | Cilji | Splošni cilji in specifični S.M.A.R.T. cilji |
| Pgl.5 | Aktivnosti | Delovni sklopi, vodenje projekta, tveganja, partnerstvo, finance |
| Pgl.6 | Pričakovani rezultati | Proizvodi, učinki, vplivi, KER-ji |
Vsako poglavje logično izhaja iz prejšnjega: Problem → Rešitev → Cilji → Aktivnosti → Rezultati. EU ocenjevalci preverjajo to verigo. InterventionLogic jo zagotavlja s pomočjo AI navzkrižnega sklicevanja.

Top bar — ① Project name ② Module navigation ③ Dark mode toggle ④ Settings & export
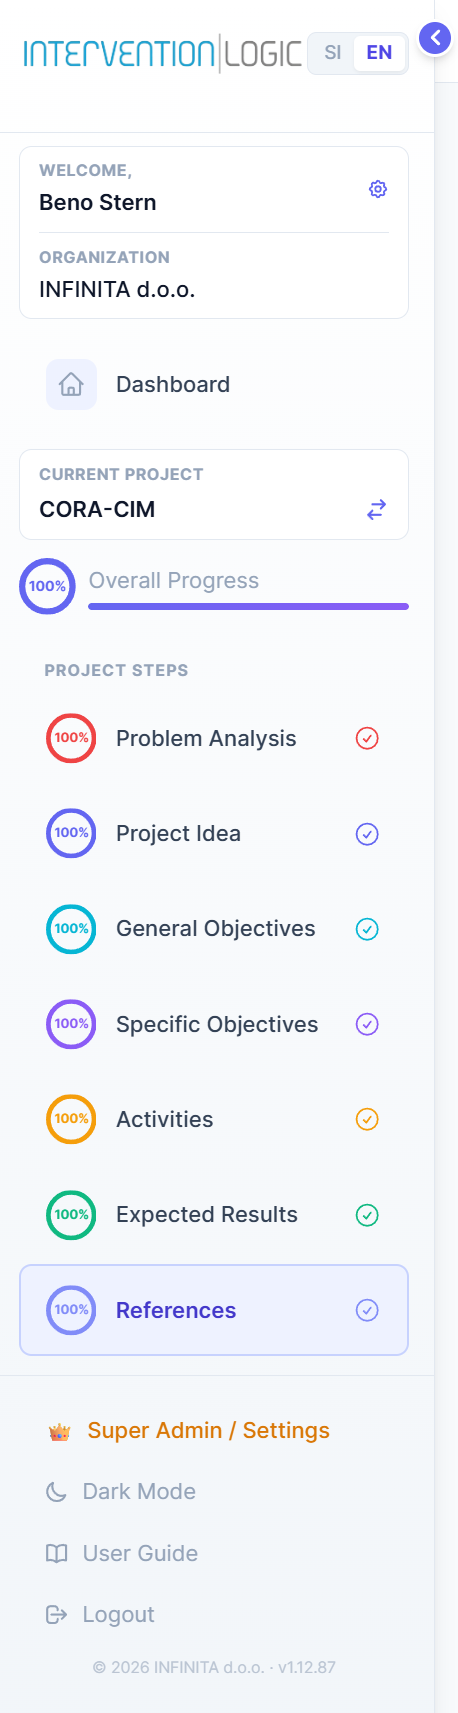
Sidebar — intervention logic chapters
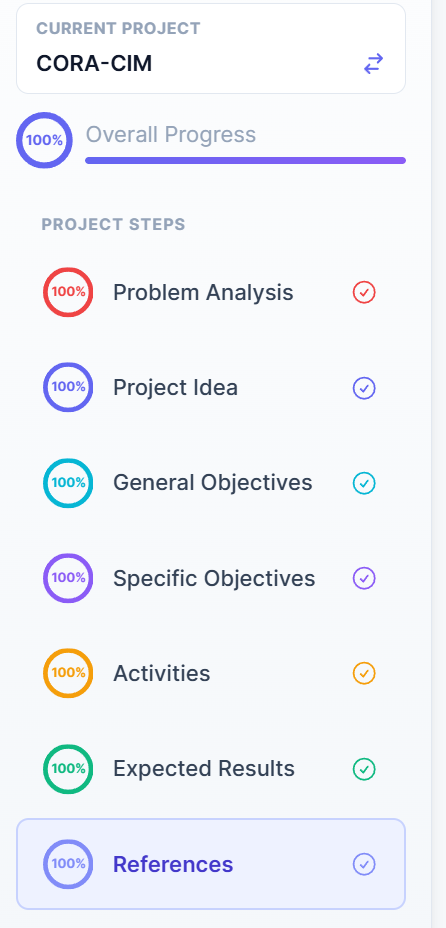
Sidebar — progress indicators per chapter
3. AI Configuration & Settings
Without a valid API key, AI generation will not work. You can still manually fill in all fields, but AI-powered features (Fill, Enhance, Regenerate, AI Assistant) require an API key.
3.1 Setting Up Your AI Provider
- Click the Settings gear icon (⚙) in the top-right corner
- Select your AI Provider:
Recommended Gemini (Google) — generous free tier, fast, web search supported
Alternative OpenRouter — multiple models, web search supported
Alternative OpenAI — GPT models, paid key, no web search - Paste your API Key
- Select the Primary Model (e.g.,
gemini-2.5-flash-lite) - Optionally select a Secondary Model as fallback NEW
- Click "Save"
3.2 Getting a Free Gemini API Key
- Go to https://aistudio.google.com/apikey
- Sign in with your Google account
- Click "Create API Key"
- Copy the key and paste it into InterventionLogic Settings
Gemini's free tier allows approximately 15 requests per minute — sufficient for generating all project sections. No credit card required.
3.3 Web Search for Evidence NEW
When enabled, the AI will actively search the internet for current data, statistics, citations and sources while generating content. This ensures your proposal contains up-to-date, verifiable information.
- In Settings, find the "Web Search for Evidence" section
- Toggle the checkbox to ON
- Click "Save"
| Provider | How Web Search Works |
|---|---|
| Gemini | Uses Google Search grounding — AI directly queries Google for real-time data |
| OpenRouter | Uses web plugin — AI searches the web via Exa for current sources |
| OpenAI | Not supported — use Gemini or OpenRouter for web search |
Web search activates only for content-heavy analytical sections (Problem Analysis, Project Idea, State of the Art, Objectives, Expected Results). Structural sections (Risks, Finance, Project Management) do not trigger web searches.
3. Konfiguracija AI in nastavitve
Brez veljavnega API ključa AI generiranje ne bo delovalo. Polja lahko še vedno izpolnite ročno, vendar AI funkcije (Izpolni, Izboljšaj, Regeneriraj, AI Asistent) zahtevajo API ključ.
3.1 Nastavitev AI ponudnika
- Kliknite ikono nastavitev (⚙) v zgornjem desnem kotu
- Izberite AI ponudnika:
Priporočeno Gemini (Google) — brezplačno, hitro, spletno iskanje podprto
Alternativa OpenRouter — več modelov, spletno iskanje podprto
Alternativa OpenAI — GPT modeli, plačljivo, brez spletnega iskanja - Prilepite API ključ
- Izberite Primarni model (npr.
gemini-2.5-flash-lite) - Po želji izberite Sekundarni model kot rezervo NOVO
- Kliknite "Shrani"
3.2 Brezplačen Gemini API ključ
- Pojdite na https://aistudio.google.com/apikey
- Prijavite se z Google računom
- Kliknite "Create API Key"
- Kopirajte ključ in ga prilepite v nastavitve InterventionLogic
Gemini brezplačna raven omogoča približno 15 zahtevkov na minuto — dovolj za generiranje vseh sekcij. Kreditna kartica ni potrebna.
3.3 Spletno iskanje za dokaze NOVO
Ko je omogočeno, bo AI aktivno iskal po internetu za aktualne podatke, statistike, citate in vire med generiranjem vsebine.
- V nastavitvah poiščite razdelek "Spletno iskanje za dokaze"
- Obkljukajte potrditveno polje na VKLOPLJENO
- Kliknite "Shrani"
| Ponudnik | Kako deluje spletno iskanje |
|---|---|
| Gemini | Uporabi Google Search — AI neposredno poizveduje po Googlu za podatke v realnem času |
| OpenRouter | Uporabi spletni vtičnik — AI išče po spletu prek Exa za aktualne vire |
| OpenAI | Ni podprto — uporabite Gemini ali OpenRouter |
Spletno iskanje se aktivira samo za vsebinsko bogate sekcije (Analiza problema, Projektna ideja, Stanje tehnike, Cilji, Rezultati). Strukturne sekcije (Tveganja, Finance, Vodenje) ne sprožijo iskanja.
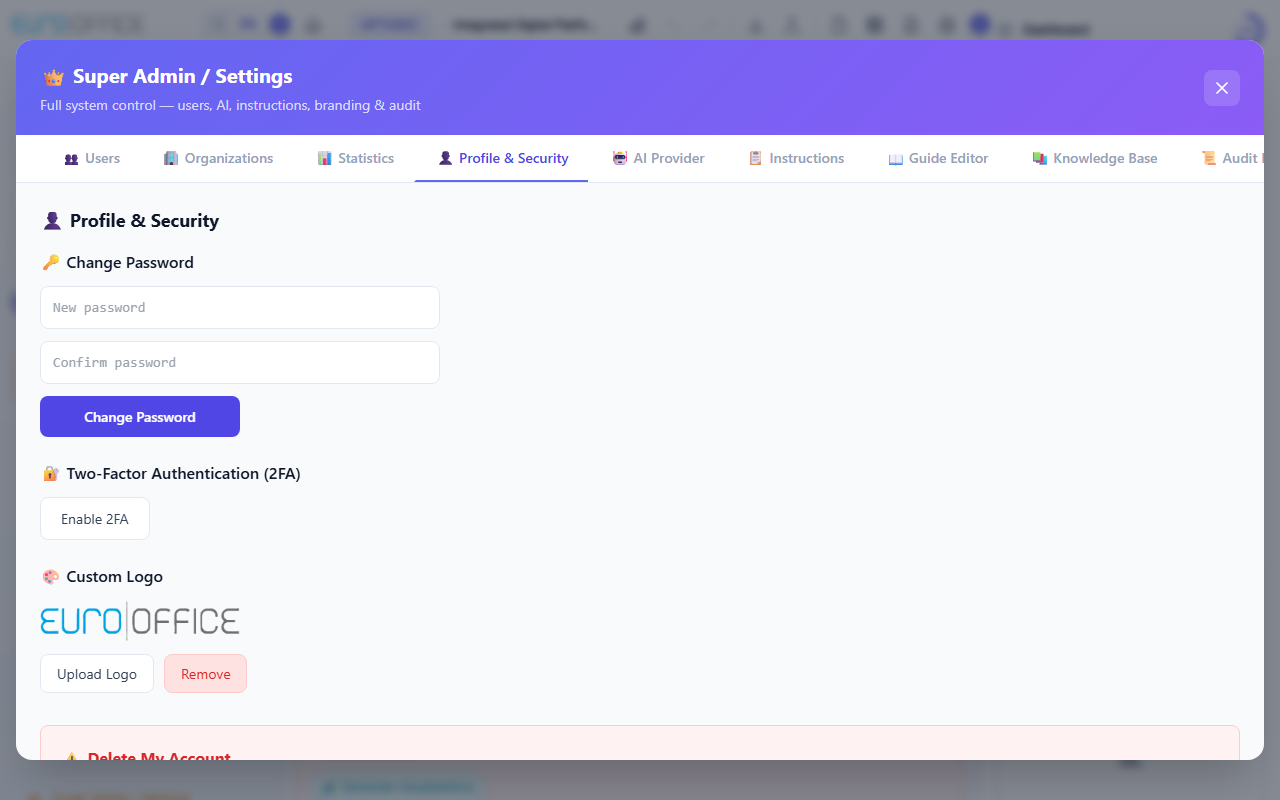
Settings panel — AI provider configuration
4. Creating a Project
4.1 New Project
- From the Home screen, click "+ New Project"
- Enter a Project Title (working title — AI can refine it later)
- Select Language: EN (English) or SI (Slovenian)
- Set the Start Date and Duration in months (e.g., 24, 36)
- Choose Funding Model: Centralized or Decentralized
- Click "Create"
4.2 Project List Actions
| Action | Description |
|---|---|
| Open | Opens the project in the editor |
| Duplicate | Creates a complete copy of the project |
| Delete | Permanently removes the project (with confirmation) |
| QR Code | Generates a shareable QR code |
4. Ustvarjanje projekta
4.1 Nov projekt
- Na domači strani kliknite "+ Nov projekt"
- Vnesite Naslov projekta (delovni naslov — AI ga lahko pozneje izpopolni)
- Izberite Jezik: EN (angleščina) ali SI (slovenščina)
- Nastavite Datum začetka in Trajanje v mesecih (npr. 24, 36)
- Izberite Model financiranja: Centralizirani ali Decentralizirani
- Kliknite "Ustvari"
4.2 Dejanja na seznamu projektov
| Dejanje | Opis |
|---|---|
| Odpri | Odpre projekt v urejevalniku |
| Podvoji | Ustvari popolno kopijo projekta |
| Izbriši | Trajno odstrani projekt (s potrditvijo) |
| QR koda | Generira QR kodo za deljenje |
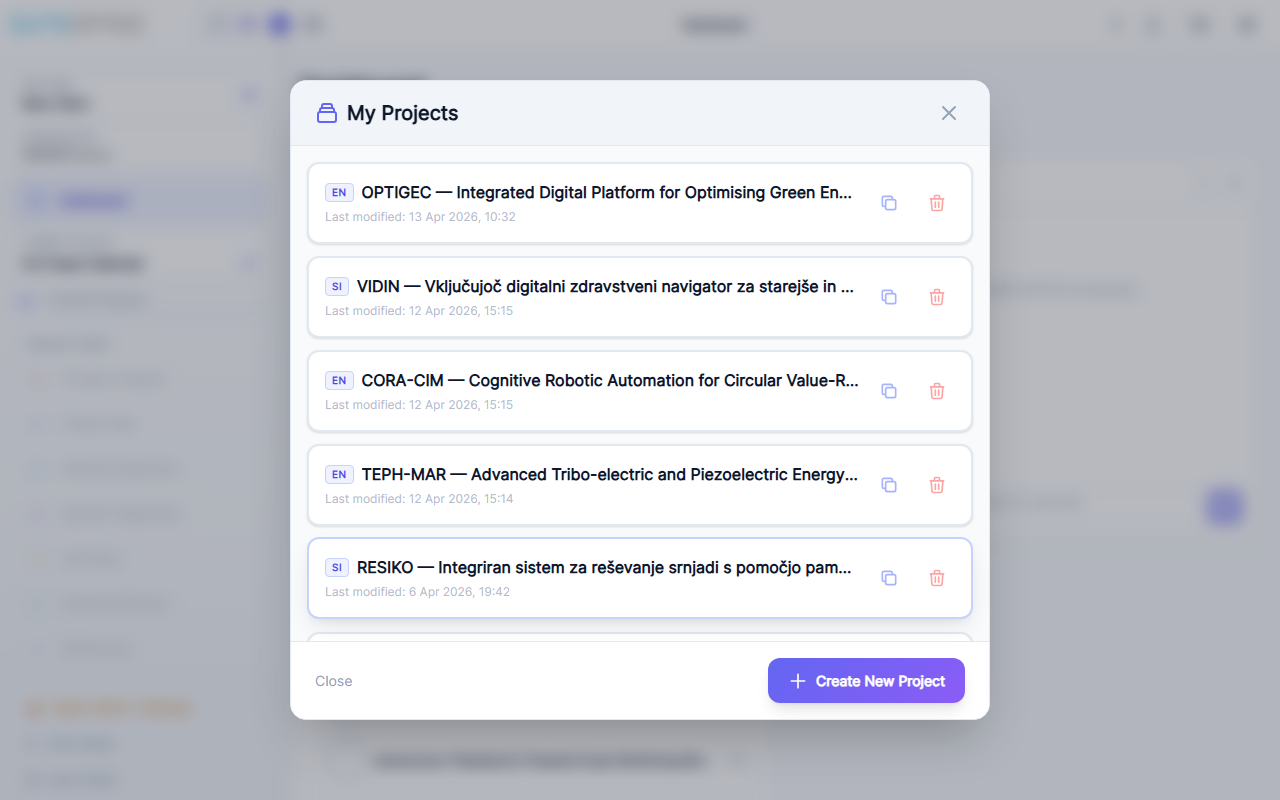
Home screen — project dashboard with project list
5. AI Generation Modes
5.1 Section-Level Generation
At the top of each section, you will find three generation buttons:
Fill
Fills only empty fields. Keeps existing content untouched.
Enhance
Deepens existing content. Adds citations, EU terminology, evidence.
Regenerate
Creates completely new content from scratch. Replaces existing data.
5.2 Field-Level AI Assistant NEW
Every text field now has a dedicated AI Assistant button (✨ icon) that appears when you hover over the field, in the top-right corner. This opens a contextual popup where you can:
- See the current field content — the popup shows what's already in the field
- Enter specific instructions — tell the AI exactly what you want (e.g., "add ISO references", "make it more formal", "expand with examples from Western Balkans")
- Generate / Regenerate — AI generates content using your instructions, field value, full project context, knowledge base, and all rules
- Preview the result — review before accepting
- Accept or Regenerate — accept to replace field content, or regenerate with modified instructions
The field-level AI Assistant is far more powerful than section-level generation because you can give precise, contextual instructions for each individual field. Use it to fine-tune paragraphs, add specific references, or adjust tone. Press Ctrl+Enter to generate quickly.
5.3 Evidence-Based Content & Citations NEW
InterventionLogic enforces strict academic rigor in all generated content:
| Rule | Description |
|---|---|
| Mandatory empirical data | Every analytical paragraph must contain at least one verified data point with source attribution |
| APA-style citations | Author surnames, publication year, at least 30% author-named citations |
| Zero-hallucination policy | AI is forbidden from fabricating sources, URLs, authors, or statistics |
| Source hierarchy | Local/regional data first, then Eurostat, OECD, EC, scientific publications |
Write your core problem title and a few sentences manually. Click Regenerate for the full AI analysis. Review, then use Enhance for more citations. Use the AI Assistant on individual fields for fine-tuning.
5. Načini AI generiranja
5.1 Generiranje na ravni sekcije
Na vrhu vsake sekcije so trije gumbi za generiranje:
Izpolni
Izpolni samo prazna polja. Obstoječo vsebino pusti nedotaknjeno.
Izboljšaj
Poglobi obstoječo vsebino. Doda citate, EU terminologijo, dokaze.
Regeneriraj
Ustvari popolnoma novo vsebino od začetka. Zamenja obstoječe.
5.2 AI Asistent na ravni polja NOVO
Vsako besedilno polje ima zdaj svoj gumb AI Asistenta (ikona ✨), ki se prikaže ob premiku miške nad polje, v zgornjem desnem kotu. Ta odpre kontekstualno okno:
- Vidite trenutno vsebino polja
- Vnesete specifična navodila — povejte AI natančno, kaj želite (npr. "dodaj ISO reference", "napiši bolj formalno", "razširi s primeri iz Zahodnega Balkana")
- Generirajte / Regenerirajte — AI generira vsebino z vašimi navodili, kontekstom projekta, bazo znanja in vsemi pravili
- Predogled rezultata — preglejte pred sprejetjem
- Sprejmite ali regenerirajte
AI Asistent na ravni polja je veliko močnejši od generiranja na ravni sekcije, ker daste natančna navodila za vsako polje. Uporabite Ctrl+Enter za hitro generiranje.
5.3 Vsebina na podlagi dokazov in citati NOVO
| Pravilo | Opis |
|---|---|
| Obvezni empirični podatki | Vsak analitični odstavek mora vsebovati vsaj eno preverjeno podatkovno točko z navedbo vira |
| APA citiranje | Priimki avtorjev, leto objave, vsaj 30% poimensko navedenih citatov |
| Ničelne halucinacije | AI-ju je prepovedano izmišljevati vire, URL-je, avtorje ali statistike |
| Hierarhija virov | Lokalni podatki najprej, nato Eurostat, OECD, EK, znanstvene publikacije |

Project editor toolbar — Fill / Enhance / Regenerate AI buttons, Export, Summary, and Print
Real-time Collaboration NEW
InterventionLogic supports full real-time multi-user collaboration. Multiple team members can work on the same project simultaneously — you see each other's presence, cursors, and edits live.
Who is Online — Presence Avatars
Colored avatar circles appear next to each section header showing which team members are currently working in that section. Each user gets a unique color that stays consistent throughout the session.
| Indicator | Where | What it shows |
|---|---|---|
| Colored dot + initials | Section header | User currently viewing or editing that section |
| Sidebar panel "Active now" | Left sidebar | All online users + the exact field each is editing |
| Field indicator | Inside text field | Colored bar shows another user is editing this field |
| Remote cursor | Inside text field | Live cursor position of another user (100ms update) |
If a collaborator closes their browser or navigates away, their avatar remains visible for 15 seconds before disappearing — preventing flickering during page reloads.
Live Co-editing
Text fields use Supabase Realtime broadcast — changes are synchronized across all connected users as you type. You can see exactly where in the text another user's cursor is positioned.
If two users edit the same field simultaneously, the last-saved value wins. For best results, coordinate via the sidebar panel to avoid editing the same field at the same time. The field-level presence indicator warns you when someone else is already typing there.
Inviting Collaborators
You can invite colleagues to collaborate on a specific project or to join your organisation.
- Open a project and click the Share / Invite button in the top toolbar
- Enter the collaborator's e-mail address
- Choose the permission level: Editor (can edit) or Viewer (read-only)
- Click "Send Invitation"
- The invitee receives an email with a link to join. If they do not have an account, they will be prompted to register first.
Manage pending invitations via the Pending Invitations panel (accessible from the share button). You can cancel any unsent invitation at any time.
Inviting someone to a project gives them access to that project only. Inviting someone to your organisation (from Admin Panel → User Management) gives them access to all projects within the organisation according to their role.
Sodelovanje v realnem času NOVO
InterventionLogic podpira polno večuporabniško sodelovanje v realnem času. Več članov ekipe lahko hkrati dela na istem projektu — vidite medsebojno prisotnost, kazalce in urejanje v živo.
Kdo je splet — avatarji prisotnosti
Barvni krogi z avatarji se prikažejo ob vsakem naslovu sekcije in kažejo, kateri člani ekipe trenutno delajo v tej sekciji. Vsak uporabnik dobi edinstveno barvo, ki ostane dosledna ves čas seje.
| Kazalnik | Kje | Kaj prikazuje |
|---|---|---|
| Barvna pika + inicialke | Glava sekcije | Uporabnik, ki trenutno pregleduje ali ureja to sekcijo |
| Stranski panel "Aktivni zdaj" | Leva stranska vrstica | Vsi spletni uporabniki + točno polje, ki ga vsak ureja |
| Kazalnik polja | Znotraj besedilnega polja | Barvna vrstica kaže, da drug uporabnik ureja to polje |
| Oddaljeni kazalec | Znotraj besedilnega polja | Živ položaj kazalca drugega uporabnika (posodobitev 100ms) |
Če sodelavec zapre brskalnik ali odide, ostane njegov avatar viden 15 sekund, preden izgine — preprečuje utripanje med ponovnimi nalagami strani.
Skupno urejanje v živo
Besedilna polja uporabljajo Supabase Realtime broadcast — spremembe se sinhronizirajo pri vseh povezanih uporabnikih med tipkanjem. Vidite natančno, kje v besedilu je kazalec drugega uporabnika.
Če dva uporabnika hkrati urejata isto polje, zmaga zadnja shranjena vrednost. Za najboljše rezultate usklajujte prek stranskega panela, da se izognete hkratnemu urejanju istega polja. Kazalnik prisotnosti polja vas opozori, ko že nekdo drug tipka.
Povabilo sodelavcev
Kolege lahko povabite k sodelovanju na določenem projektu ali v vašo organizacijo.
- Odprite projekt in kliknite gumb Deli / Povabi v zgornji orodni vrstici
- Vnesite e-poštni naslov sodelavca
- Izberite raven dovoljenja: Urednik (lahko ureja) ali Gledalec (samo branje)
- Kliknite "Pošlji povabilo"
- Povabljenec prejme e-pošto s povezavo. Če nima računa, bo najprej pozvan k registraciji.
Upravljajte čakajoča povabila prek panela Čakajoča povabila (dostopno prek gumba za deljenje). Vsako neposlano povabilo lahko kadar koli prekličete.
Povabilo k projektu da dostop samo do tega projekta. Povabilo v organizacijo (Administracijska plošča → Upravljanje uporabnikov) da dostop do vseh projektov v organizaciji glede na vlogo.
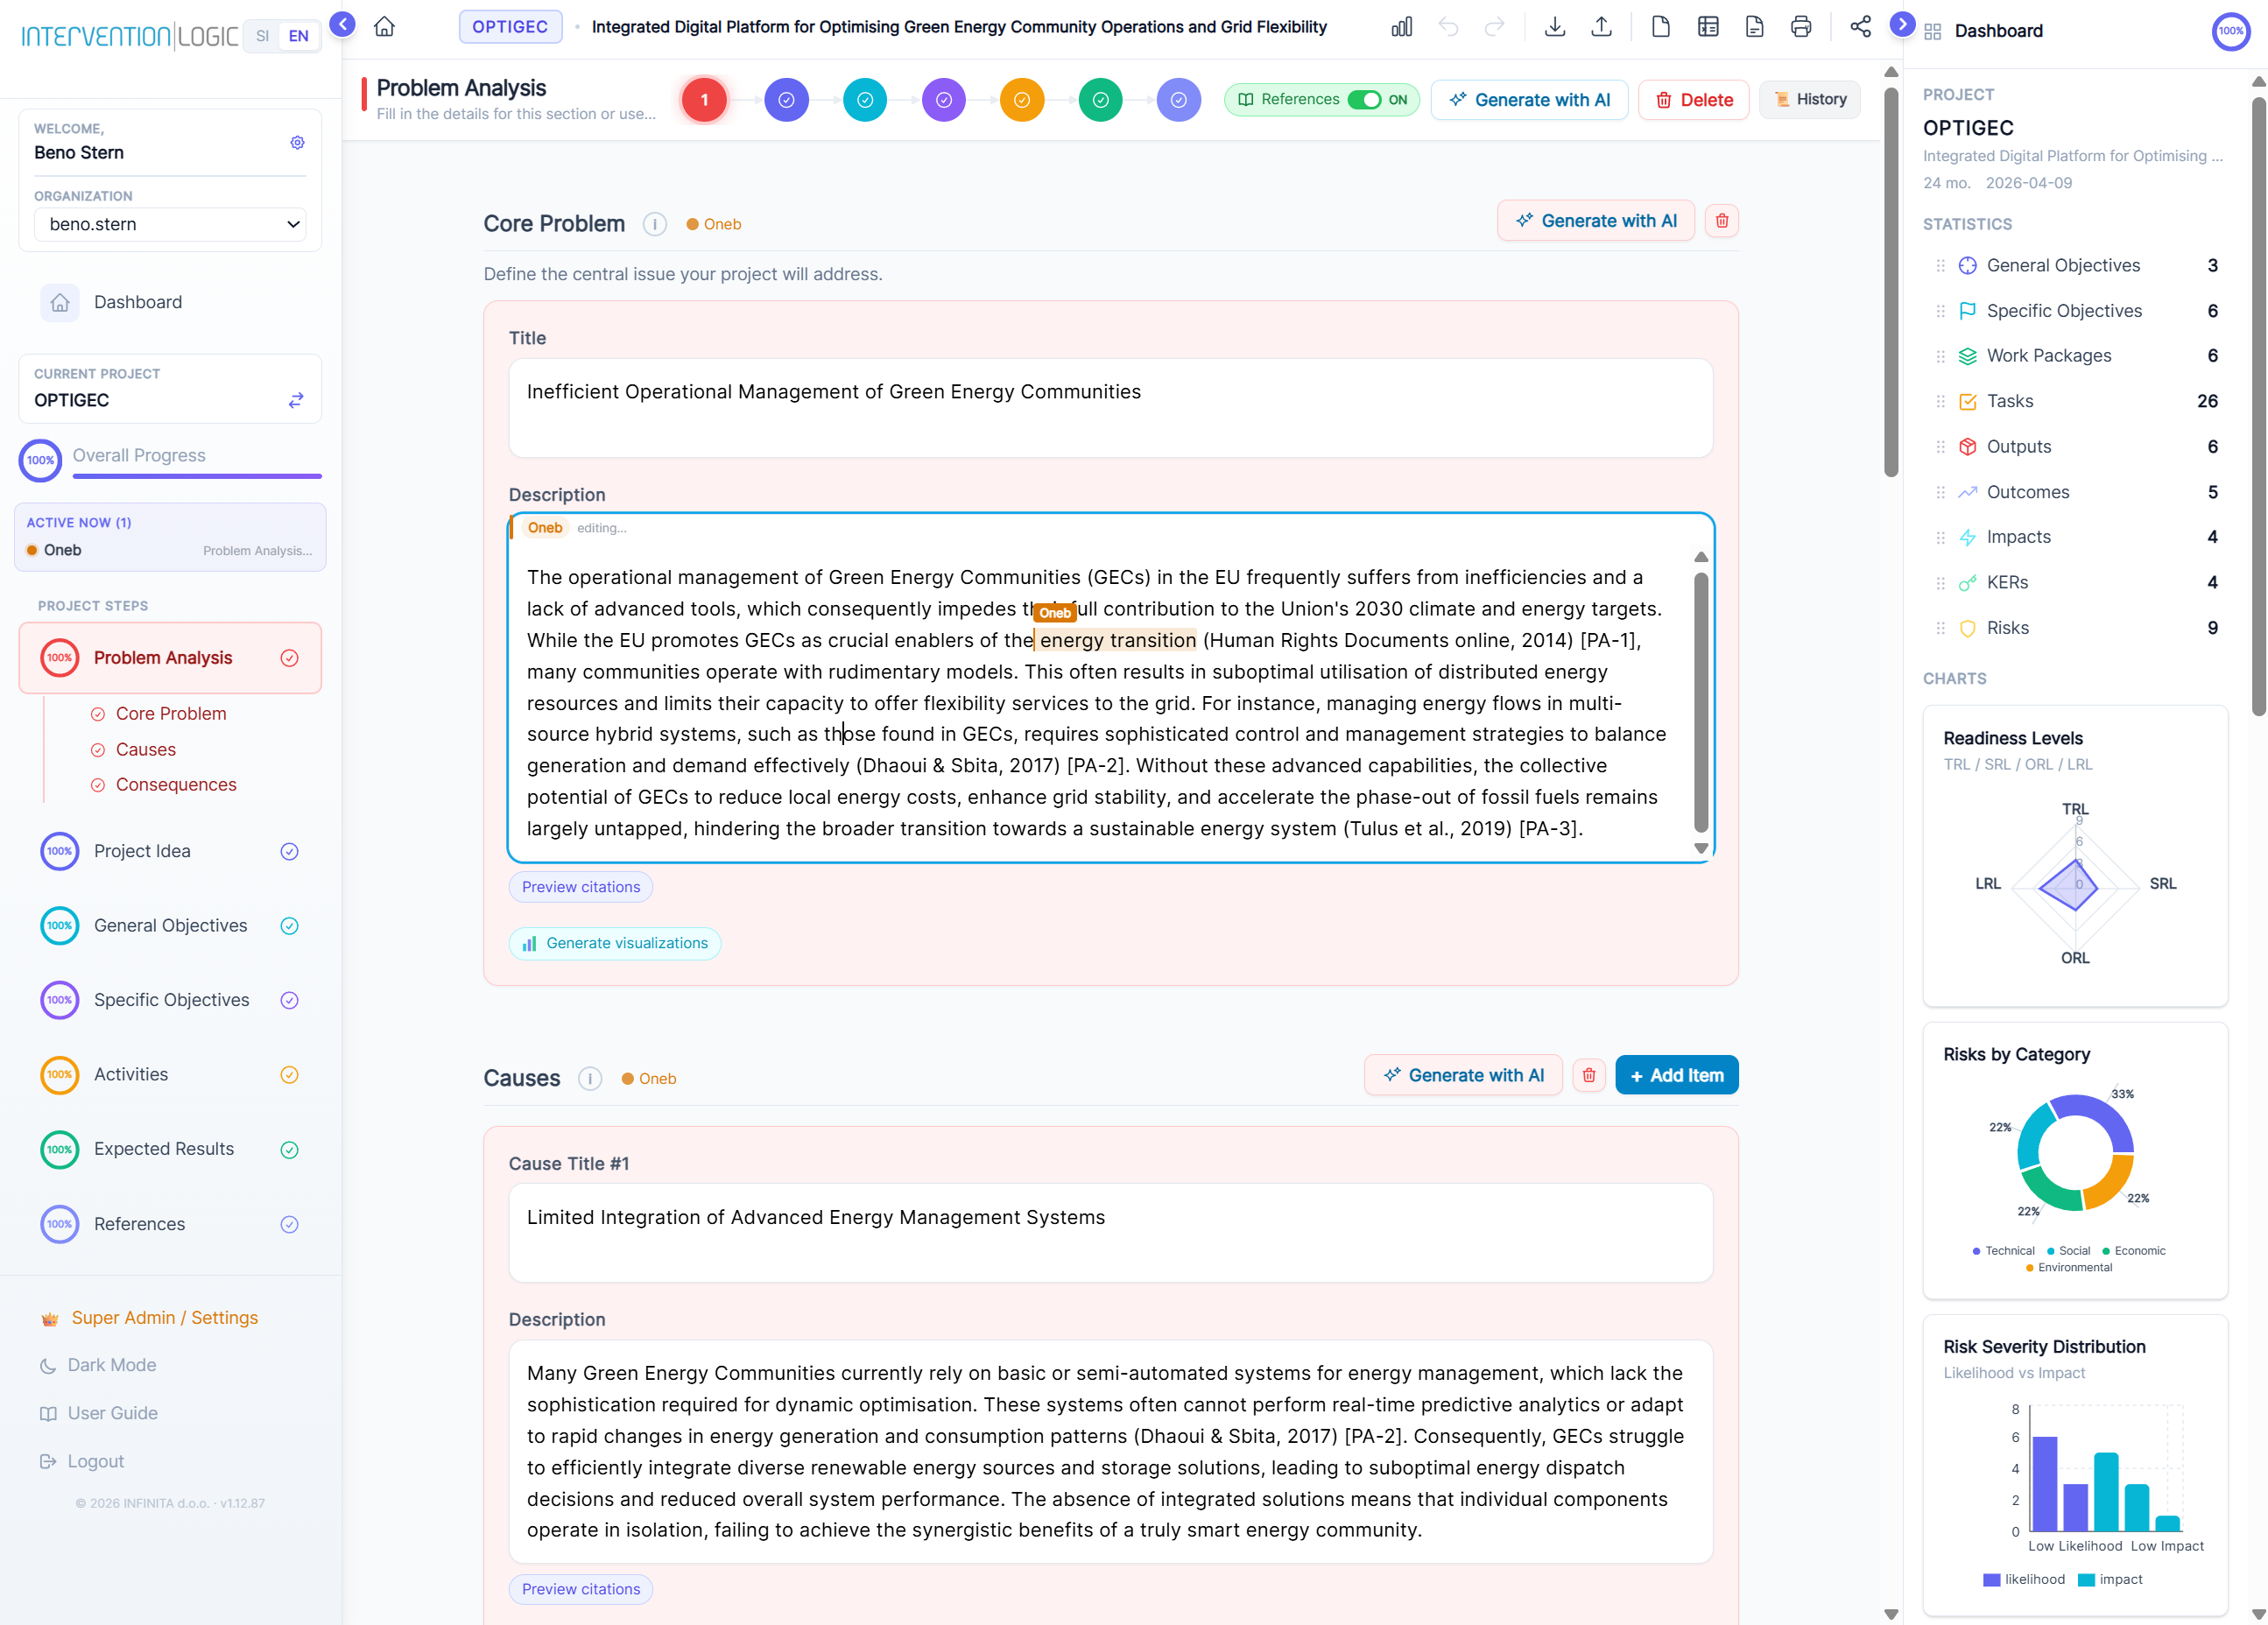
Full collaboration view — section-level presence badges ("Oneb" on Core Problem and Causes headers), live "editing…" indicator on the active field, and the sidebar "Active now" panel listing all connected users with their current section
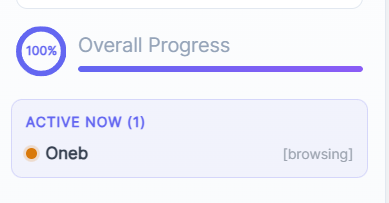
Sidebar "Active now" panel — shows each online user with their status ([browsing] or the section they are editing)
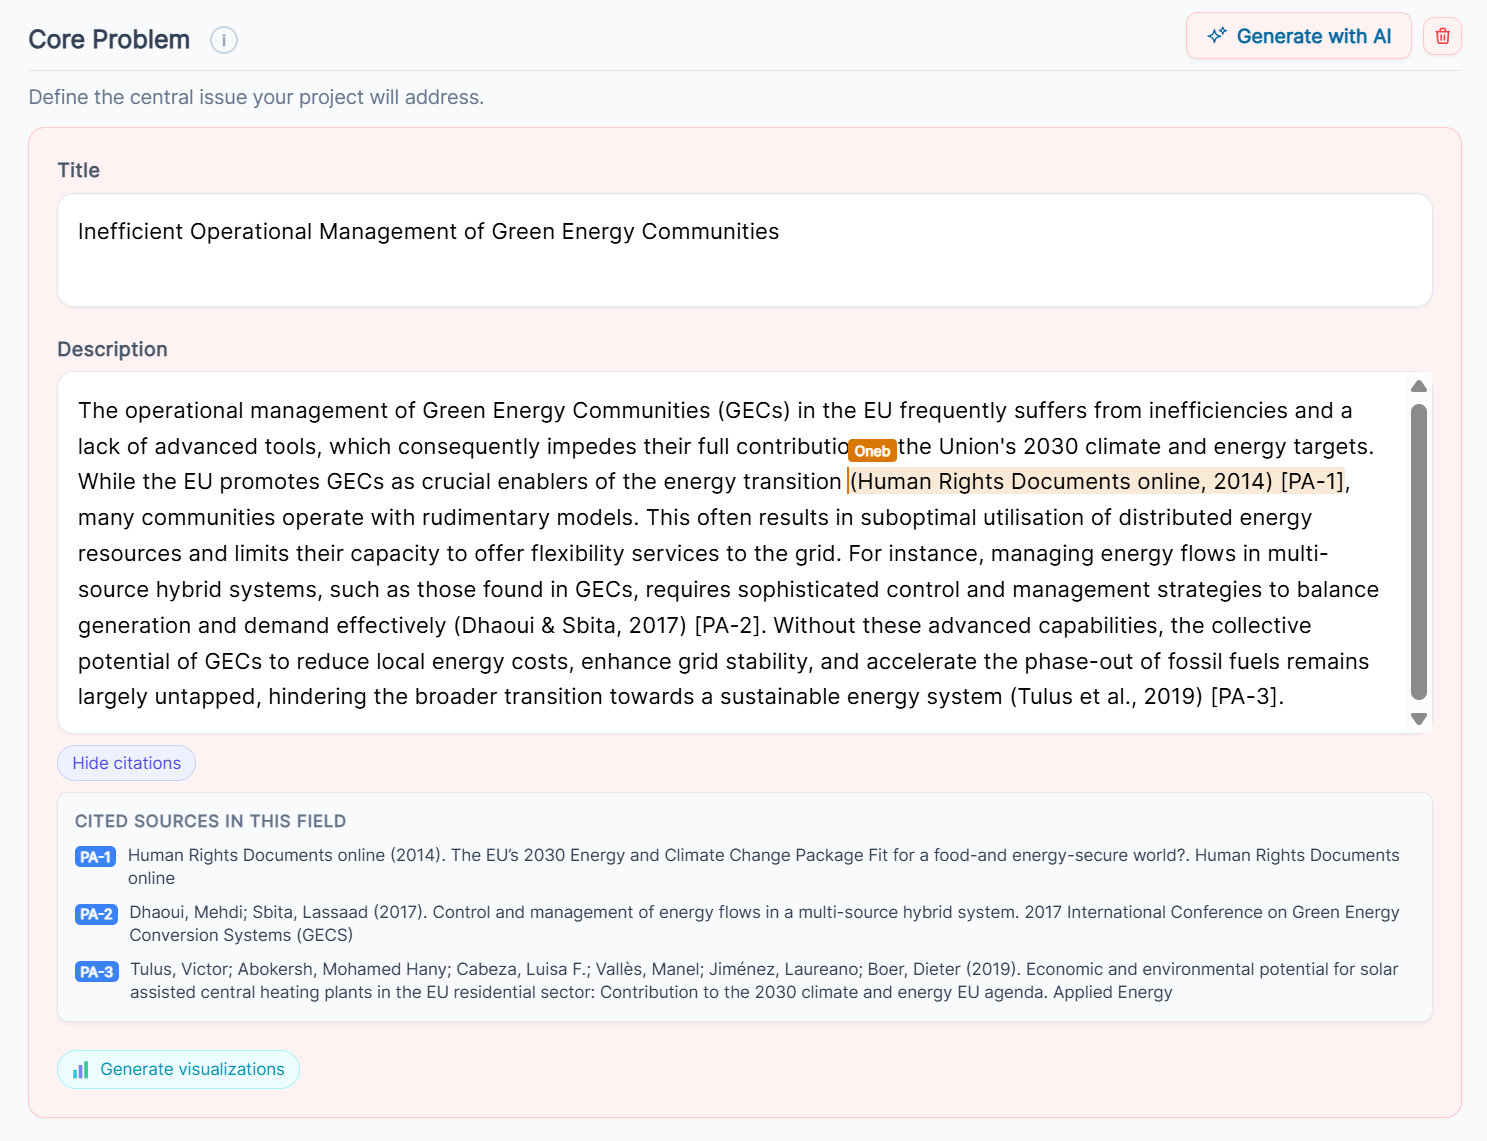
Live cursor in a text field — the orange "Oneb" label marks the exact cursor position of the collaborator in real time; cited sources appear inline below the field
6. Problem Analysis
This is the foundation of your entire project. Every cause must later be addressed by an activity, and every consequence must connect to an impact.
6.1 Core Problem
Enter a concise Title and a detailed Description with quantitative evidence. Even a few sentences are enough — AI will expand and enrich with citations from real sources (Eurostat, OECD, European Commission, etc.).
6.2 Causes (minimum 4)
Click "+ Add Cause" or let AI generate them. Ordered from root/structural causes first to proximate causes second.
6.3 Consequences (minimum 4)
Click "+ Add Consequence" or let AI generate them. Show the escalation chain: local → regional → national → EU-level.
6.4 Inline Visualizations
After generation, a "Generate visualizations" button appears below descriptions with empirical data. Creates charts (bar, gauge, donut) that visualize statistics mentioned in the text.
6. Analiza problema
To je temelj vašega celotnega projekta. Vsak vzrok mora biti pozneje obravnavan z aktivnostjo, vsaka posledica pa se mora povezati z vplivom.
6.1 Osrednji problem
Vnesite jedrnat Naslov in podroben Opis s kvantitativnimi dokazi. Tudi nekaj stavkov je dovolj — AI bo razširil in obogatil z citati.
6.2 Vzroki (najmanj 4)
Kliknite "+ Dodaj vzrok" ali pustite AI. Urejeni od korenskih/strukturnih najprej do neposrednih.
6.3 Posledice (najmanj 4)
Kliknite "+ Dodaj posledico" ali pustite AI. Verigo stopnjevanja: lokalni → regionalni → nacionalni → EU vpliv.
6.4 Vrstične vizualizacije
Po generiranju se prikaže gumb "Generiraj vizualizacije" za ustvarjanje grafov, ki vizualizirajo statistike v besedilu.
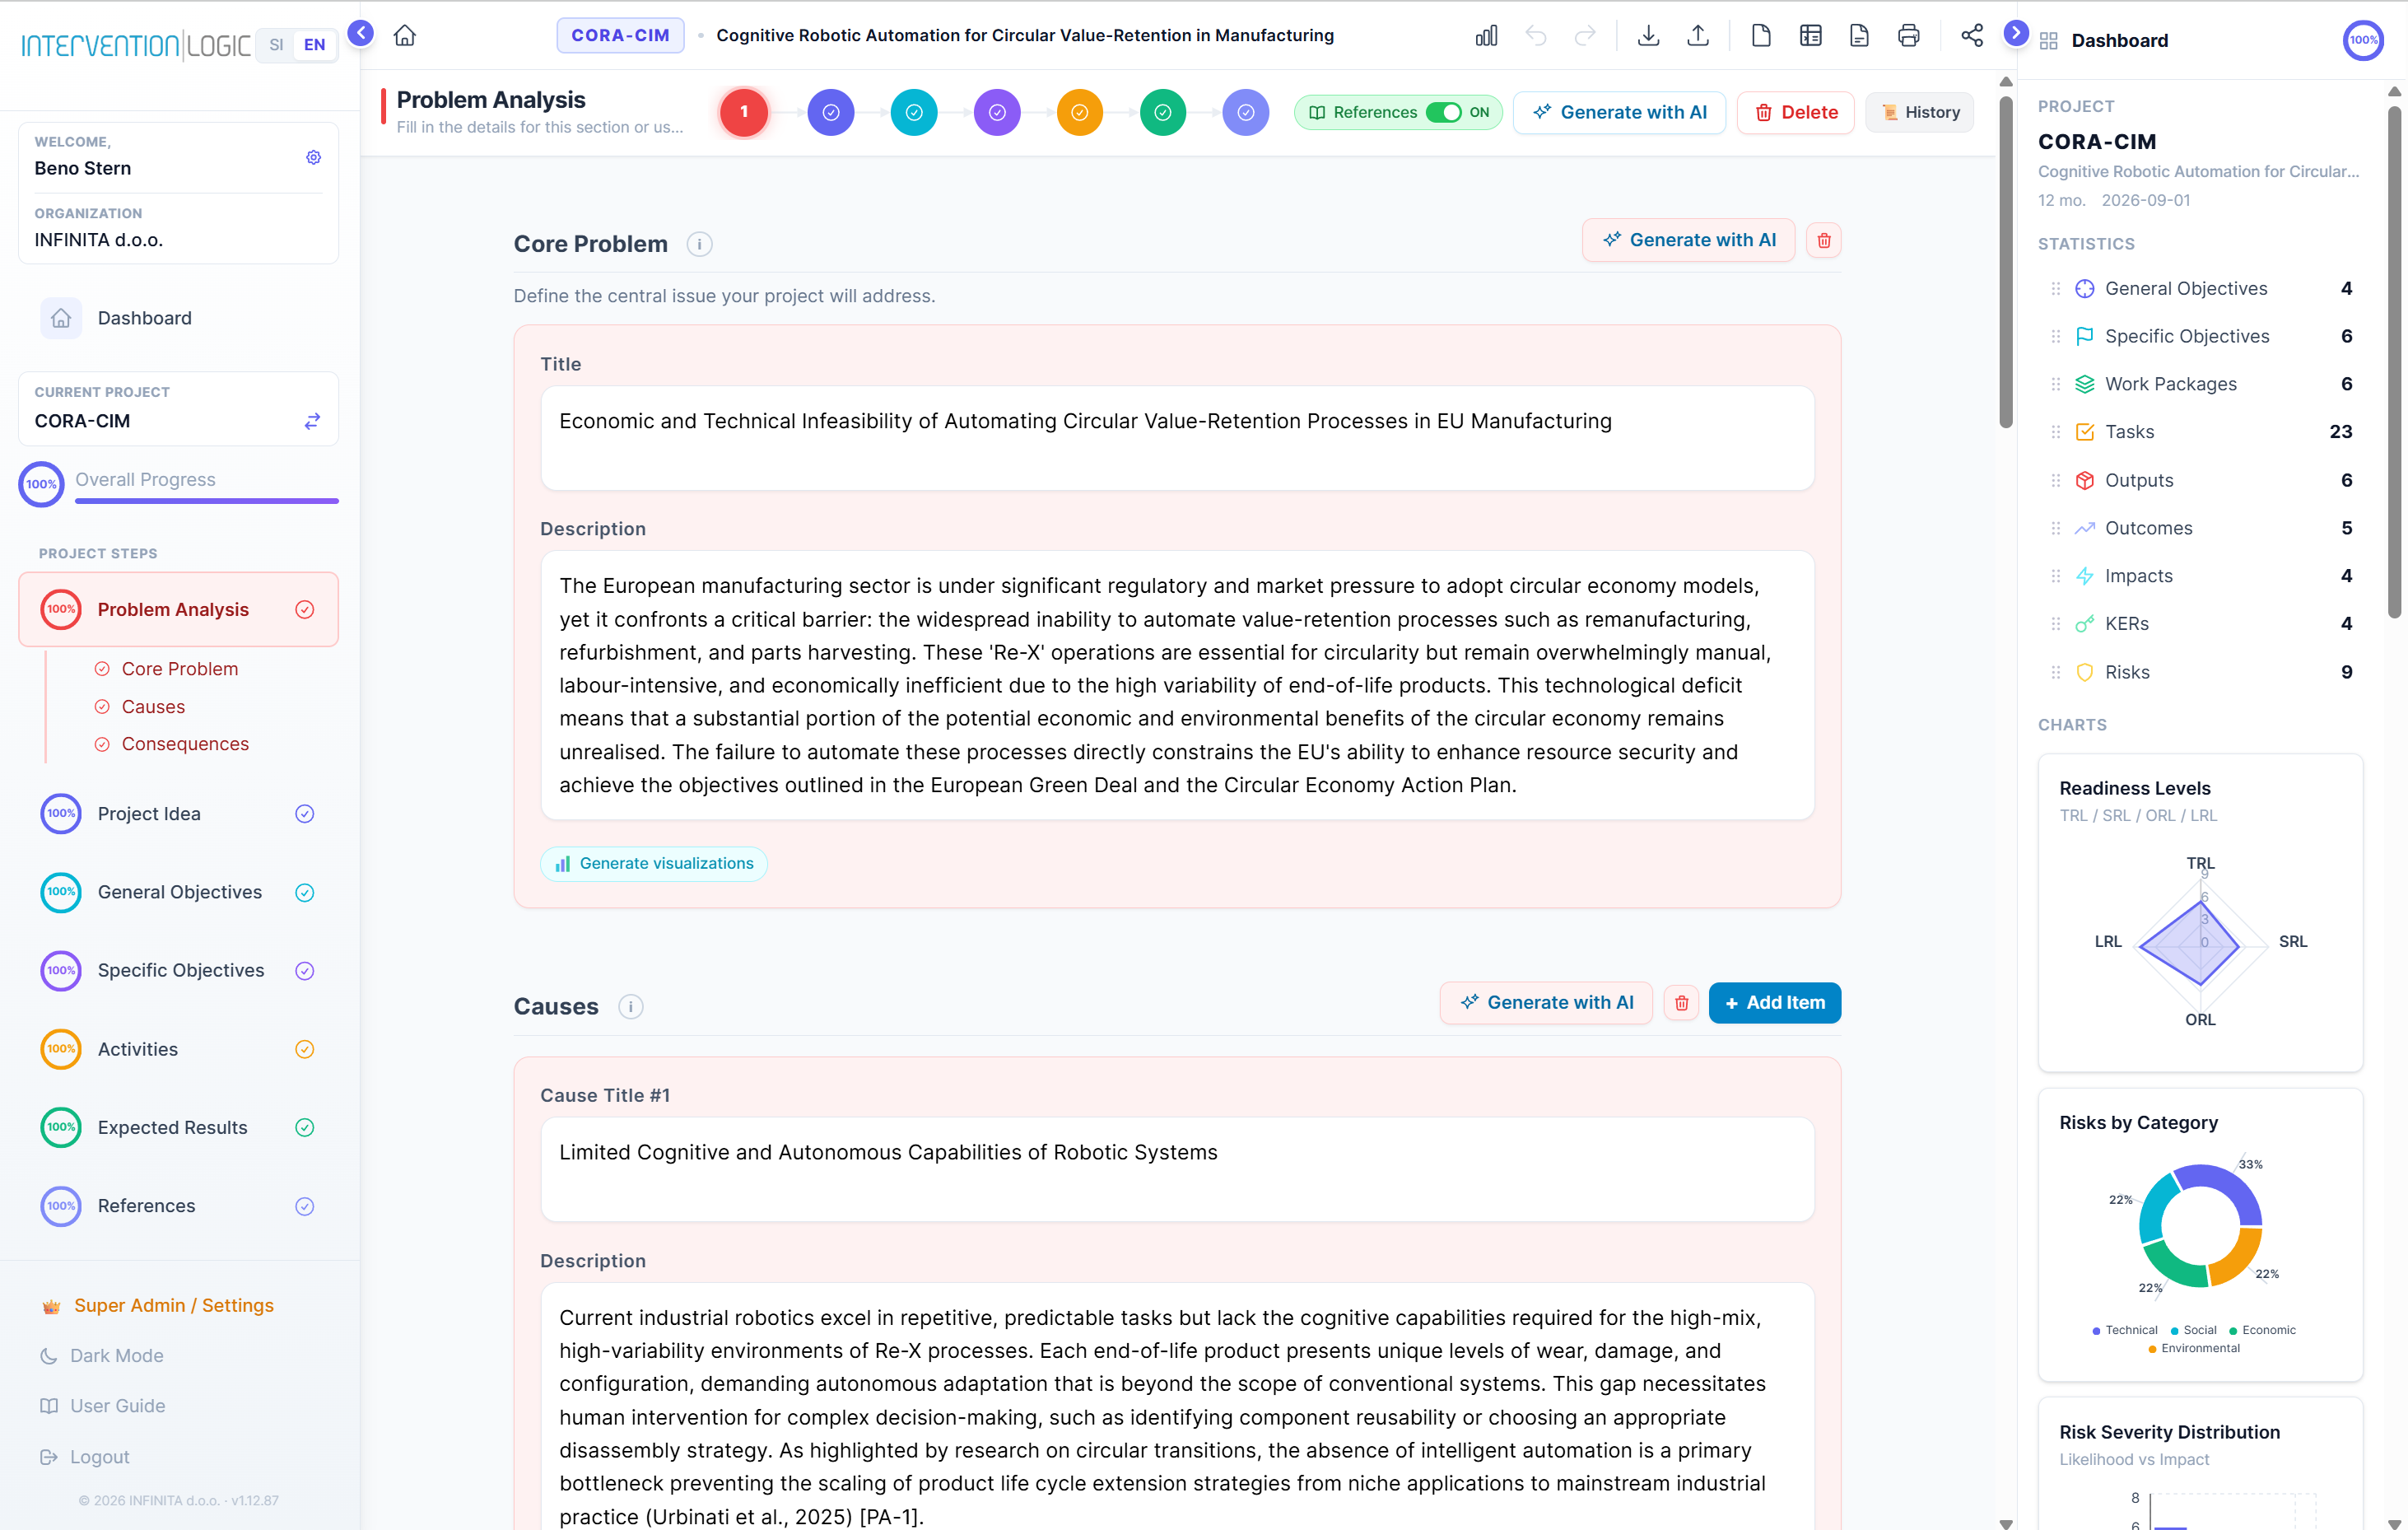
6.1 Core Problem — title & description with inline chart
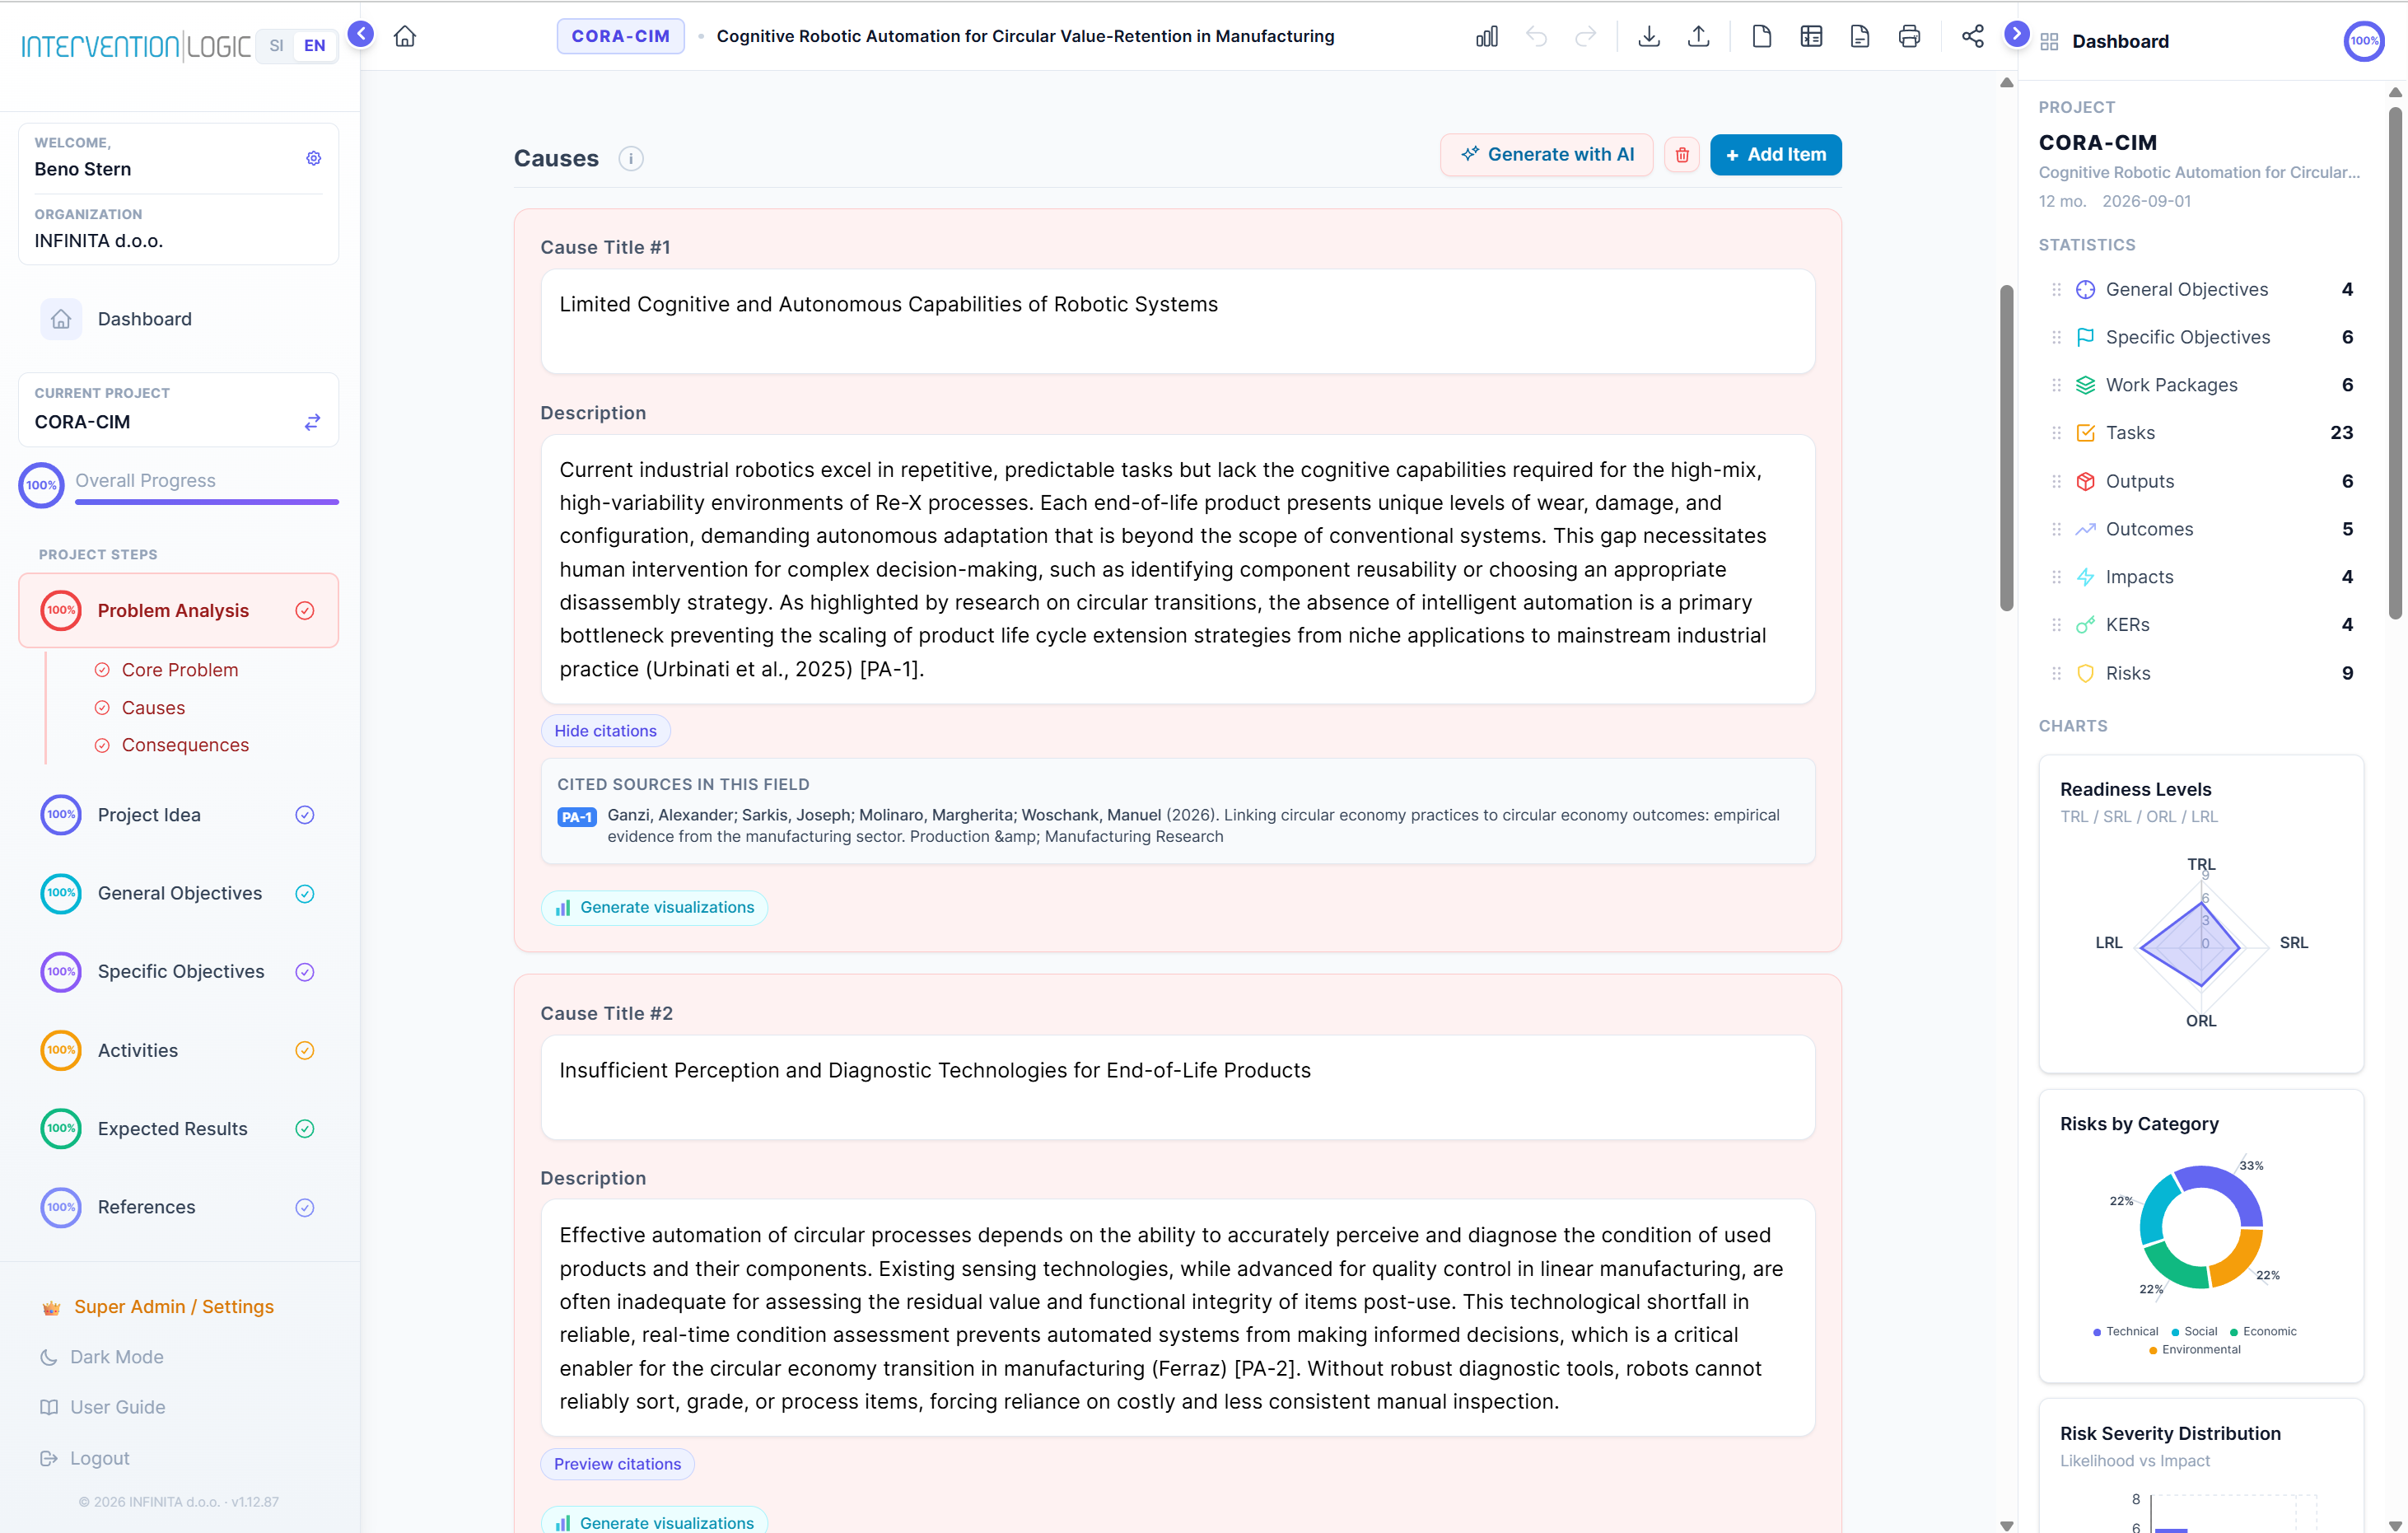
6.2 Causes — structured list with AI generation
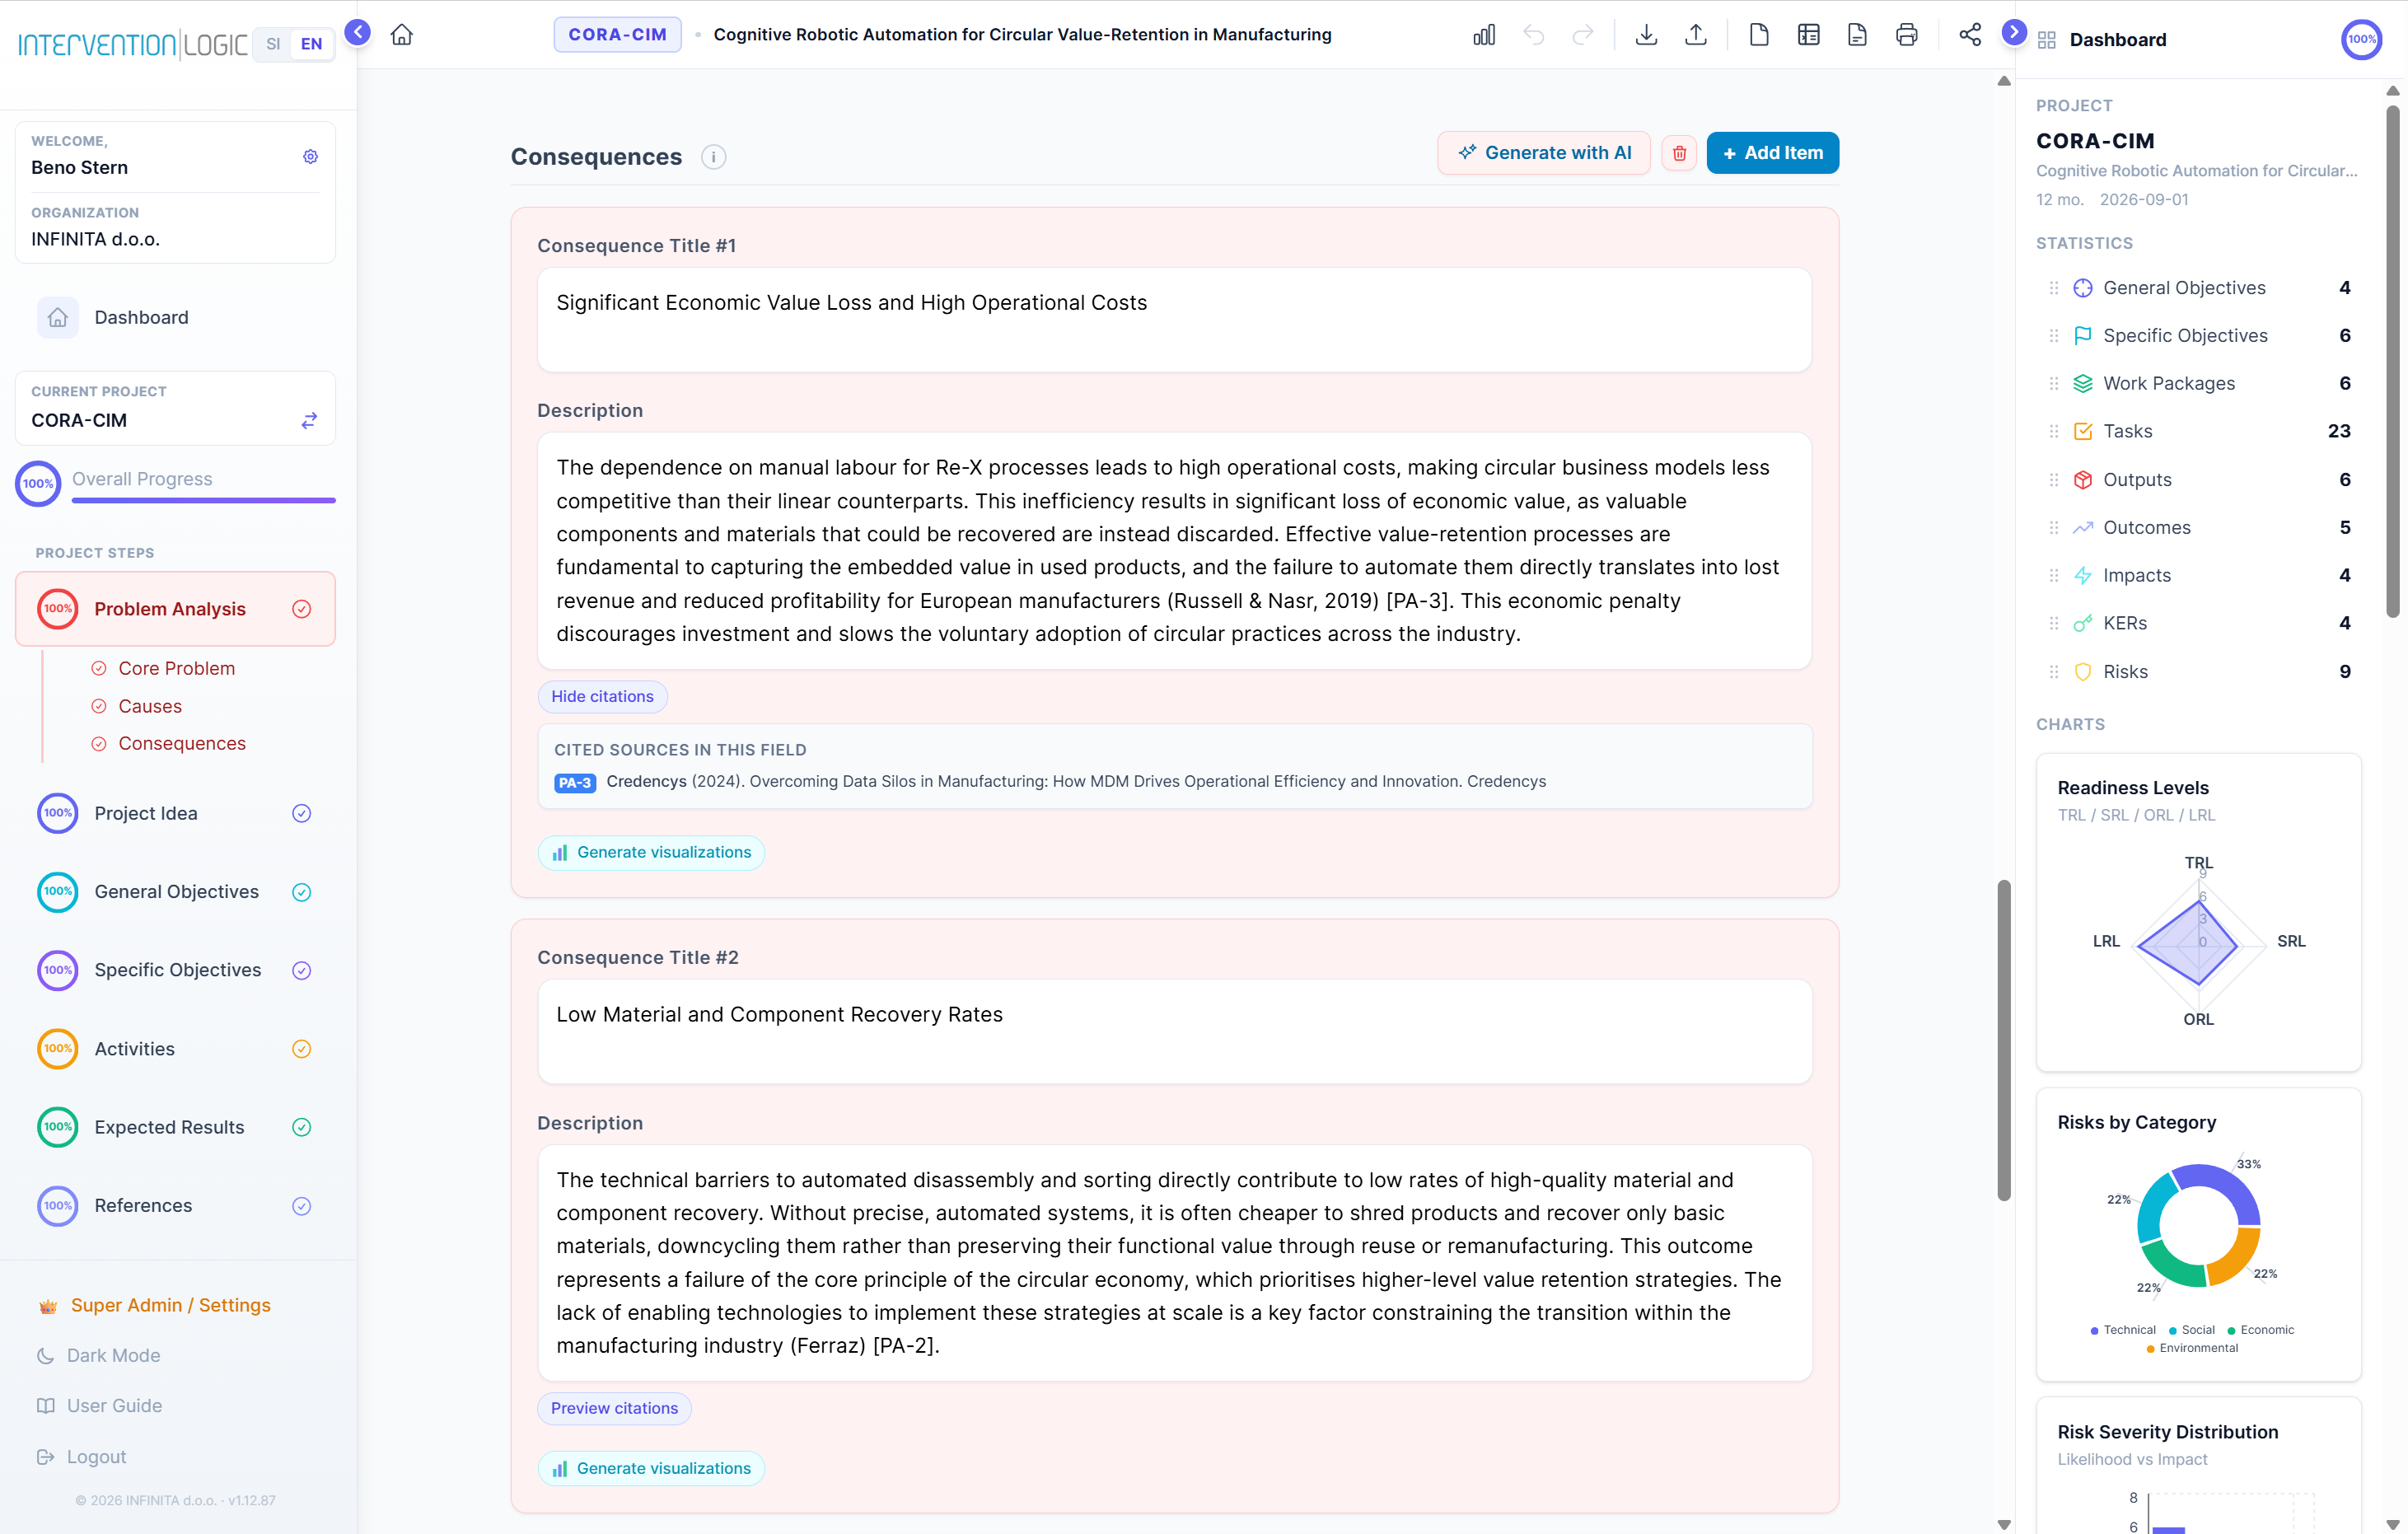
6.3 Consequences — escalation chain from local to EU level
7. Project Idea
This chapter translates the problem analysis into a proposed intervention.
7.1 Project Title & Acronym
Title: Concise noun phrase (30–200 characters). No acronym, no verb. Acronym: 3–8 uppercase letters (e.g., GREENTRANS, DIGI-CRAFT).
7.2 Main Aim
One sentence starting with an infinitive verb capturing the project's core purpose.
7.3 State of the Art
AI references at least 3 real EU projects/studies, describing synergies and capitalisation.
7.4 Proposed Solution
Introductory overview, phase-by-phase breakdown, and mandatory DNSH compliance statement.
7.5 EU Policies
At least 3 relevant EU policies with verifiable references.
7.6 Readiness Levels
| Level | Full Name | Measures |
|---|---|---|
| TRL | Technology Readiness Level | Technology maturity |
| SRL | Societal Readiness Level | Social acceptance |
| ORL | Organisational Readiness Level | Institutional capacity |
| LRL | Legislative Readiness Level | Regulatory alignment |
7. Projektna ideja
To poglavje prevede analizo problema v predlagano intervencijo.
7.1 Naslov in akronim
Naslov: Jedrnata imenska fraza (30–200 znakov). Akronim: 3–8 velikih črk.
7.2 Glavni cilj
En stavek z nedoločnikom, ki zajame bistvo projekta.
7.3 Stanje tehnike
AI navede vsaj 3 realne EU projekte/študije s sinergijami in kapitalizacijo.
7.4 Predlagana rešitev
Uvodni pregled, fazna razčlenitev in obvezna DNSH izjava.
7.5 EU politike
Vsaj 3 relevantne EU politike s preverljivimi referencami.
7.6 Ravni pripravljenosti
| Raven | Polno ime | Meri |
|---|---|---|
| TRL | Raven tehnološke pripravljenosti | Tehnološka zrelost |
| SRL | Raven družbene pripravljenosti | Družbeno sprejemanje |
| ORL | Raven organizacijske pripravljenosti | Institucionalna zmogljivost |
| LRL | Raven zakonodajne pripravljenosti | Regulativna usklajenost |
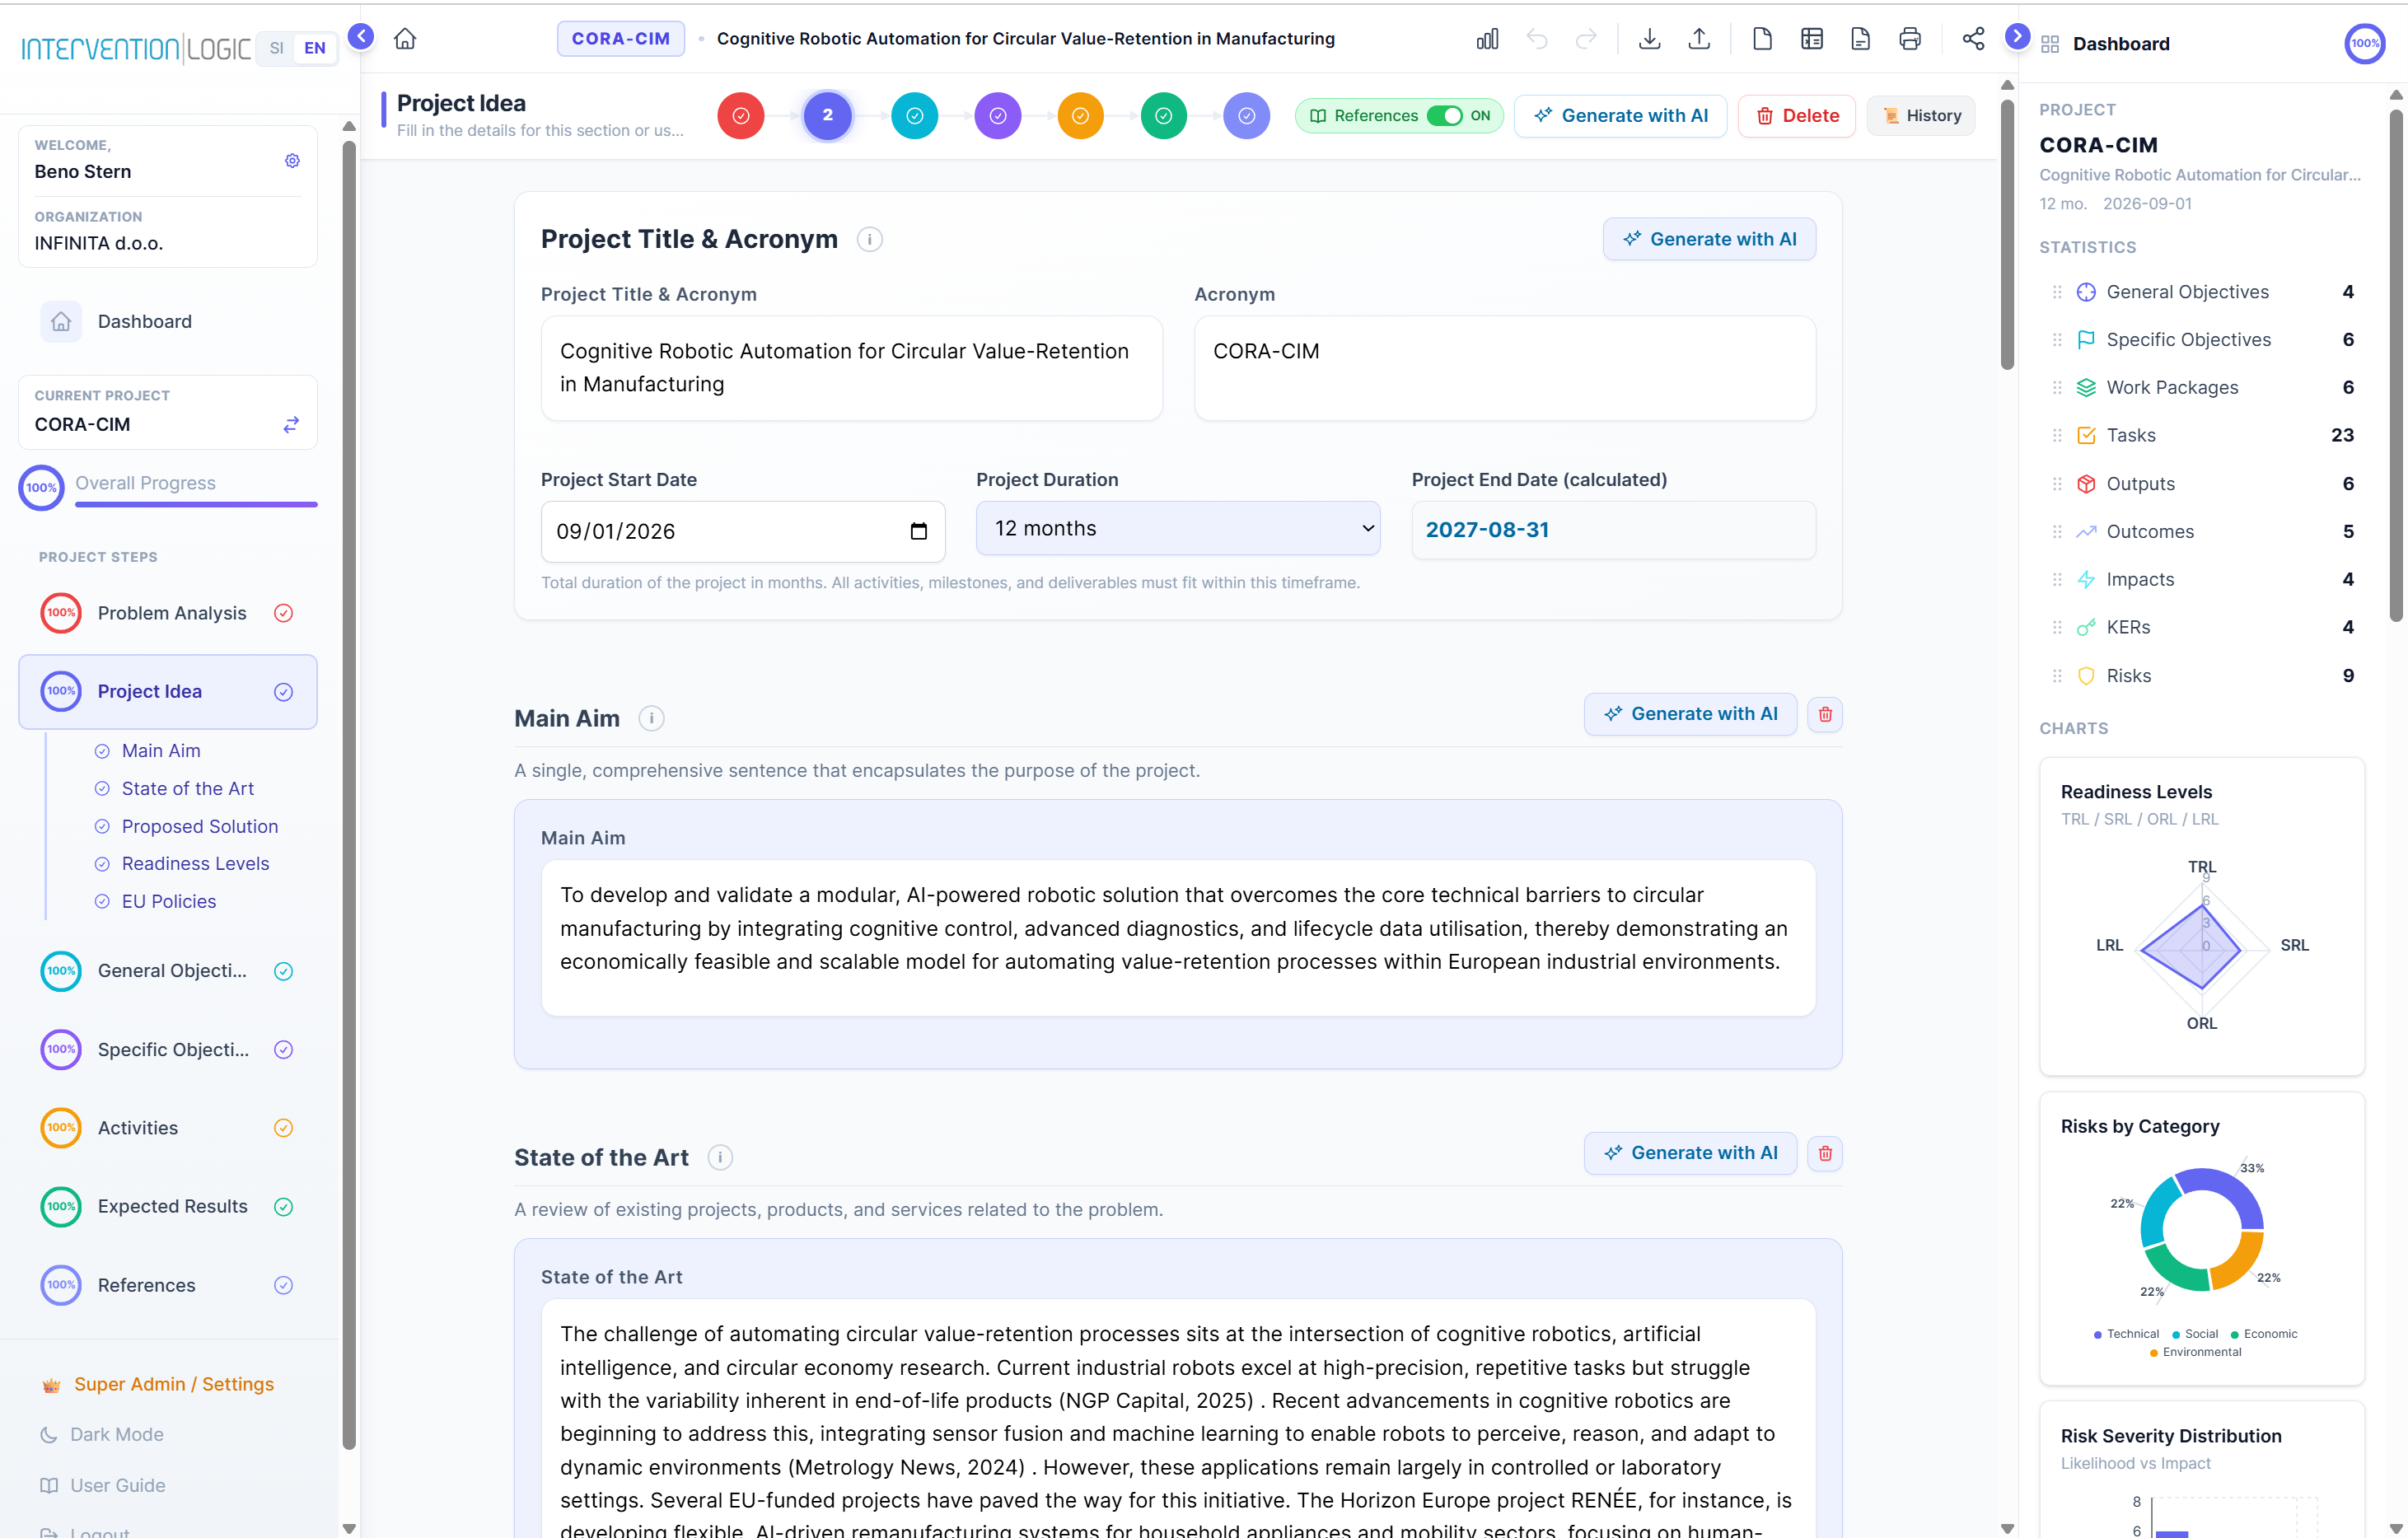
7.1 Title & Acronym
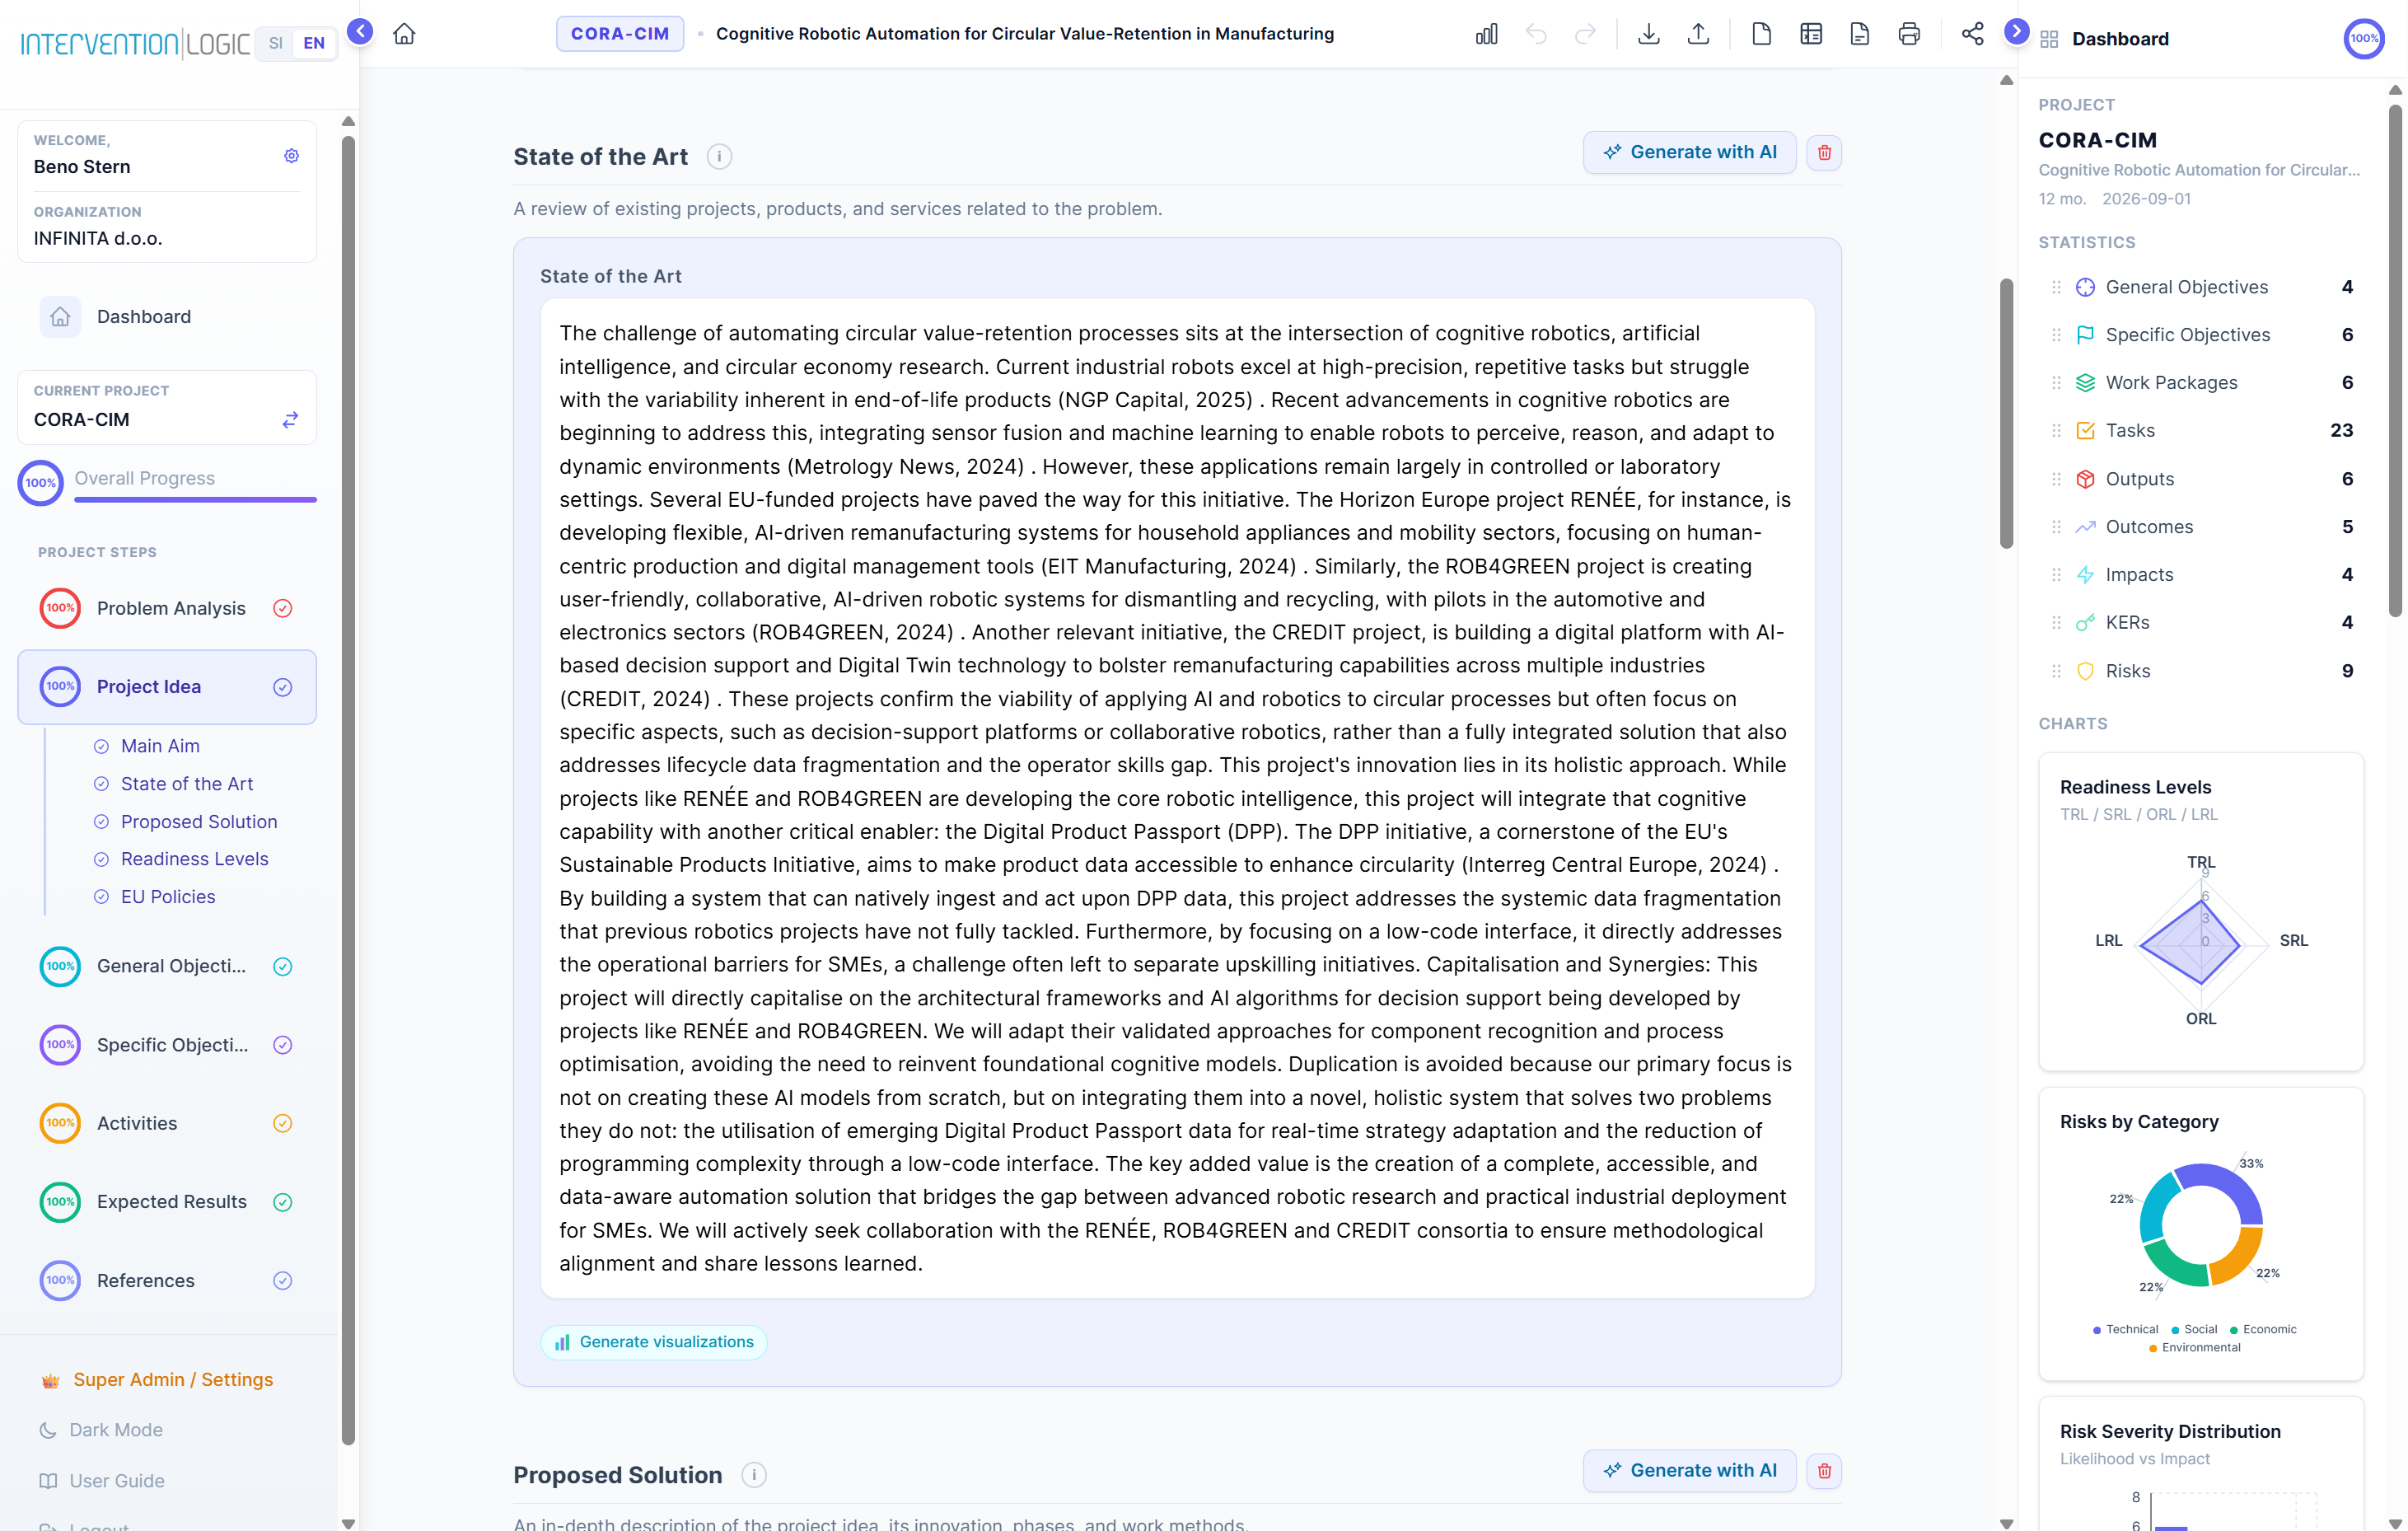
7.3 State of the Art — real EU project references
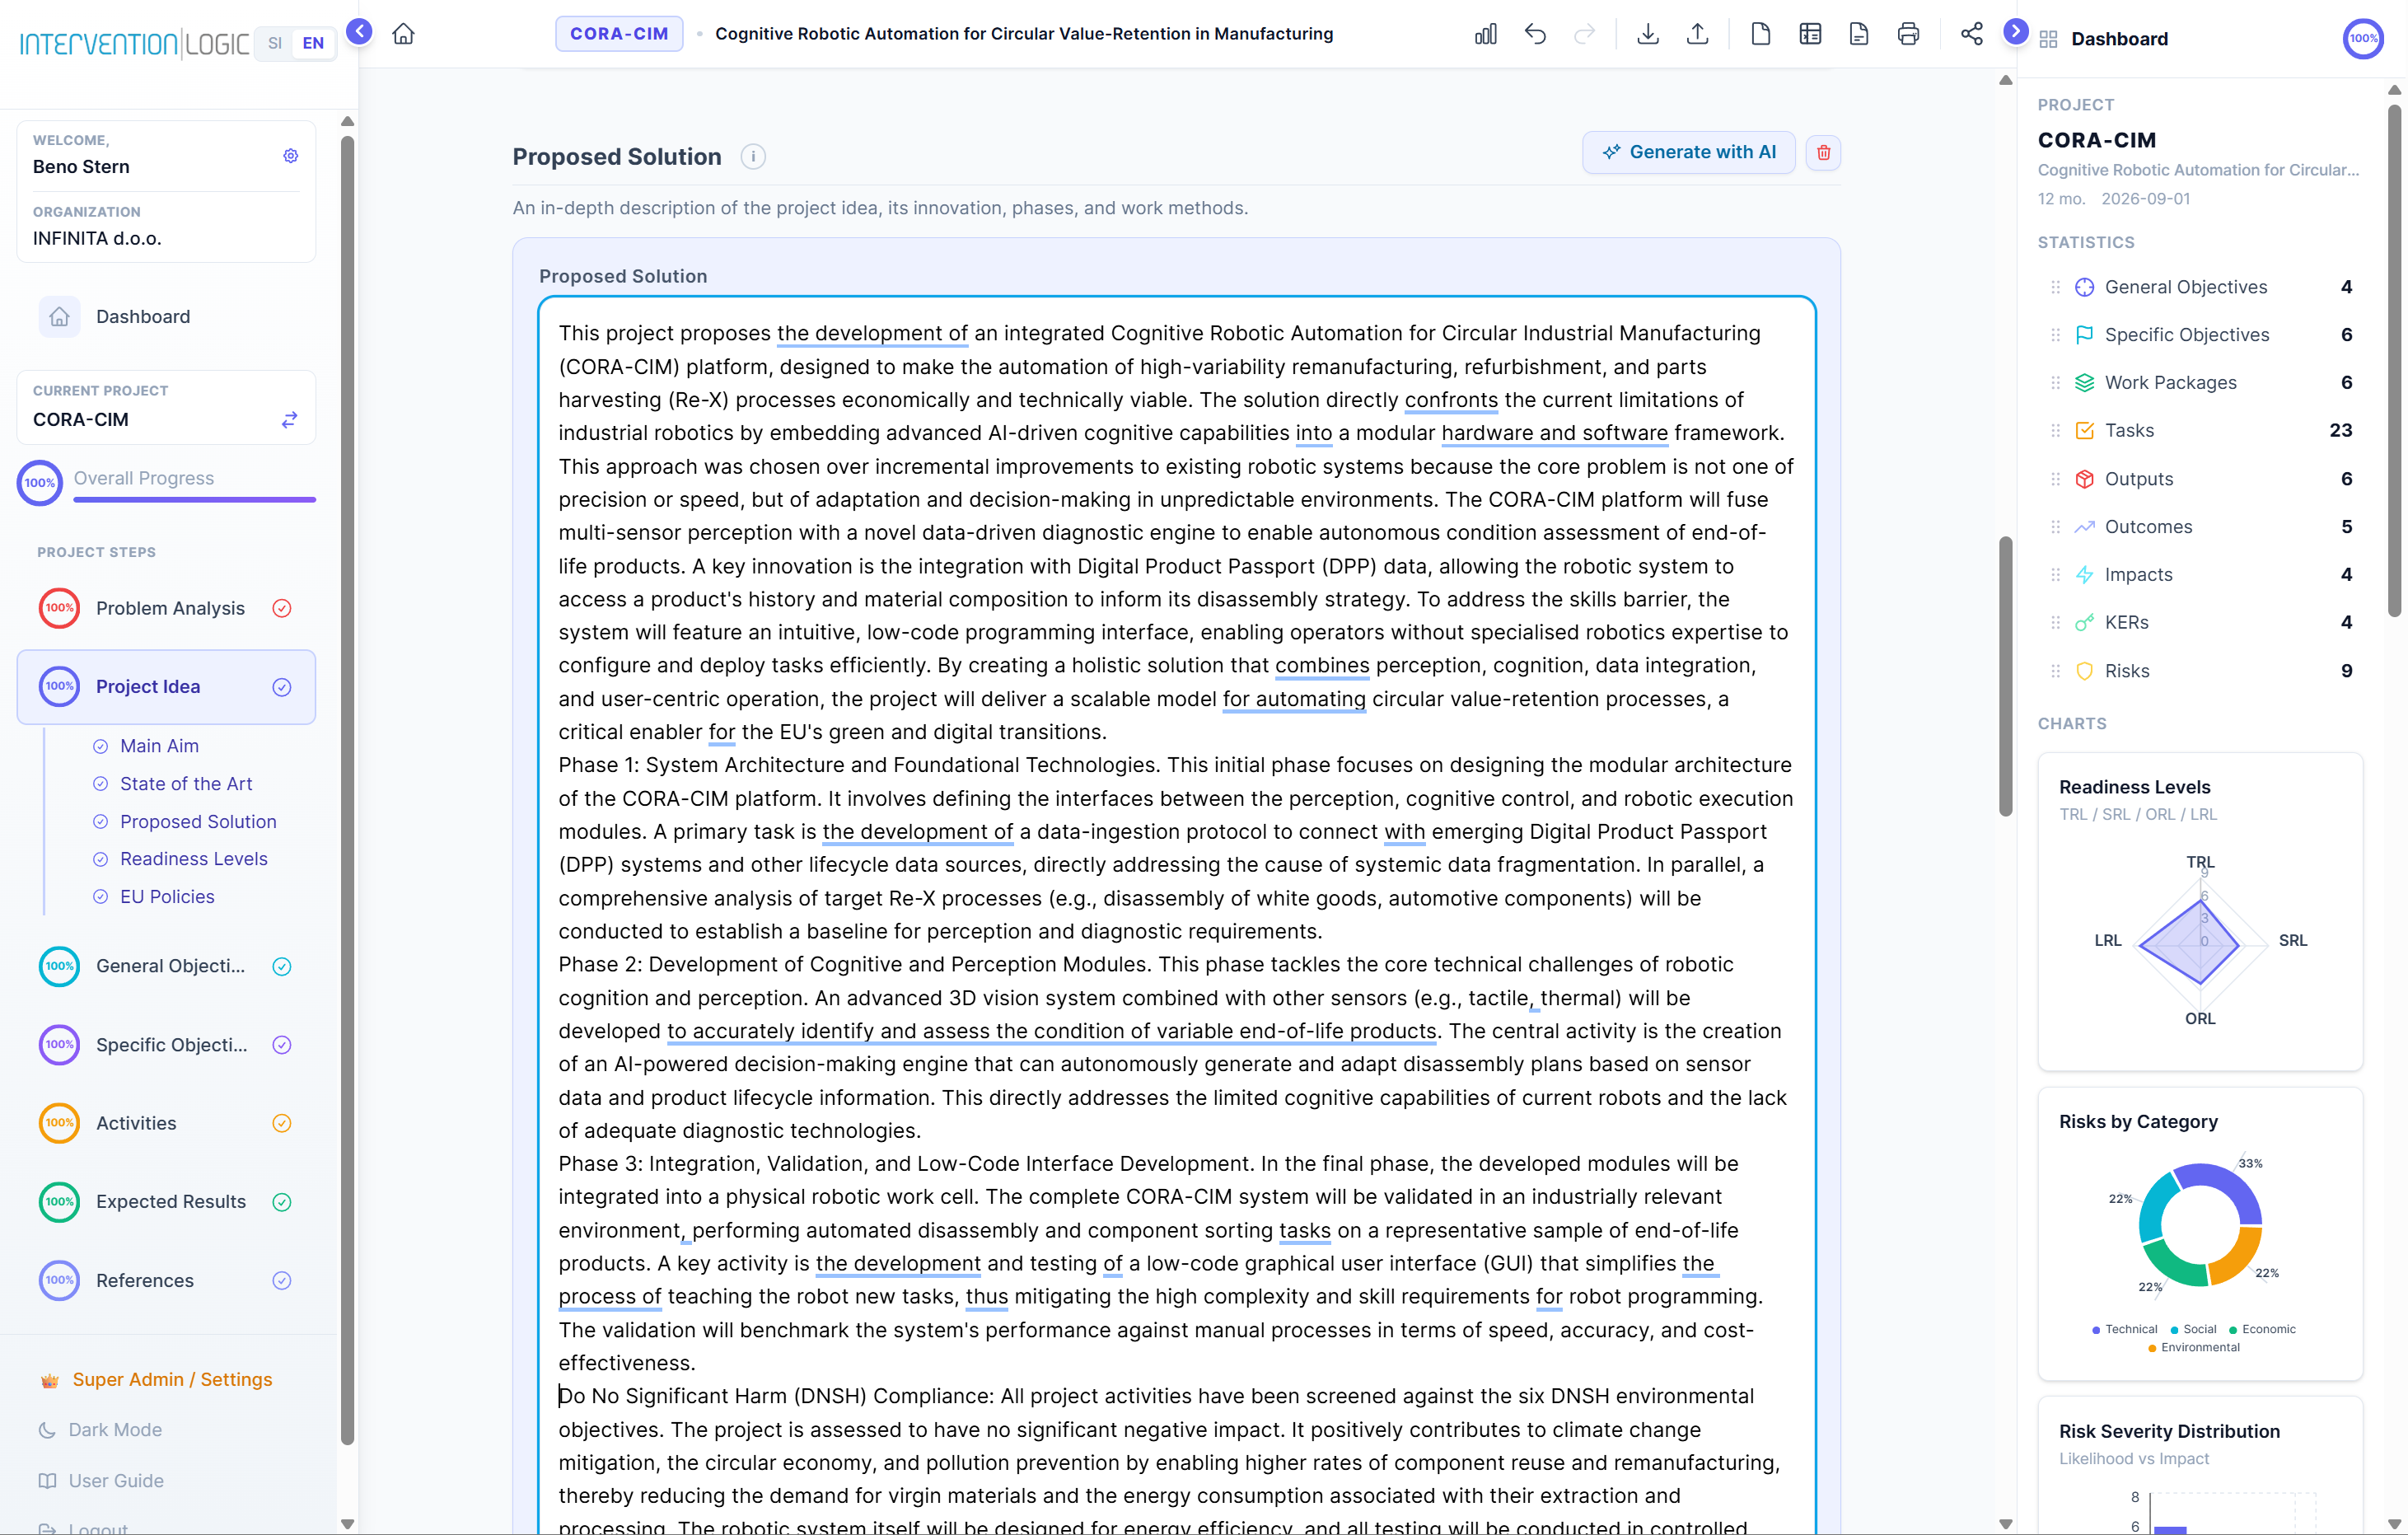
7.4 Proposed Solution — phased breakdown + DNSH
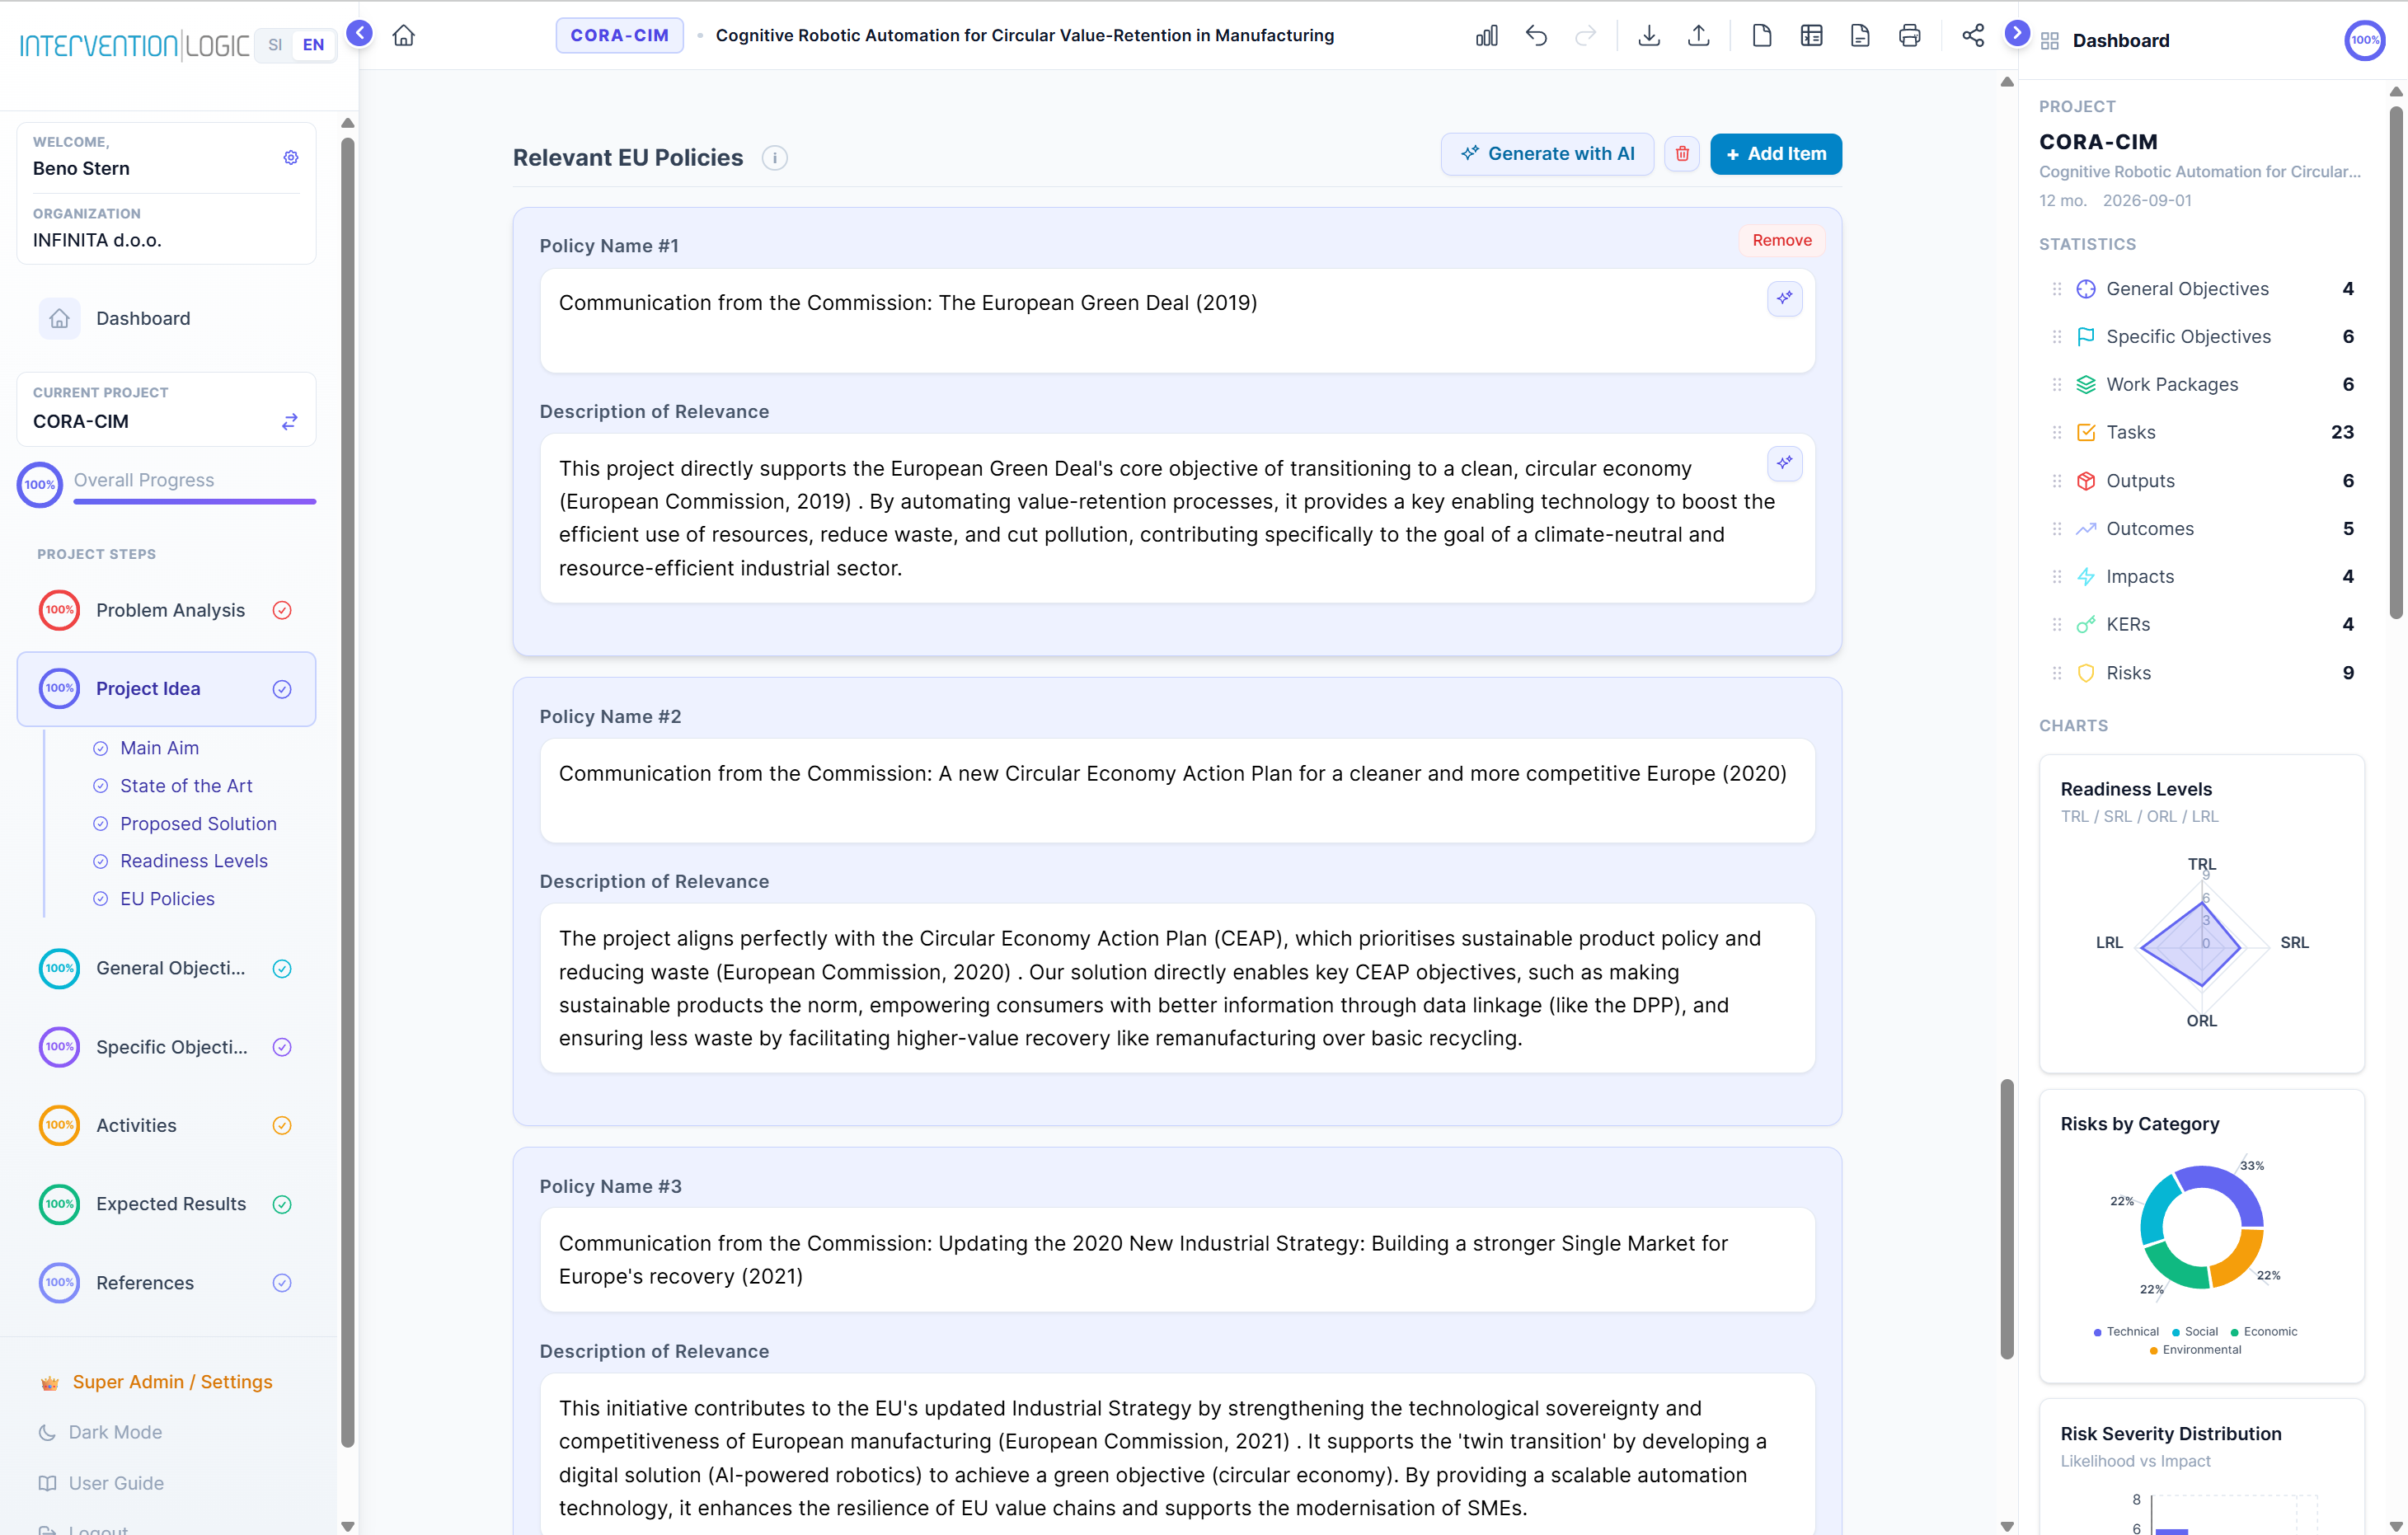
7.5 EU Policies — verified policy references
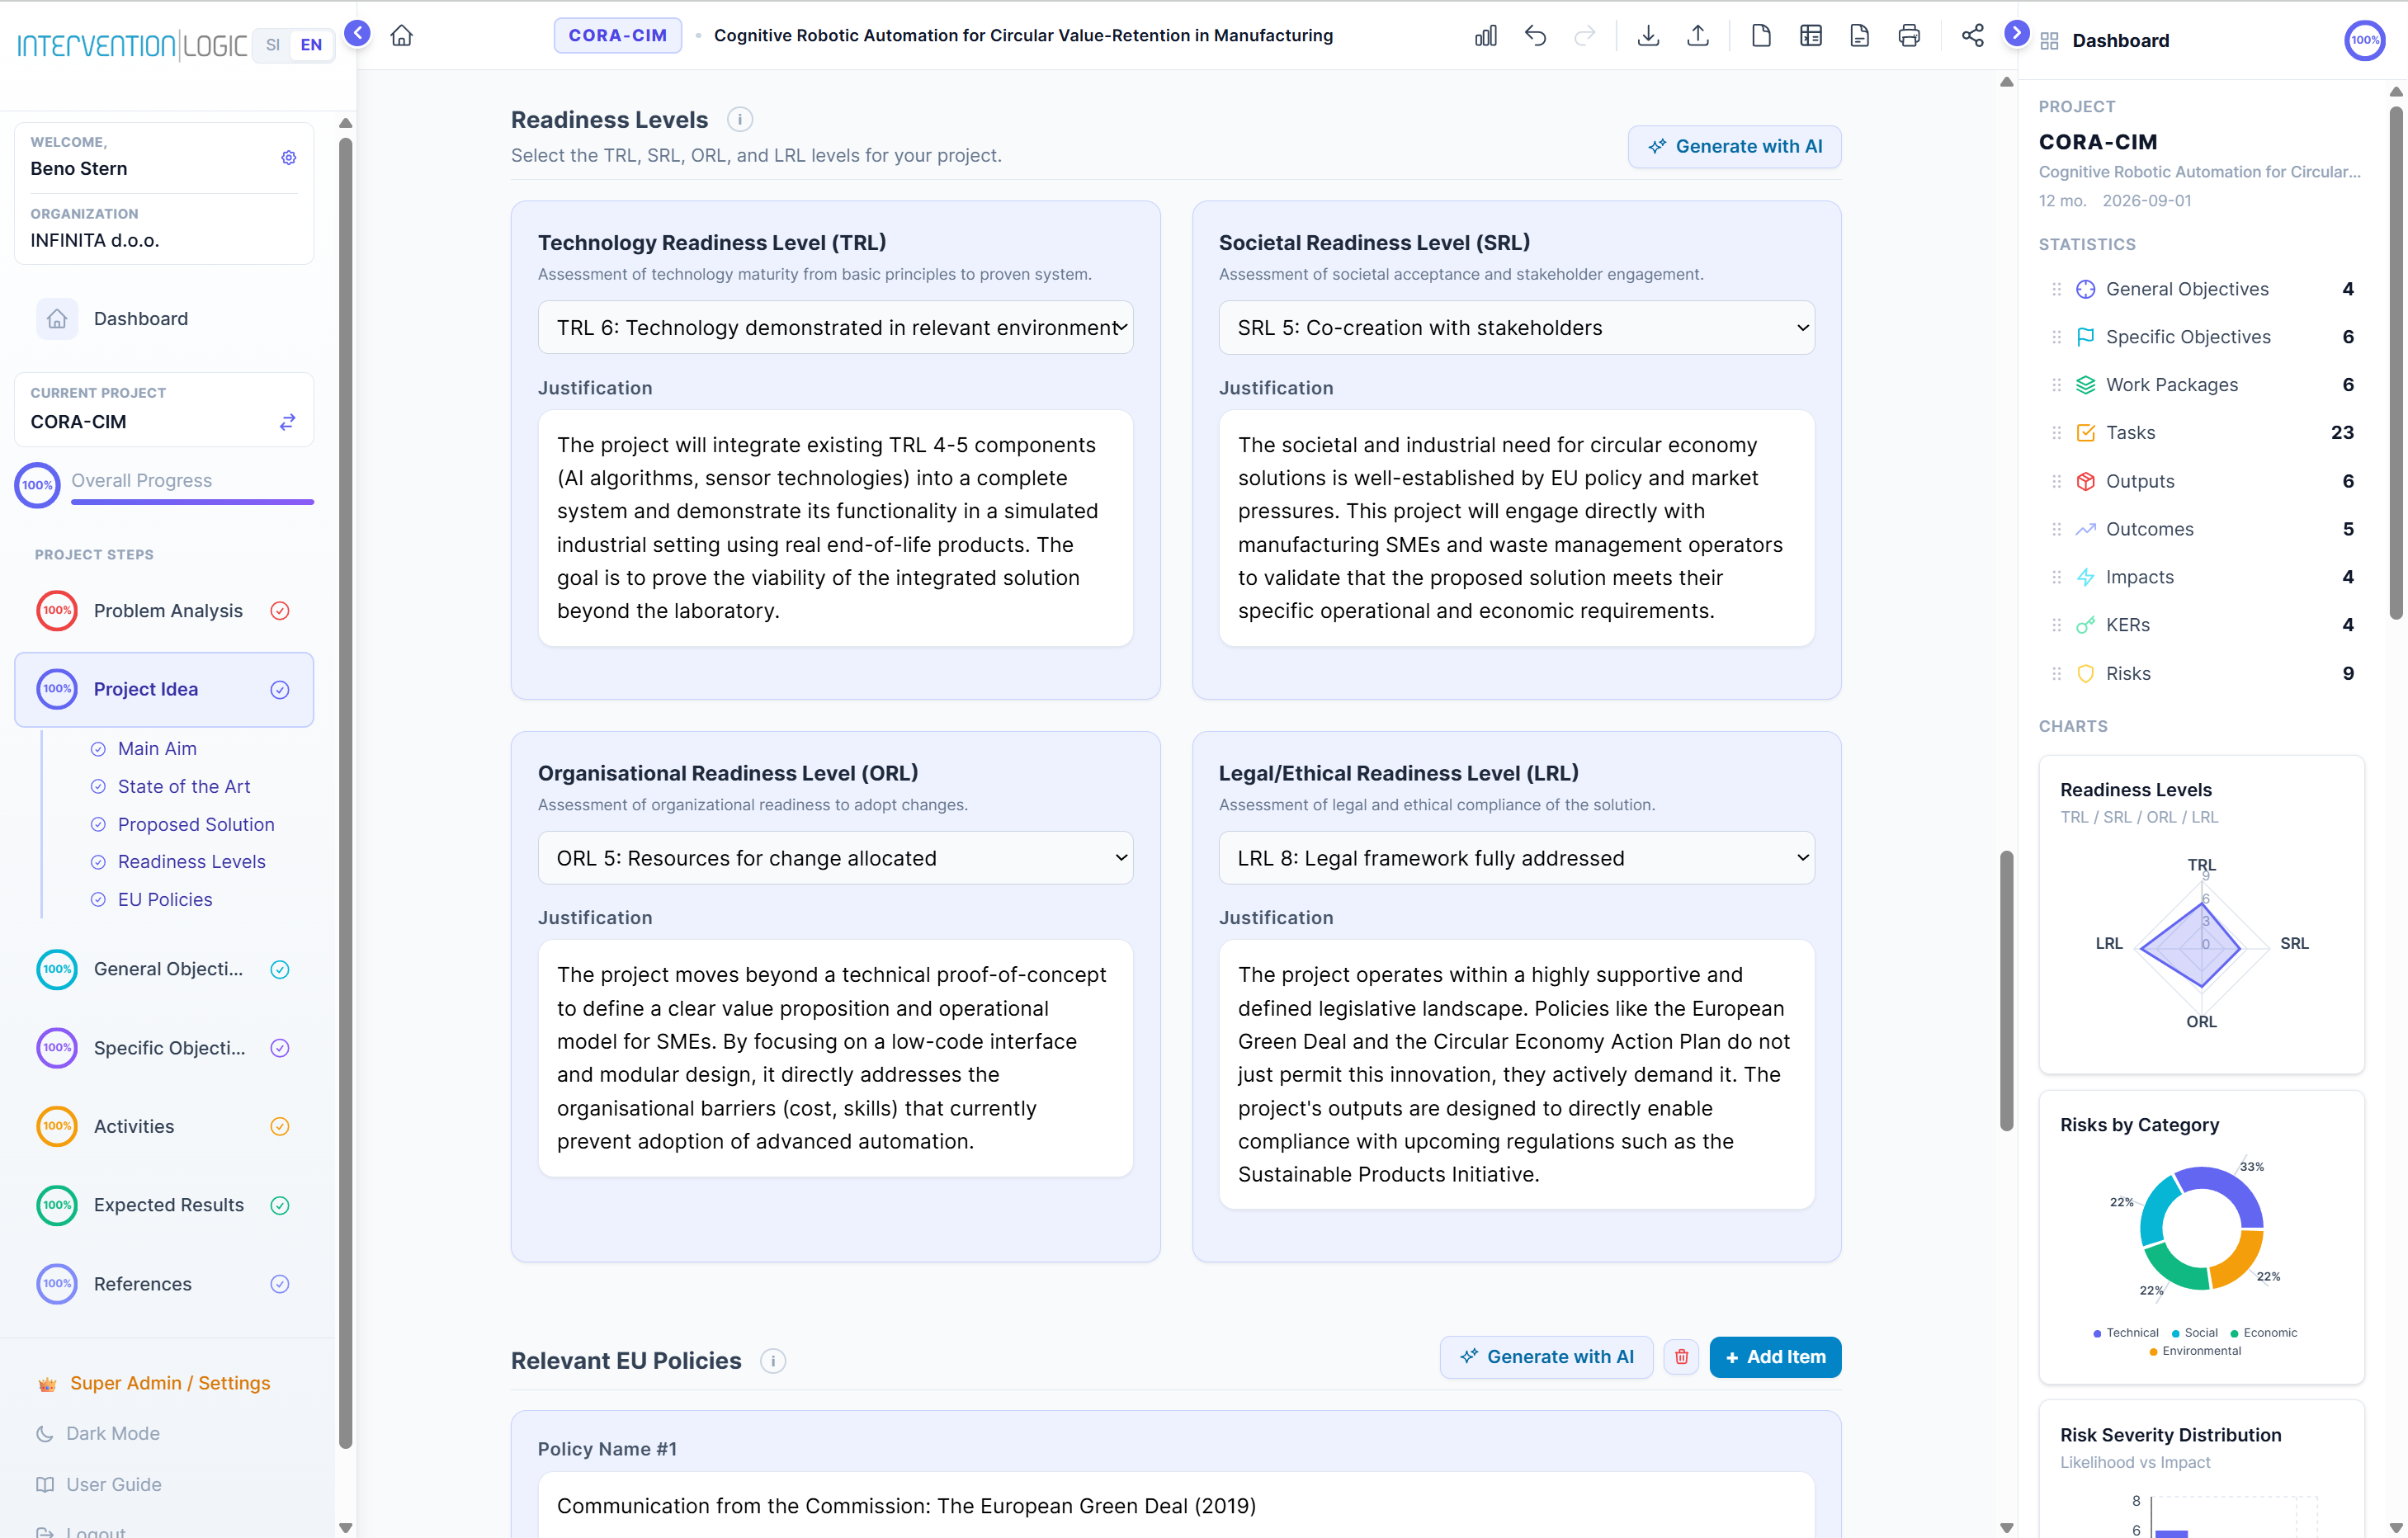
7.6 Readiness Levels — TRL / SRL / ORL / LRL
8. Objectives
8.1 General Objectives (3–5)
Each starts with an infinitive verb, connects to broader EU goals. Title, description, KPI indicator.
8.2 Specific Objectives (5–7)
Follow S.M.A.R.T.: Specific, Measurable, Achievable, Relevant, Time-bound. Each has a measurable KPI with targets, baselines, timeframes.
"Increase pilot school completion rates from 82% to 93% by M24, verified by school records across 5 partner regions."
8. Cilji
8.1 Splošni cilji (3–5)
Vsak se začne z nedoločnikom, se povezuje s širšimi cilji EU. Naslov, opis, KPI kazalnik.
8.2 Specifični cilji (5–7)
Sledijo metodi S.M.A.R.T.: Specifični, Merljivi, Dosegljivi, Relevantni, Časovno omejeni.
"Povečati delež pilotnih učencev, ki zaključijo šolsko leto, z 82% na 93% do M24, preverjeno z evidencami šolskih uprav v 5 regijah."
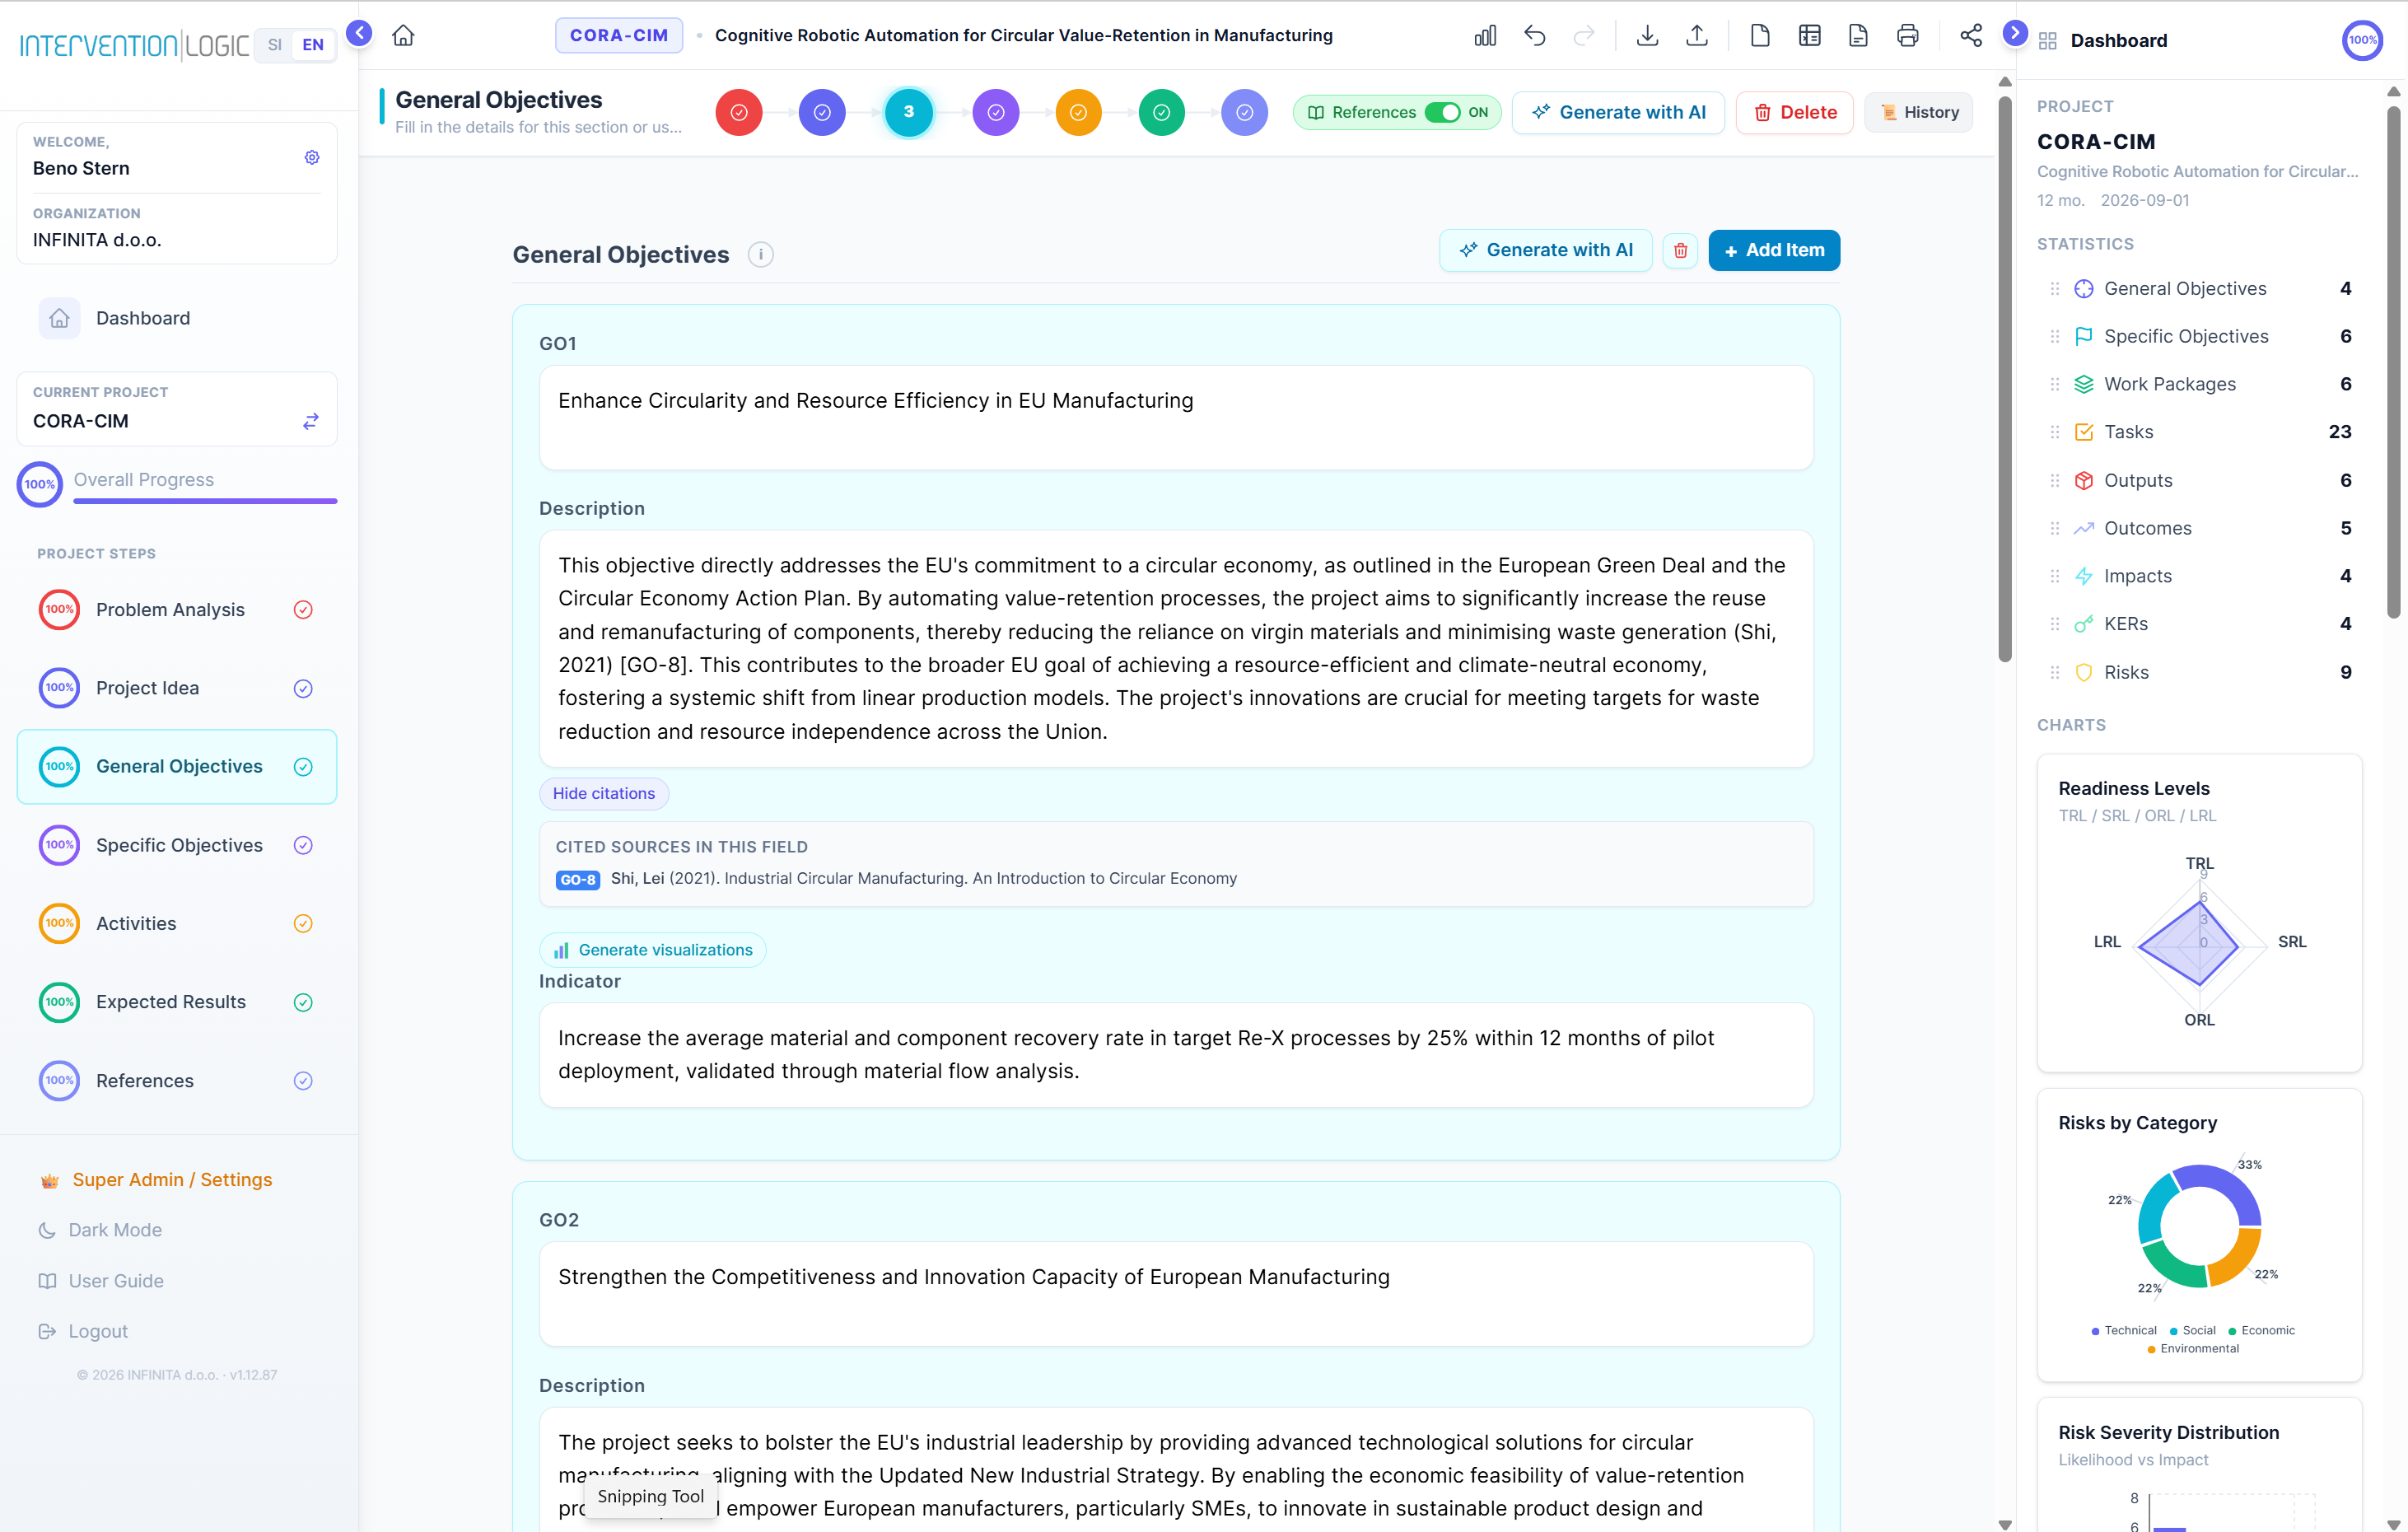
8.1 General Objectives — KPI indicators
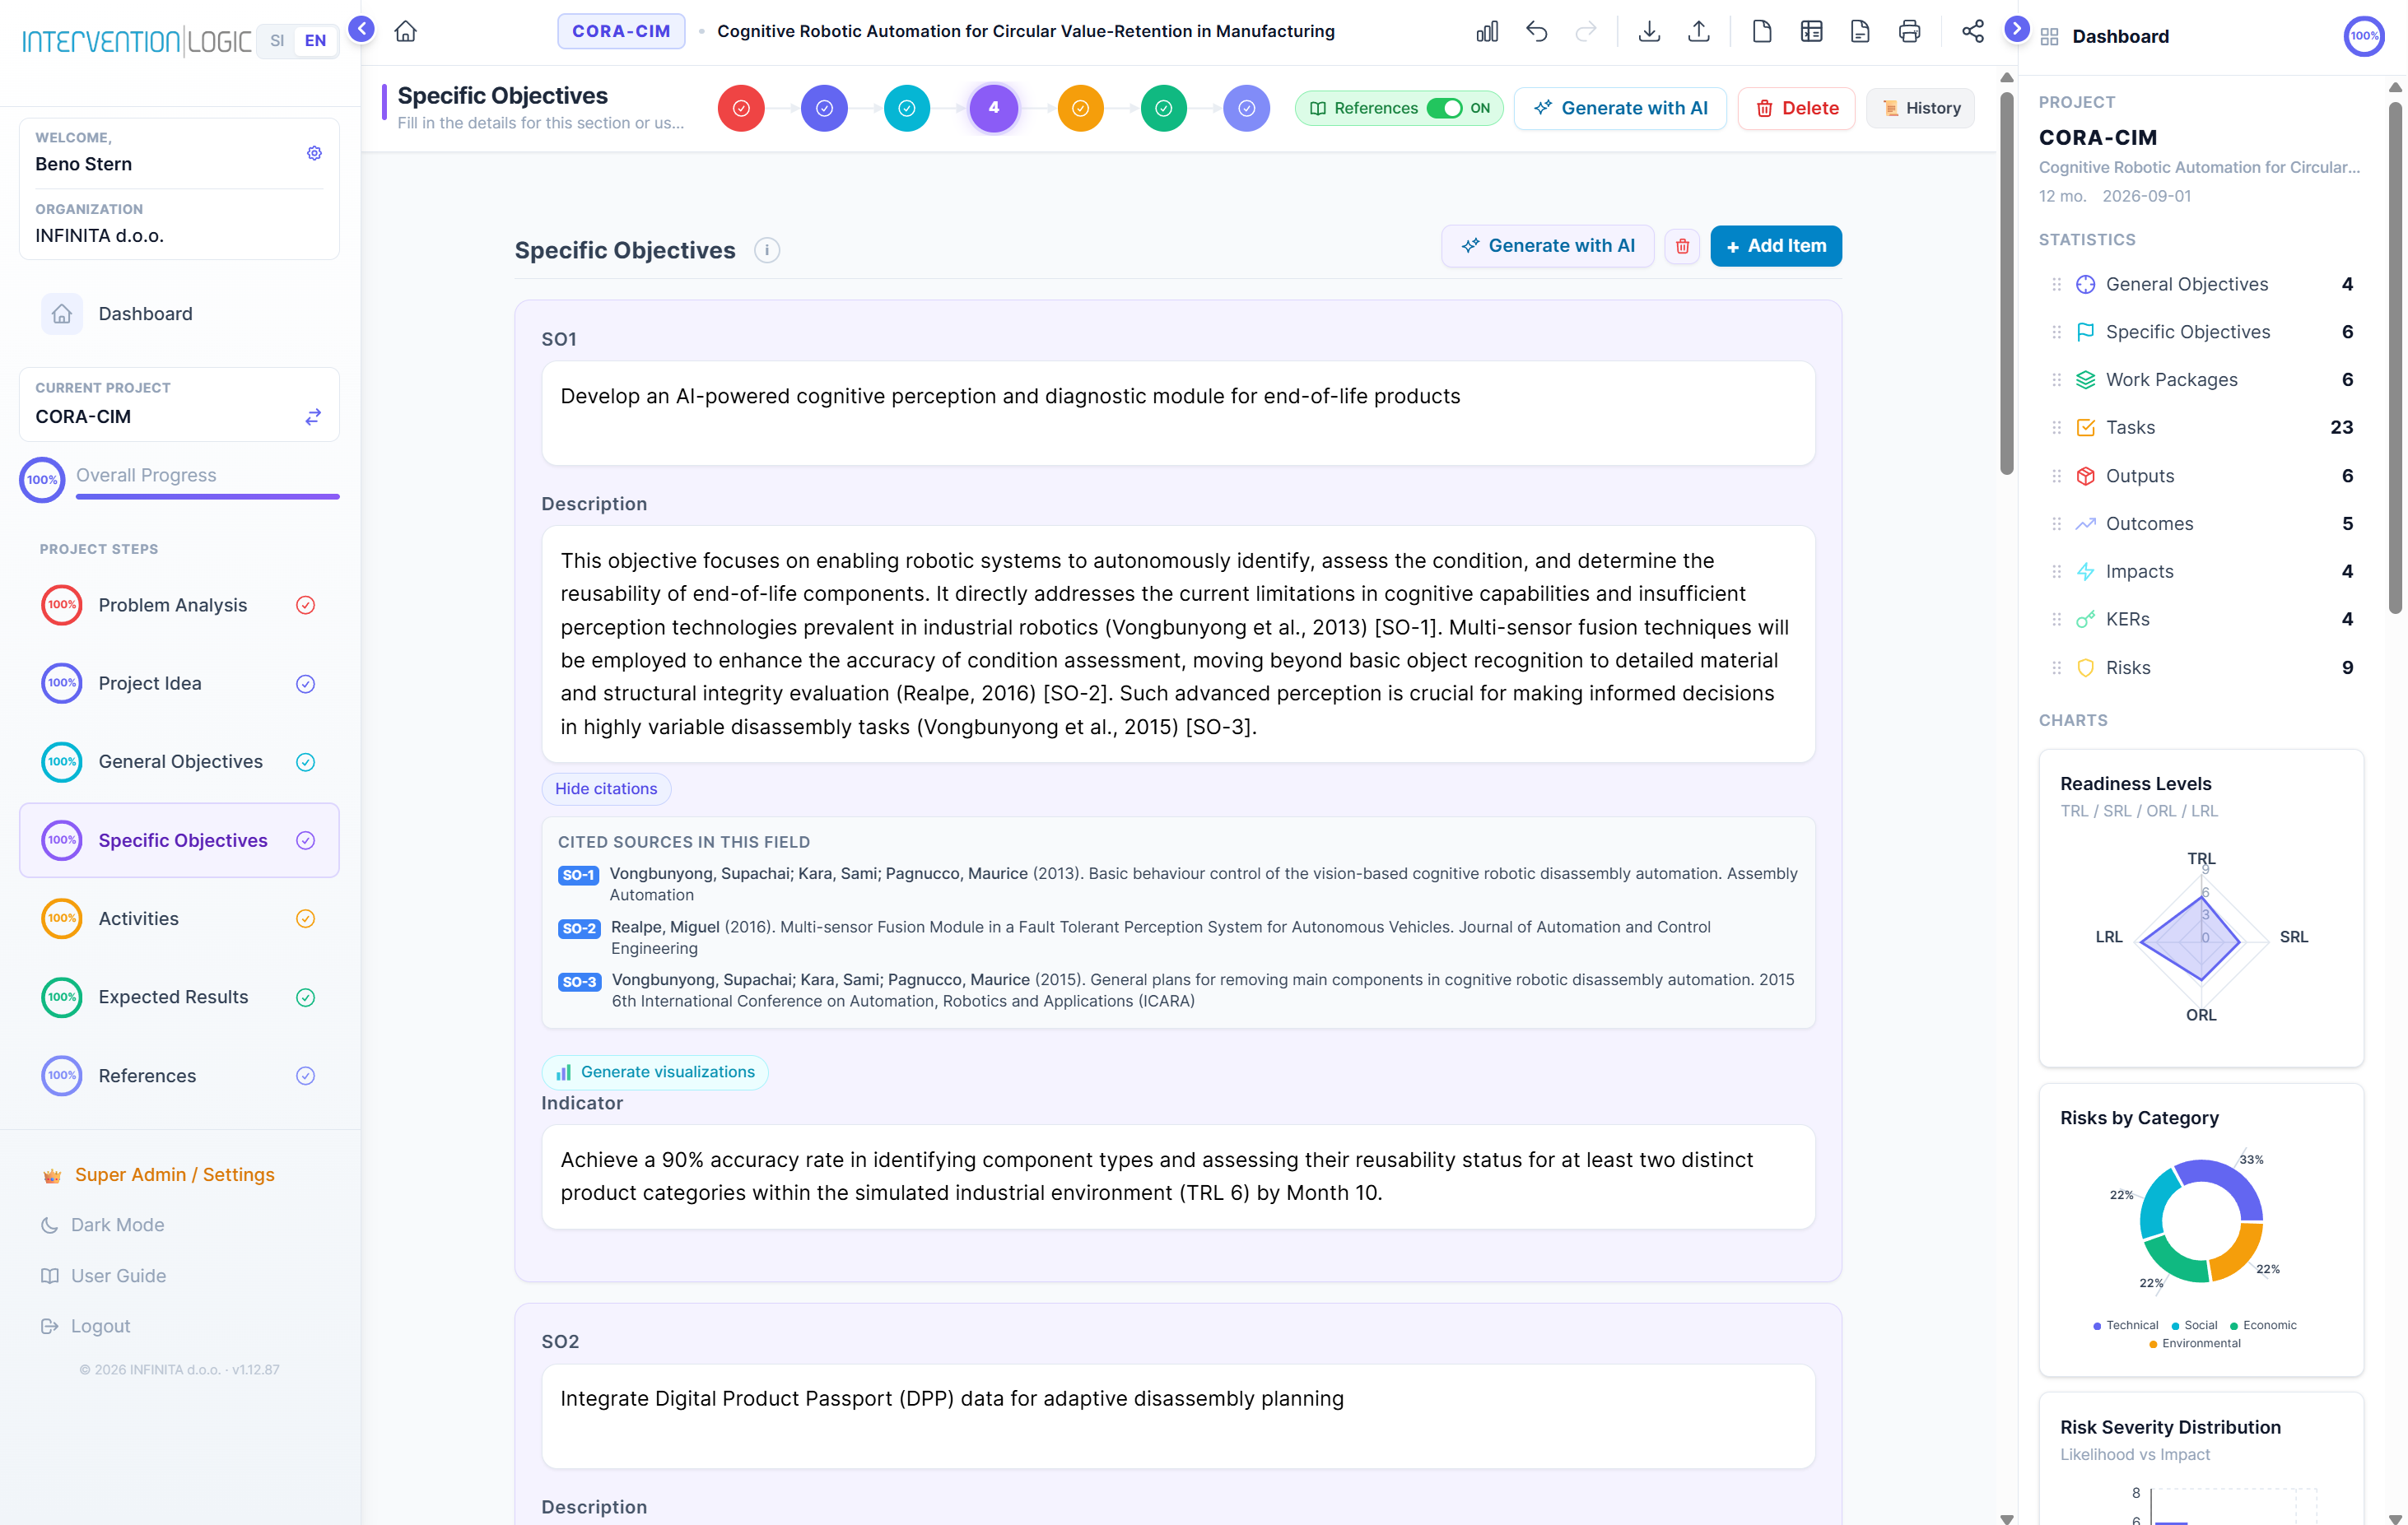
8.2 Specific S.M.A.R.T. Objectives — targets & baselines
9. Activities (Work Packages)
The most complex section. AI generates the full work plan in two phases.
9.1 Work Package Structure
| Position | WP Type | Duration |
|---|---|---|
| WP1 | Foundational / Analytical (incl. Capitalisation) | Specific phase |
| WP2–WP(N-2) | Content / Thematic WPs | Sequential with overlaps |
| WP(N-1) | Dissemination, Communication & Exploitation | Full duration |
| WP(N) | Project Management & Coordination | Full duration |
9.2 Each WP Contains
Tasks (2–5) with dependencies (FS, SS, FF, SF). Milestones (1–2). Deliverables (1–3) with binary verifiable indicators.
9.3 Two-Phase Generation
- Phase 1 — Scaffold: WP titles and date ranges
- Phase 2 — Detail: Each WP with tasks, milestones, deliverables, cross-WP dependencies
Takes 1–3 minutes for 6–10 WPs — this is normal.
InterventionLogic enforces that NO task, milestone, or deliverable falls outside the project timeframe. Out-of-range dates are automatically corrected.
9. Aktivnosti (Delovni sklopi)
Najkompleksnejša sekcija. AI generira celoten delovni načrt v dveh fazah.
9.1 Struktura delovnih sklopov
| Pozicija | Tip DS | Trajanje |
|---|---|---|
| DS1 | Temeljni / Analitični (vklj. Kapitalizacija) | Specifična faza |
| DS2–DS(N-2) | Vsebinski / Tematski DS | Zaporedno s prekrivanjem |
| DS(N-1) | Razširjanje, komunikacija in izkoriščanje | Celotno trajanje |
| DS(N) | Vodenje projekta in koordinacija | Celotno trajanje |
9.2 Dvofazno generiranje
- Faza 1 — Ogrodje: Naslovi DS in časovni okviri
- Faza 2 — Podrobnosti: Vsak DS s polnimi nalogami, mejniki, rezultati
Traja 1–3 minute za 6–10 DS — to je normalno.
InterventionLogic avtomatsko zagotavlja, da NOBENA naloga, mejnik ali rezultat ne pade izven datumov projekta.
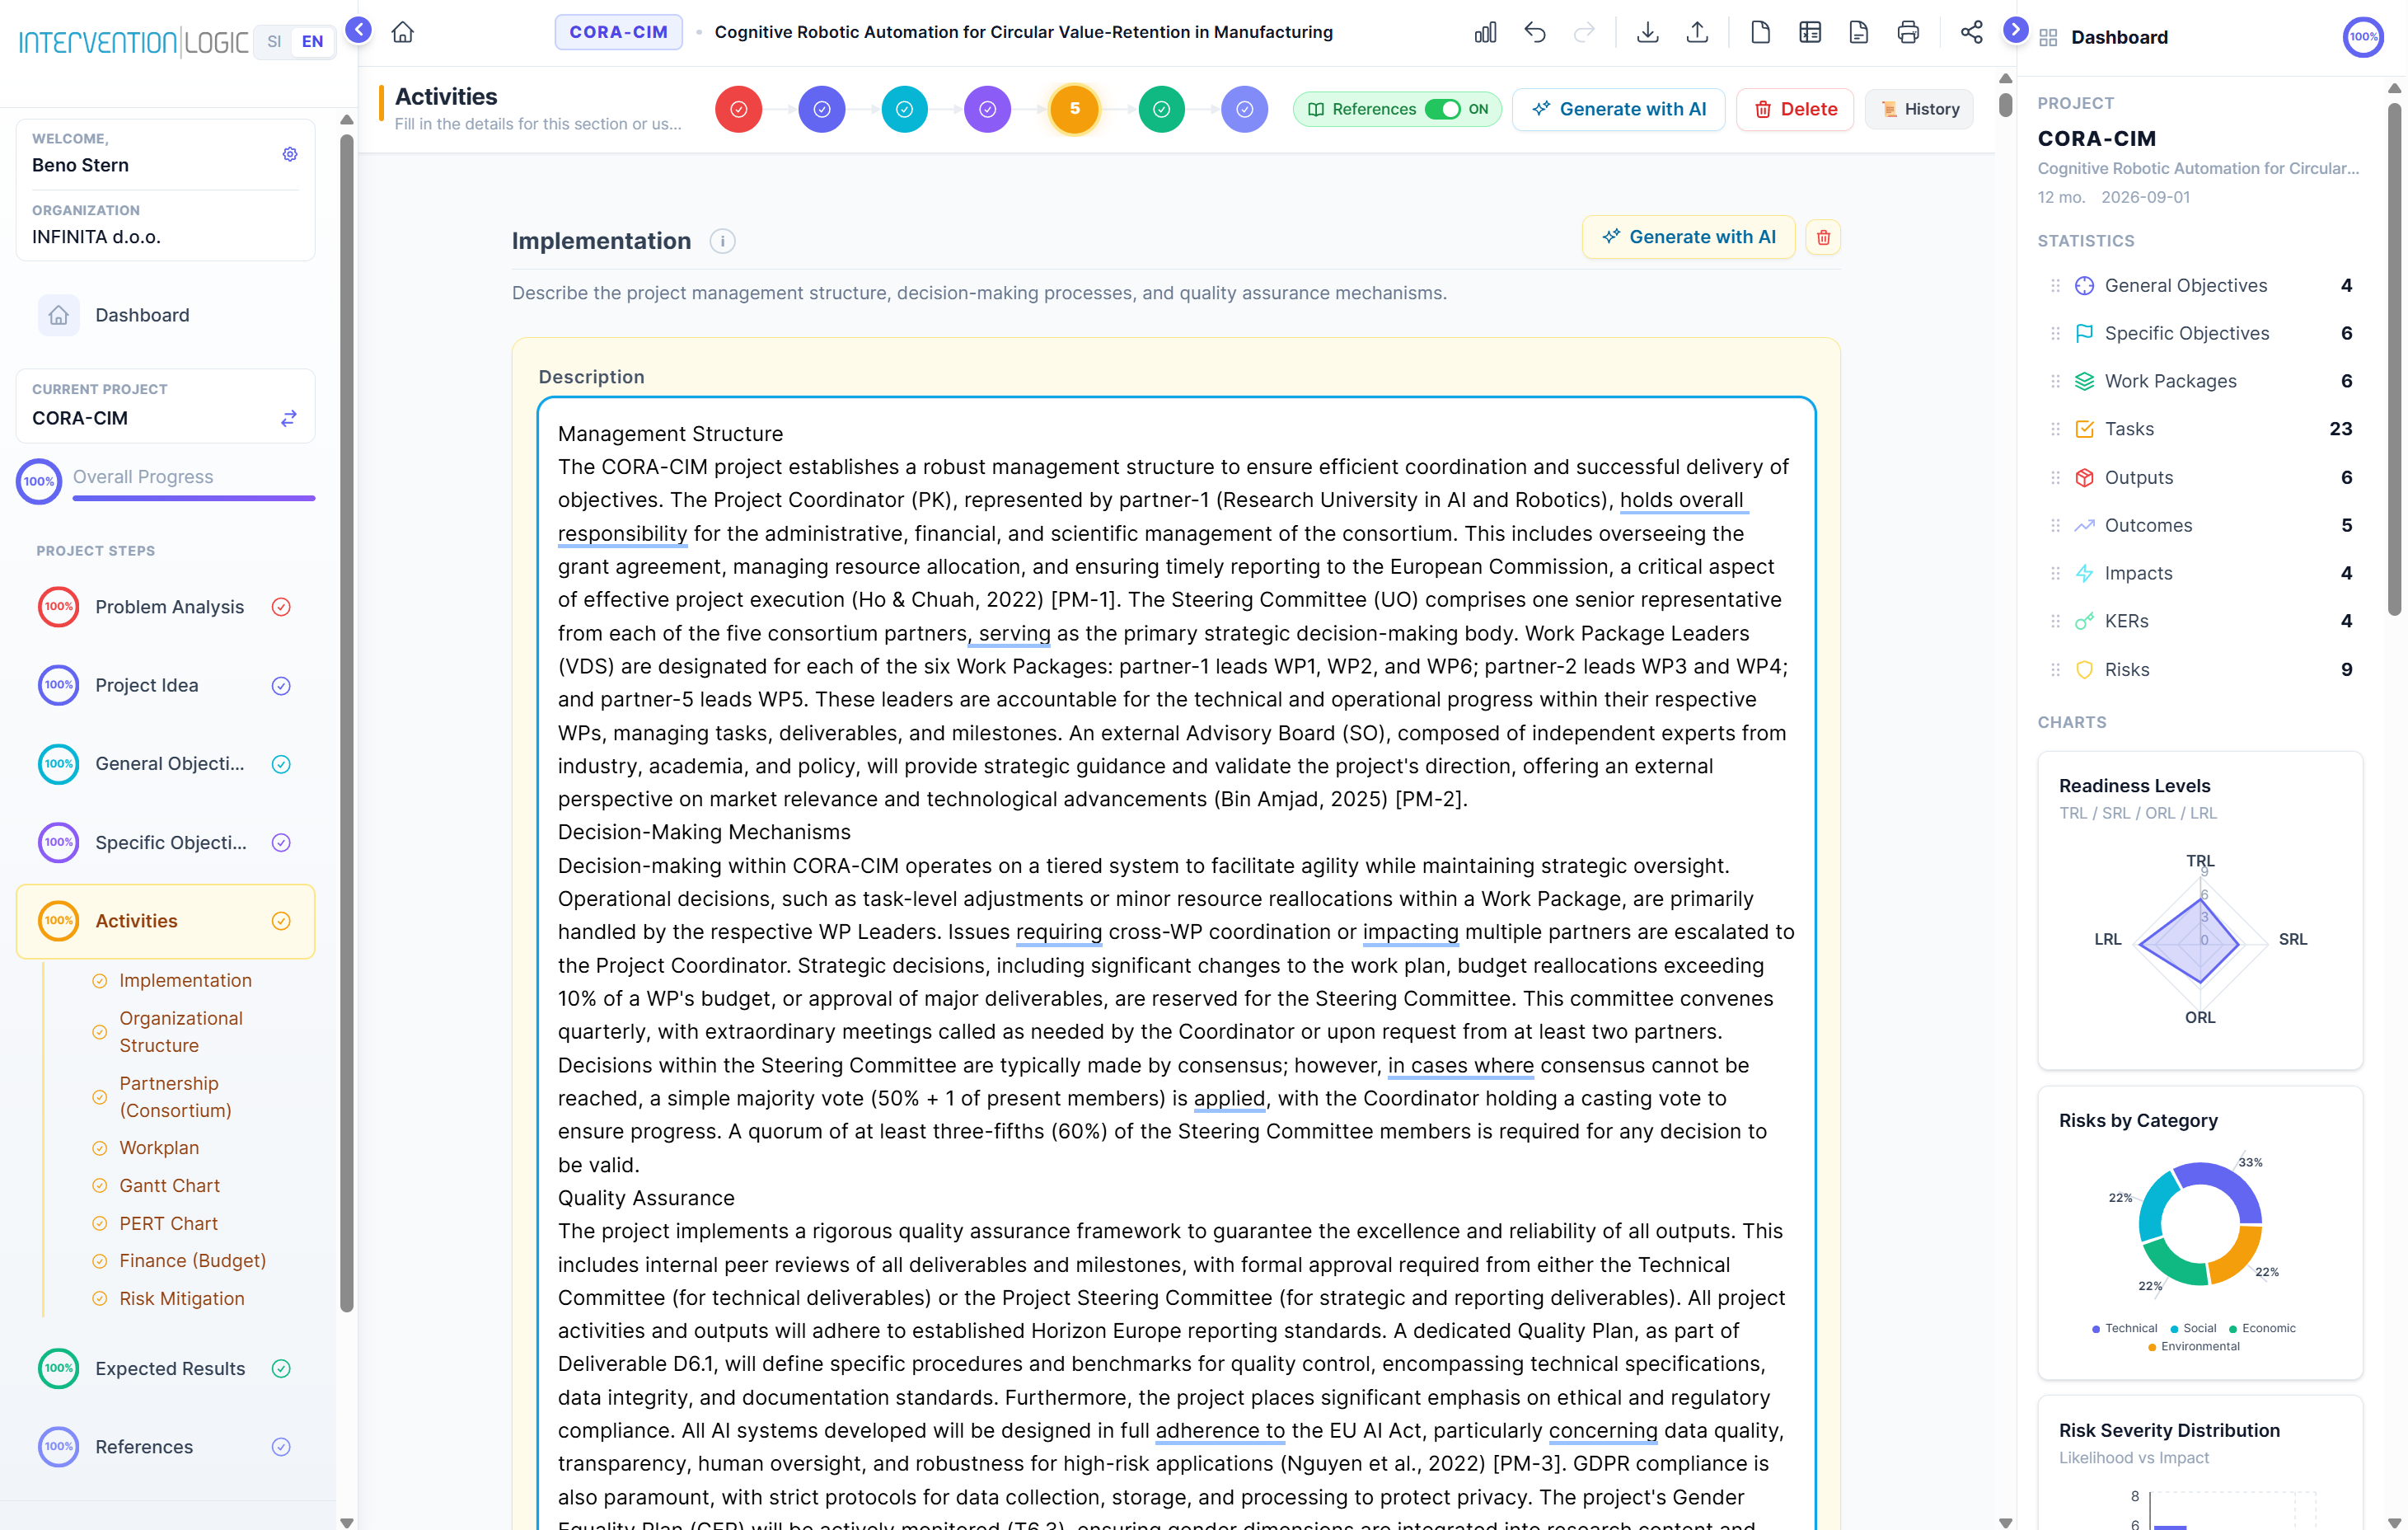
Activities — Work Packages with tasks, milestones & deliverables
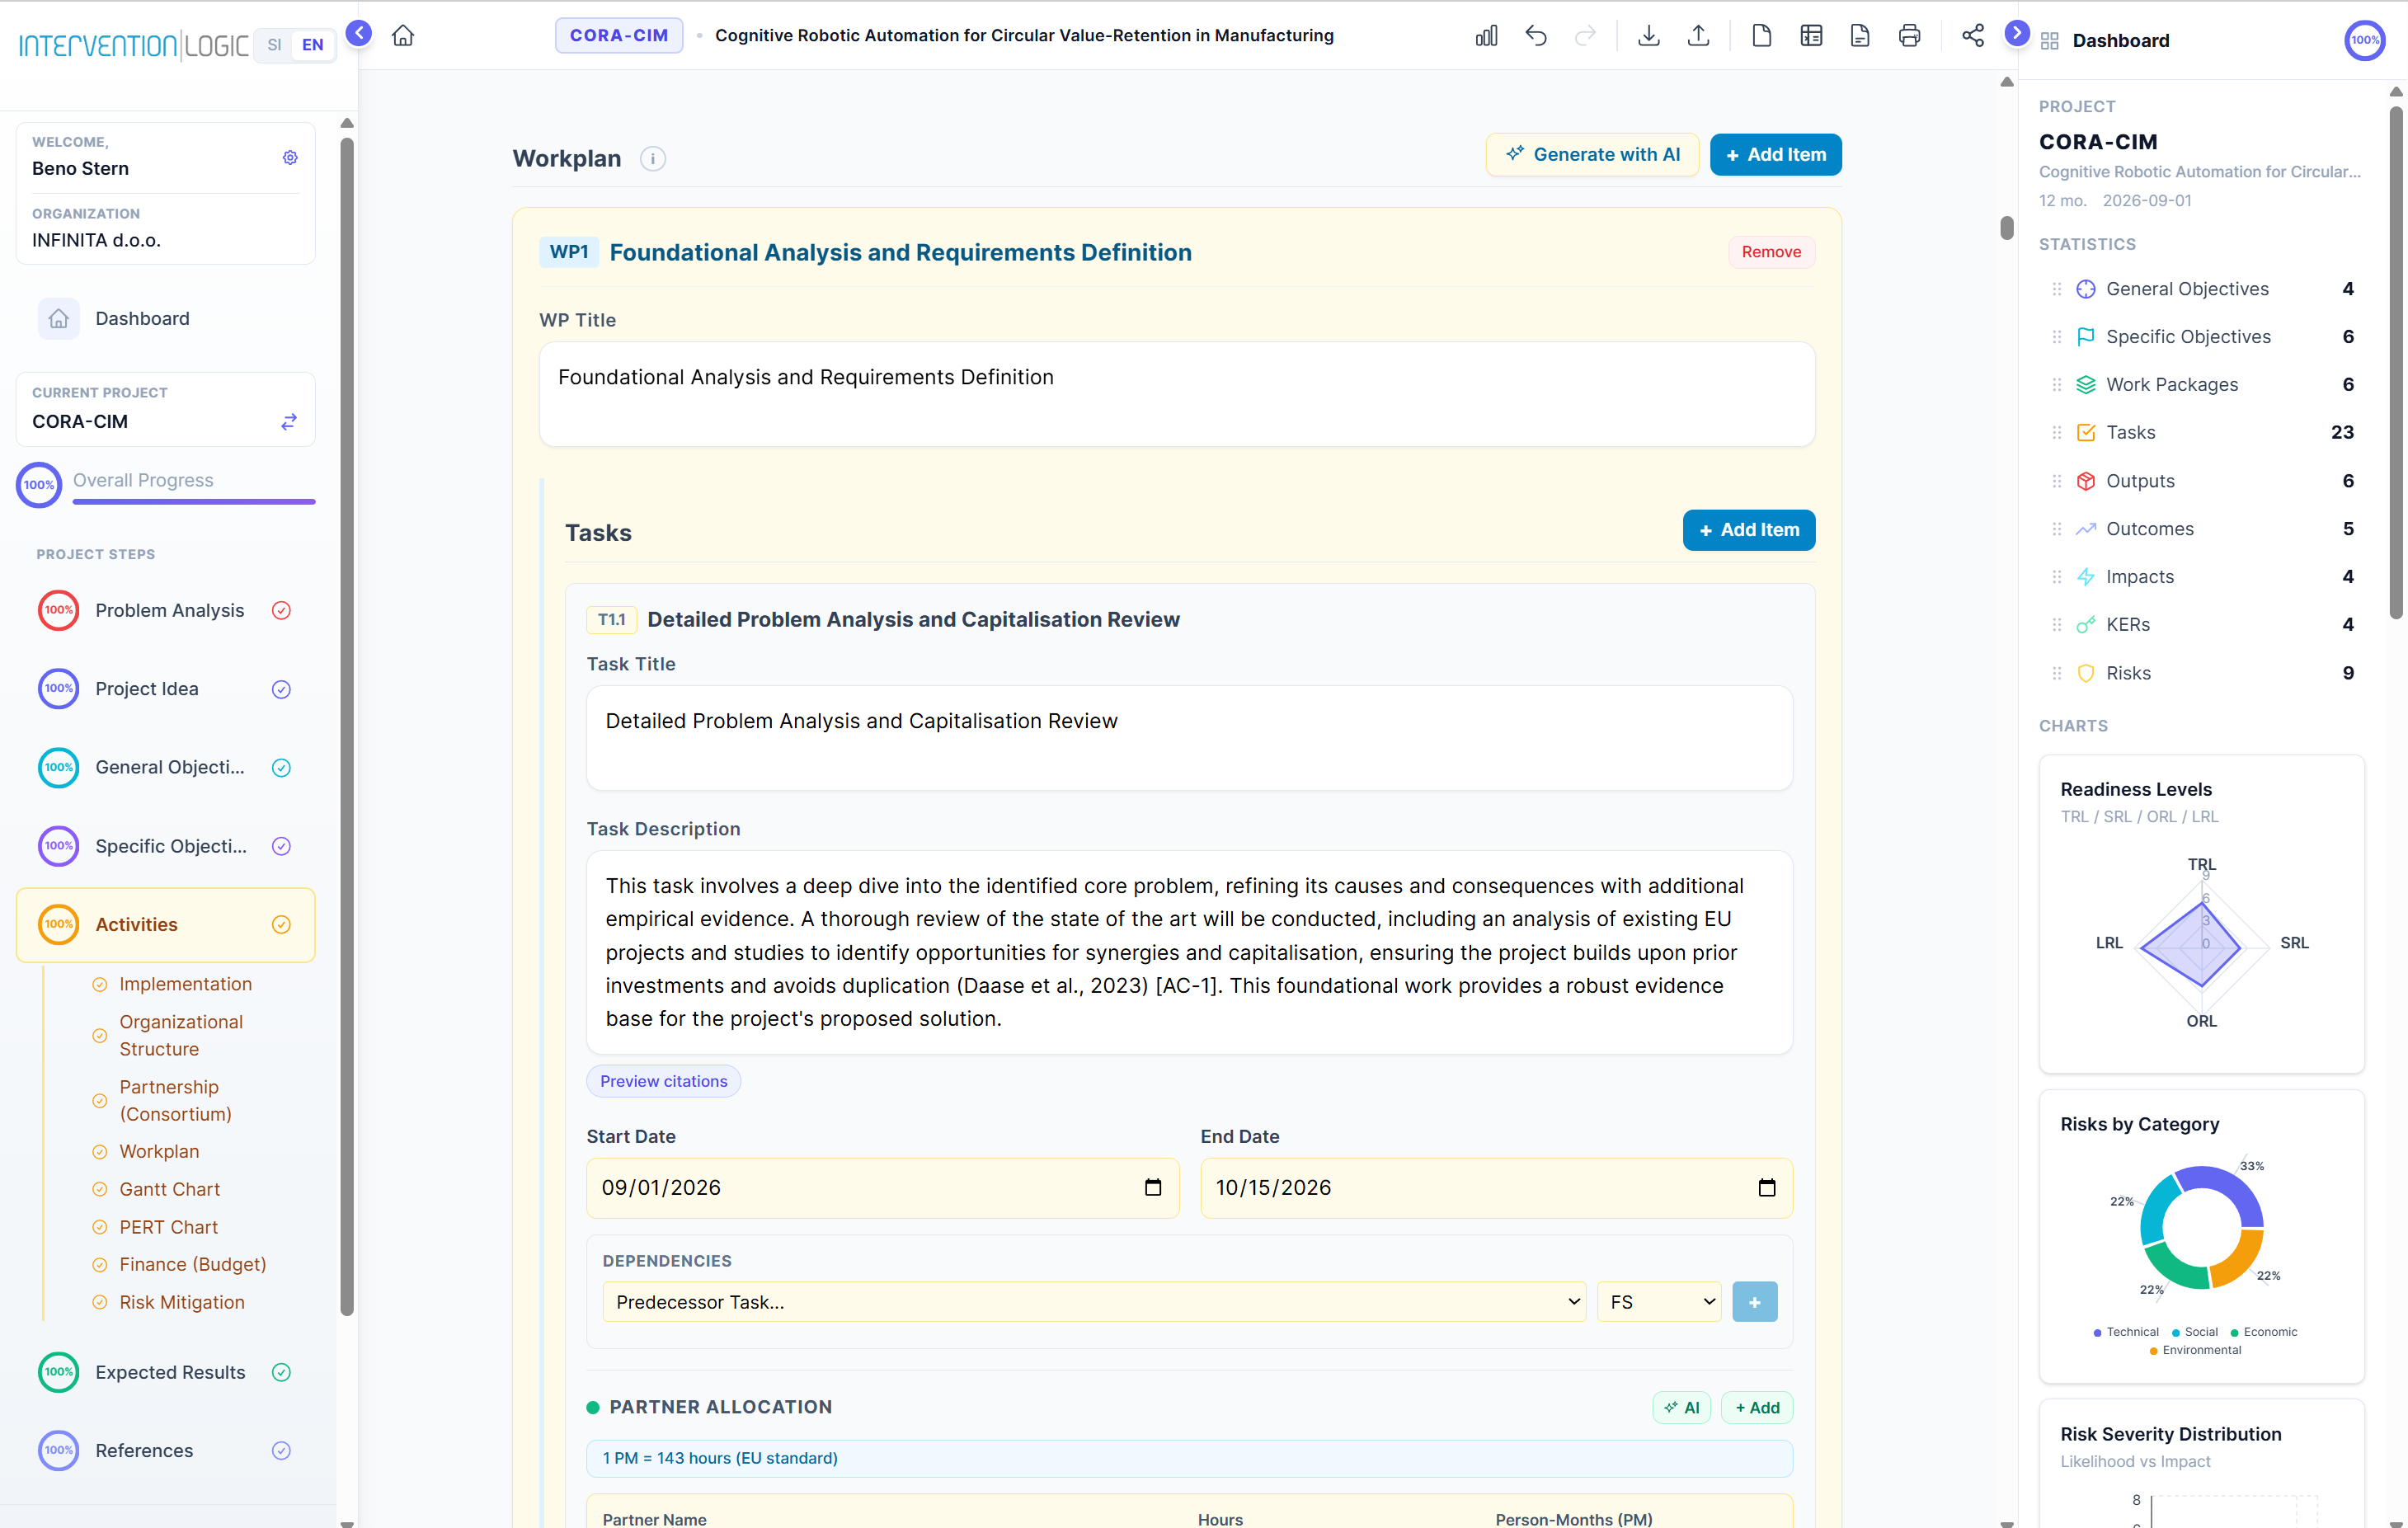
Workplan — task list with start/end dates & dependencies
10. Project Management
10.1 Management Description
AI generates a comprehensive narrative (500+ words) covering: governance structure, decision-making, quality assurance (Gender Equality Plans, AI Act/GDPR), risk management, communication tools, conflict resolution, FAIR data management.
10.2 Organigram Labels
| Role | EU Abbr. | Label |
|---|---|---|
| Coordinator | PK | "Project Coordinator (PK)" |
| Steering Committee | UO | "Steering Committee (UO)" |
| Advisory Board | SO | "Advisory Board (SO)" |
| WP Leaders | VDS | "WP Leaders (VDS)" |
10. Vodenje projekta
10.1 Opis vodenja
AI generira obsežno pripoved (500+ besed): struktura upravljanja, odločanje, zagotavljanje kakovosti, obvladovanje tveganj, komunikacija, FAIR podatki.
10.2 Oznake za organigram
| Vloga | EU kratica | Oznaka |
|---|---|---|
| Koordinator | PK | "Koordinator projekta (PK)" |
| Usmerjevalni odbor | UO | "Usmerjevalni odbor (UO)" |
| Svetovalni odbor | SO | "Svetovalni odbor (SO)" |
| Vodje DS | VDS | "Vodje DS (VDS)" |
11. Risk Register
AI generates 8–12 risks across four categories:
| Category | Examples |
|---|---|
| Technical | Technology failures, integration issues, data quality |
| Social | Stakeholder resistance, low engagement, cultural barriers |
| Economic | Budget overruns, market changes, partner instability |
| Environmental | Climate events, regulatory changes, environmental compliance |
Each risk: auto-generated ID, category, title, description, likelihood, impact, mitigation strategy.
11. Register tveganj
AI generira 8–12 tveganj v štirih kategorijah:
| Kategorija | Primeri |
|---|---|
| Tehnična | Tehnološke napake, integracijske težave, kakovost podatkov |
| Družbena | Odpor deležnikov, nizka vključenost, kulturne ovire |
| Ekonomska | Prekoračitve proračuna, tržne spremembe, nestabilnost partnerjev |
| Okoljska | Podnebni dogodki, regulativne spremembe, okoljska skladnost |
Vsako tveganje: ID, kategorija, naslov, opis, verjetnost, vpliv, strategija ublažitve.
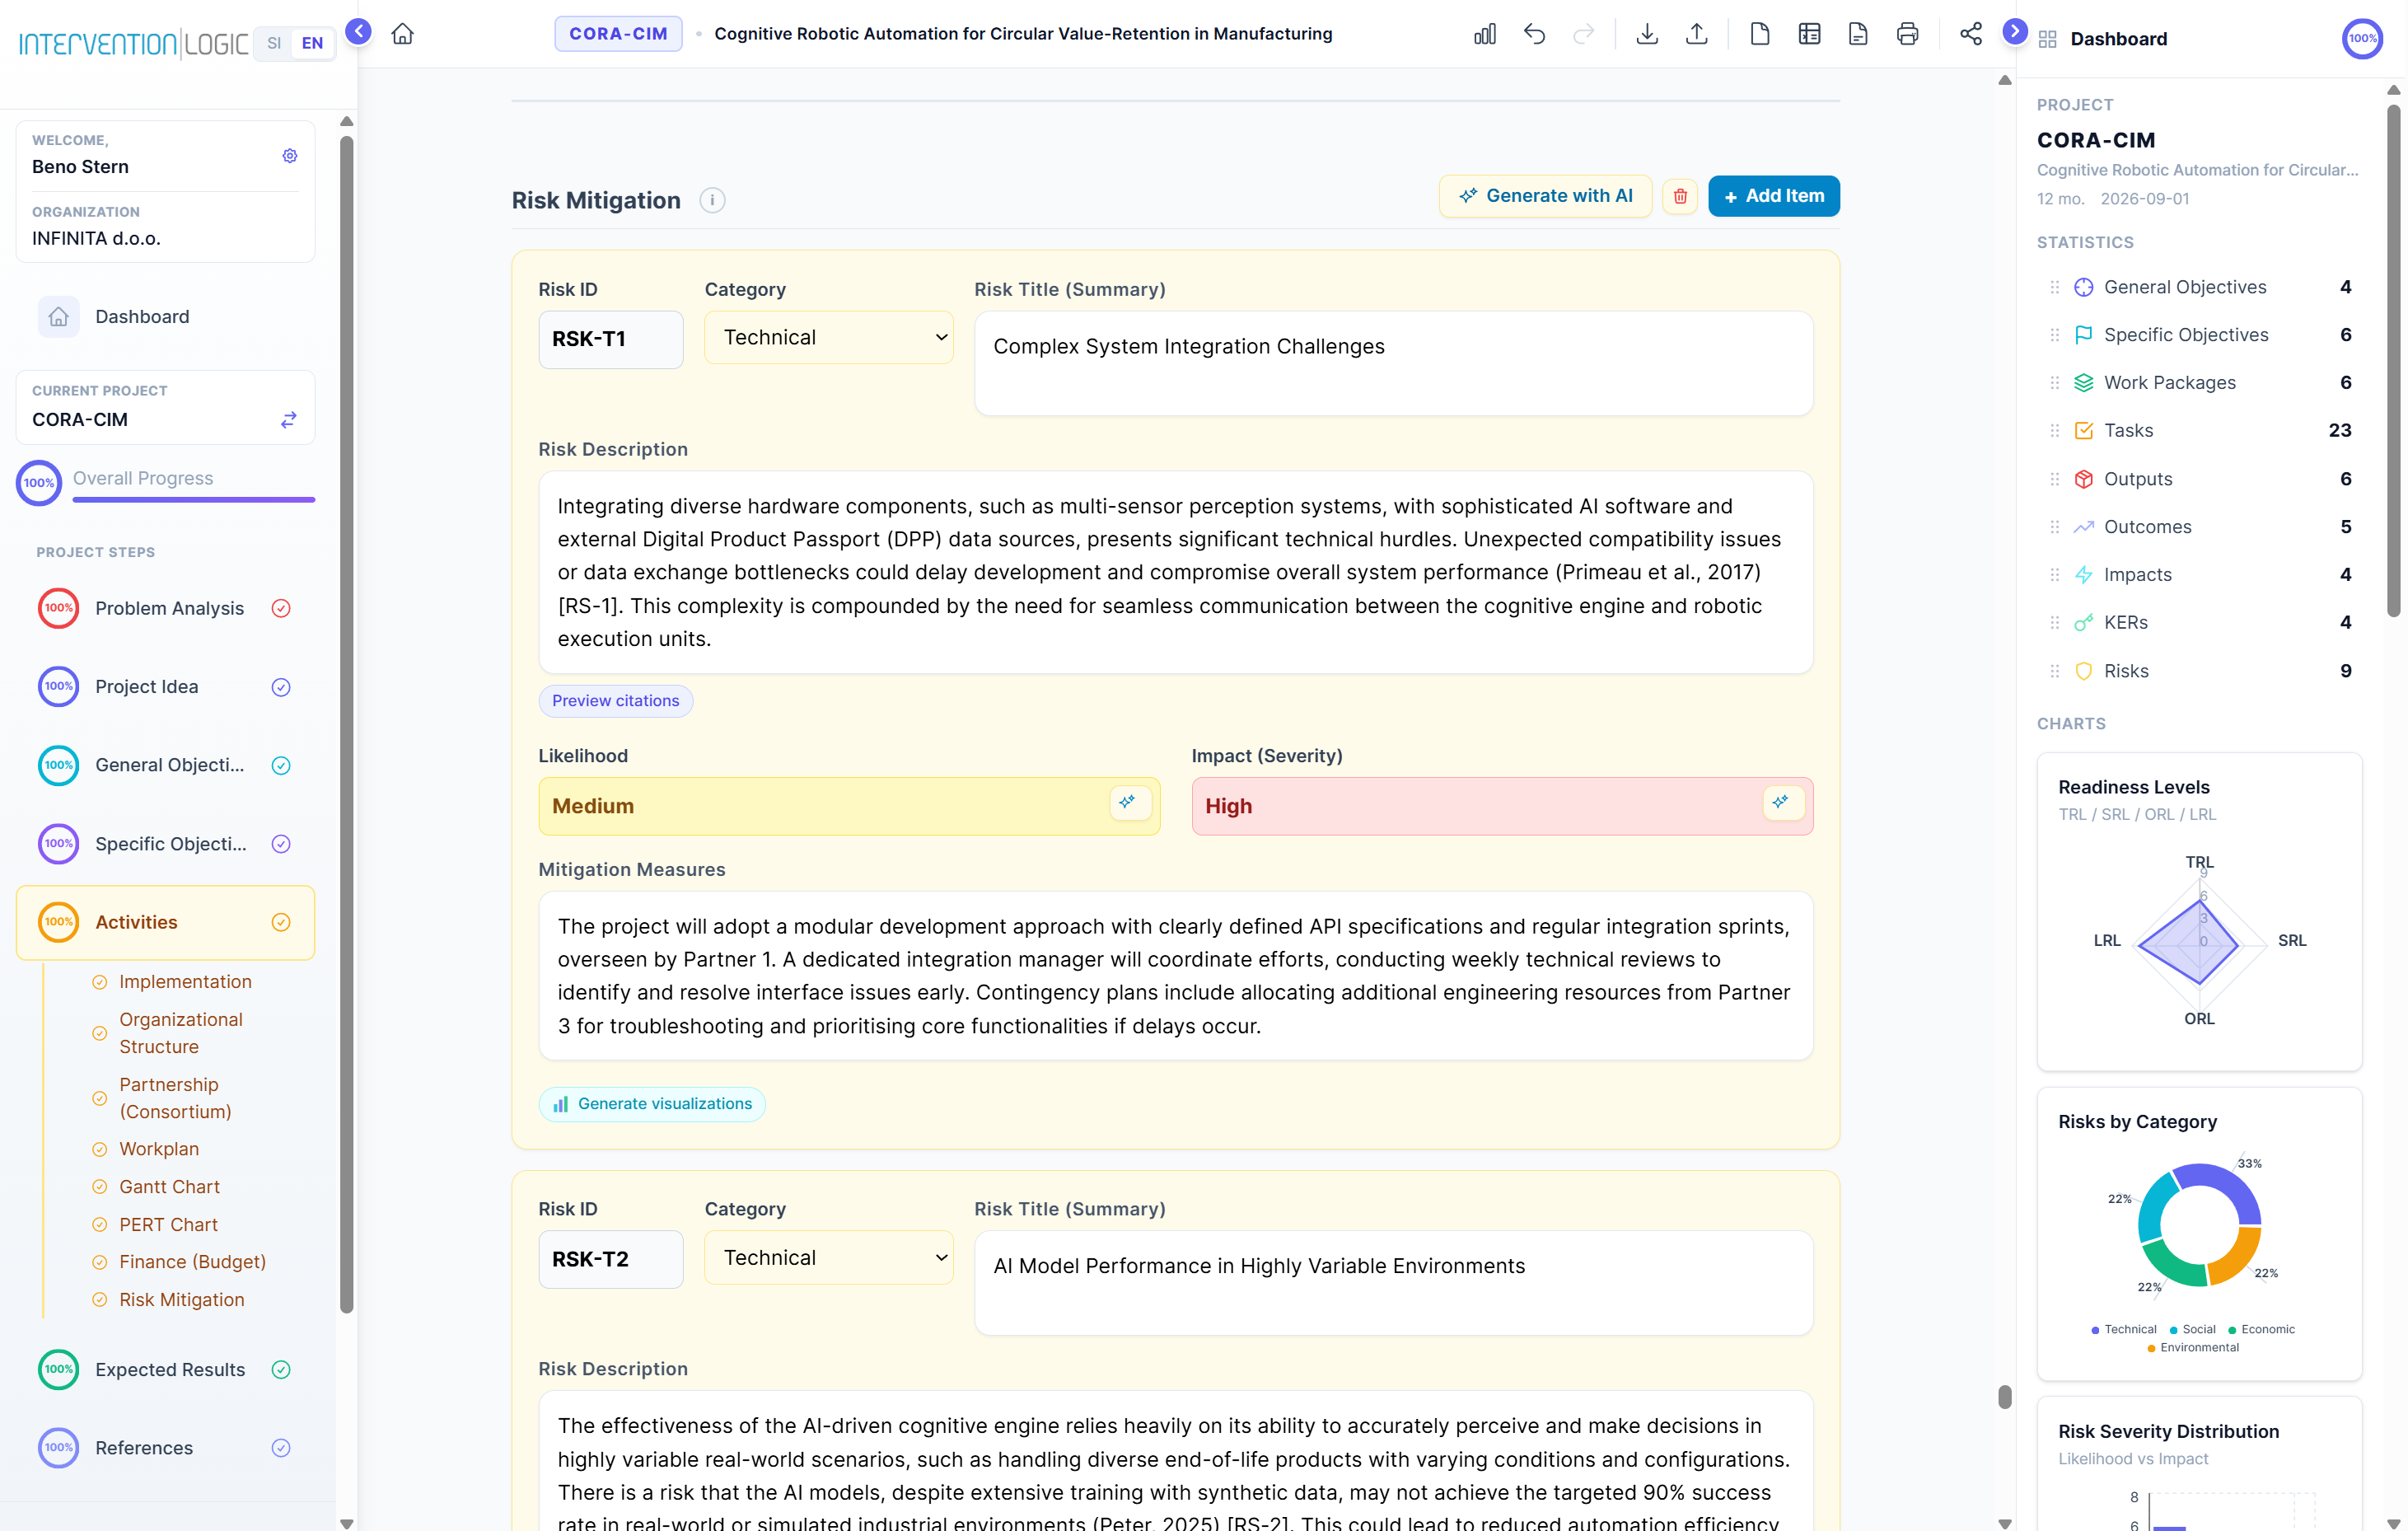
Risk Register — 8–12 risks across 4 categories with mitigation strategies
12. Expected Results & KERs
12.1 Outputs (5–8)
Direct, tangible deliverables with result-oriented titles and binary verifiable indicators.
12.2 Outcomes (4–6)
Medium-term changes with measurable indicators, targets, and measurement methods.
12.3 Impacts (3–5)
Long-term strategic shifts in Key Impact Pathways: Scientific, Societal, Economic.
12.4 Key Exploitable Results (4–6)
Assets with exploitation strategies covering 3 sustainability pillars: Financial, Institutional, Political/Regulatory.
Clicking Regenerate generates Outputs, Outcomes, Impacts, and Risks together for cross-reference consistency.
12. Pričakovani rezultati in KER-ji
12.1 Proizvodi (5–8)
Neposredni rezultati z binarnimi preverljivimi kazalniki.
12.2 Učinki (4–6)
Srednjeročne spremembe z merljivimi kazalniki in cilji.
12.3 Vplivi (3–5)
Dolgoročni premiki v ključnih poteh vpliva: Znanstvena, Družbena, Ekonomska.
12.4 Ključni izkoristljivi rezultati (4–6)
Sredstva s strategijami izkoriščanja v 3 stebrih: Finančni, Institucionalni, Politični.
Regeneriraj generira Proizvode, Učinke, Vplive in Tveganja skupaj za medsebojno doslednost.
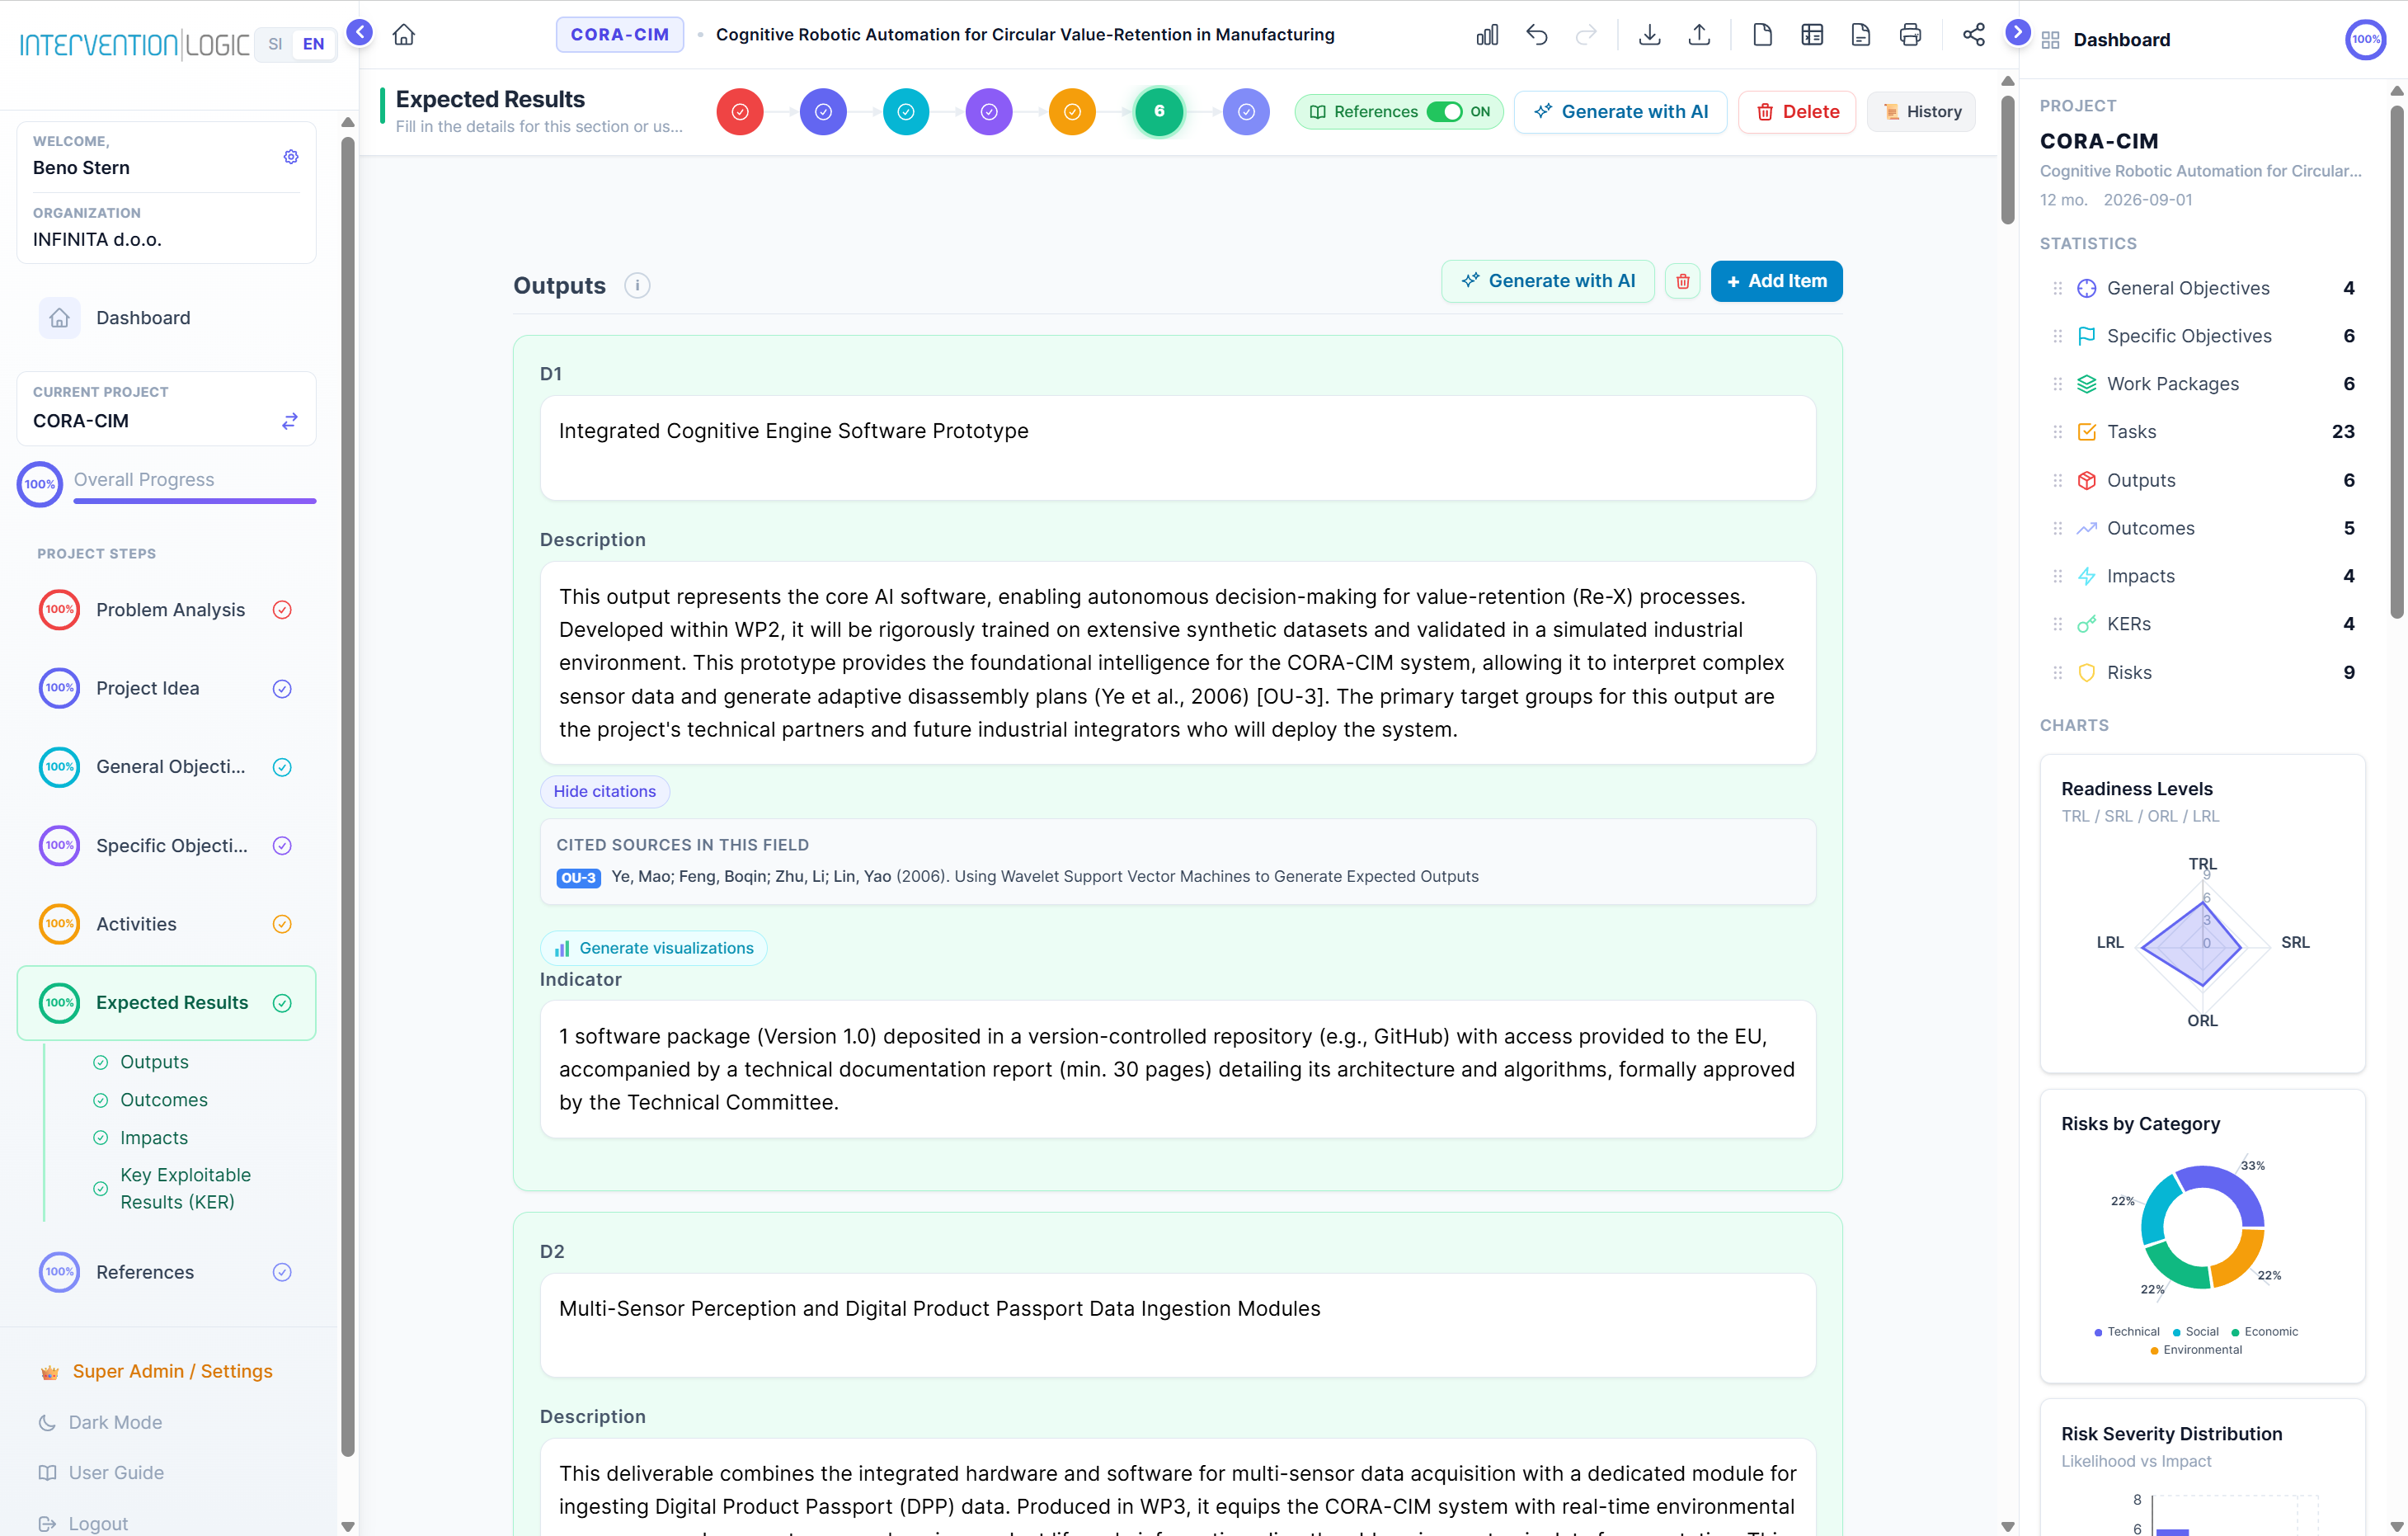
12.1 Outputs — direct tangible deliverables
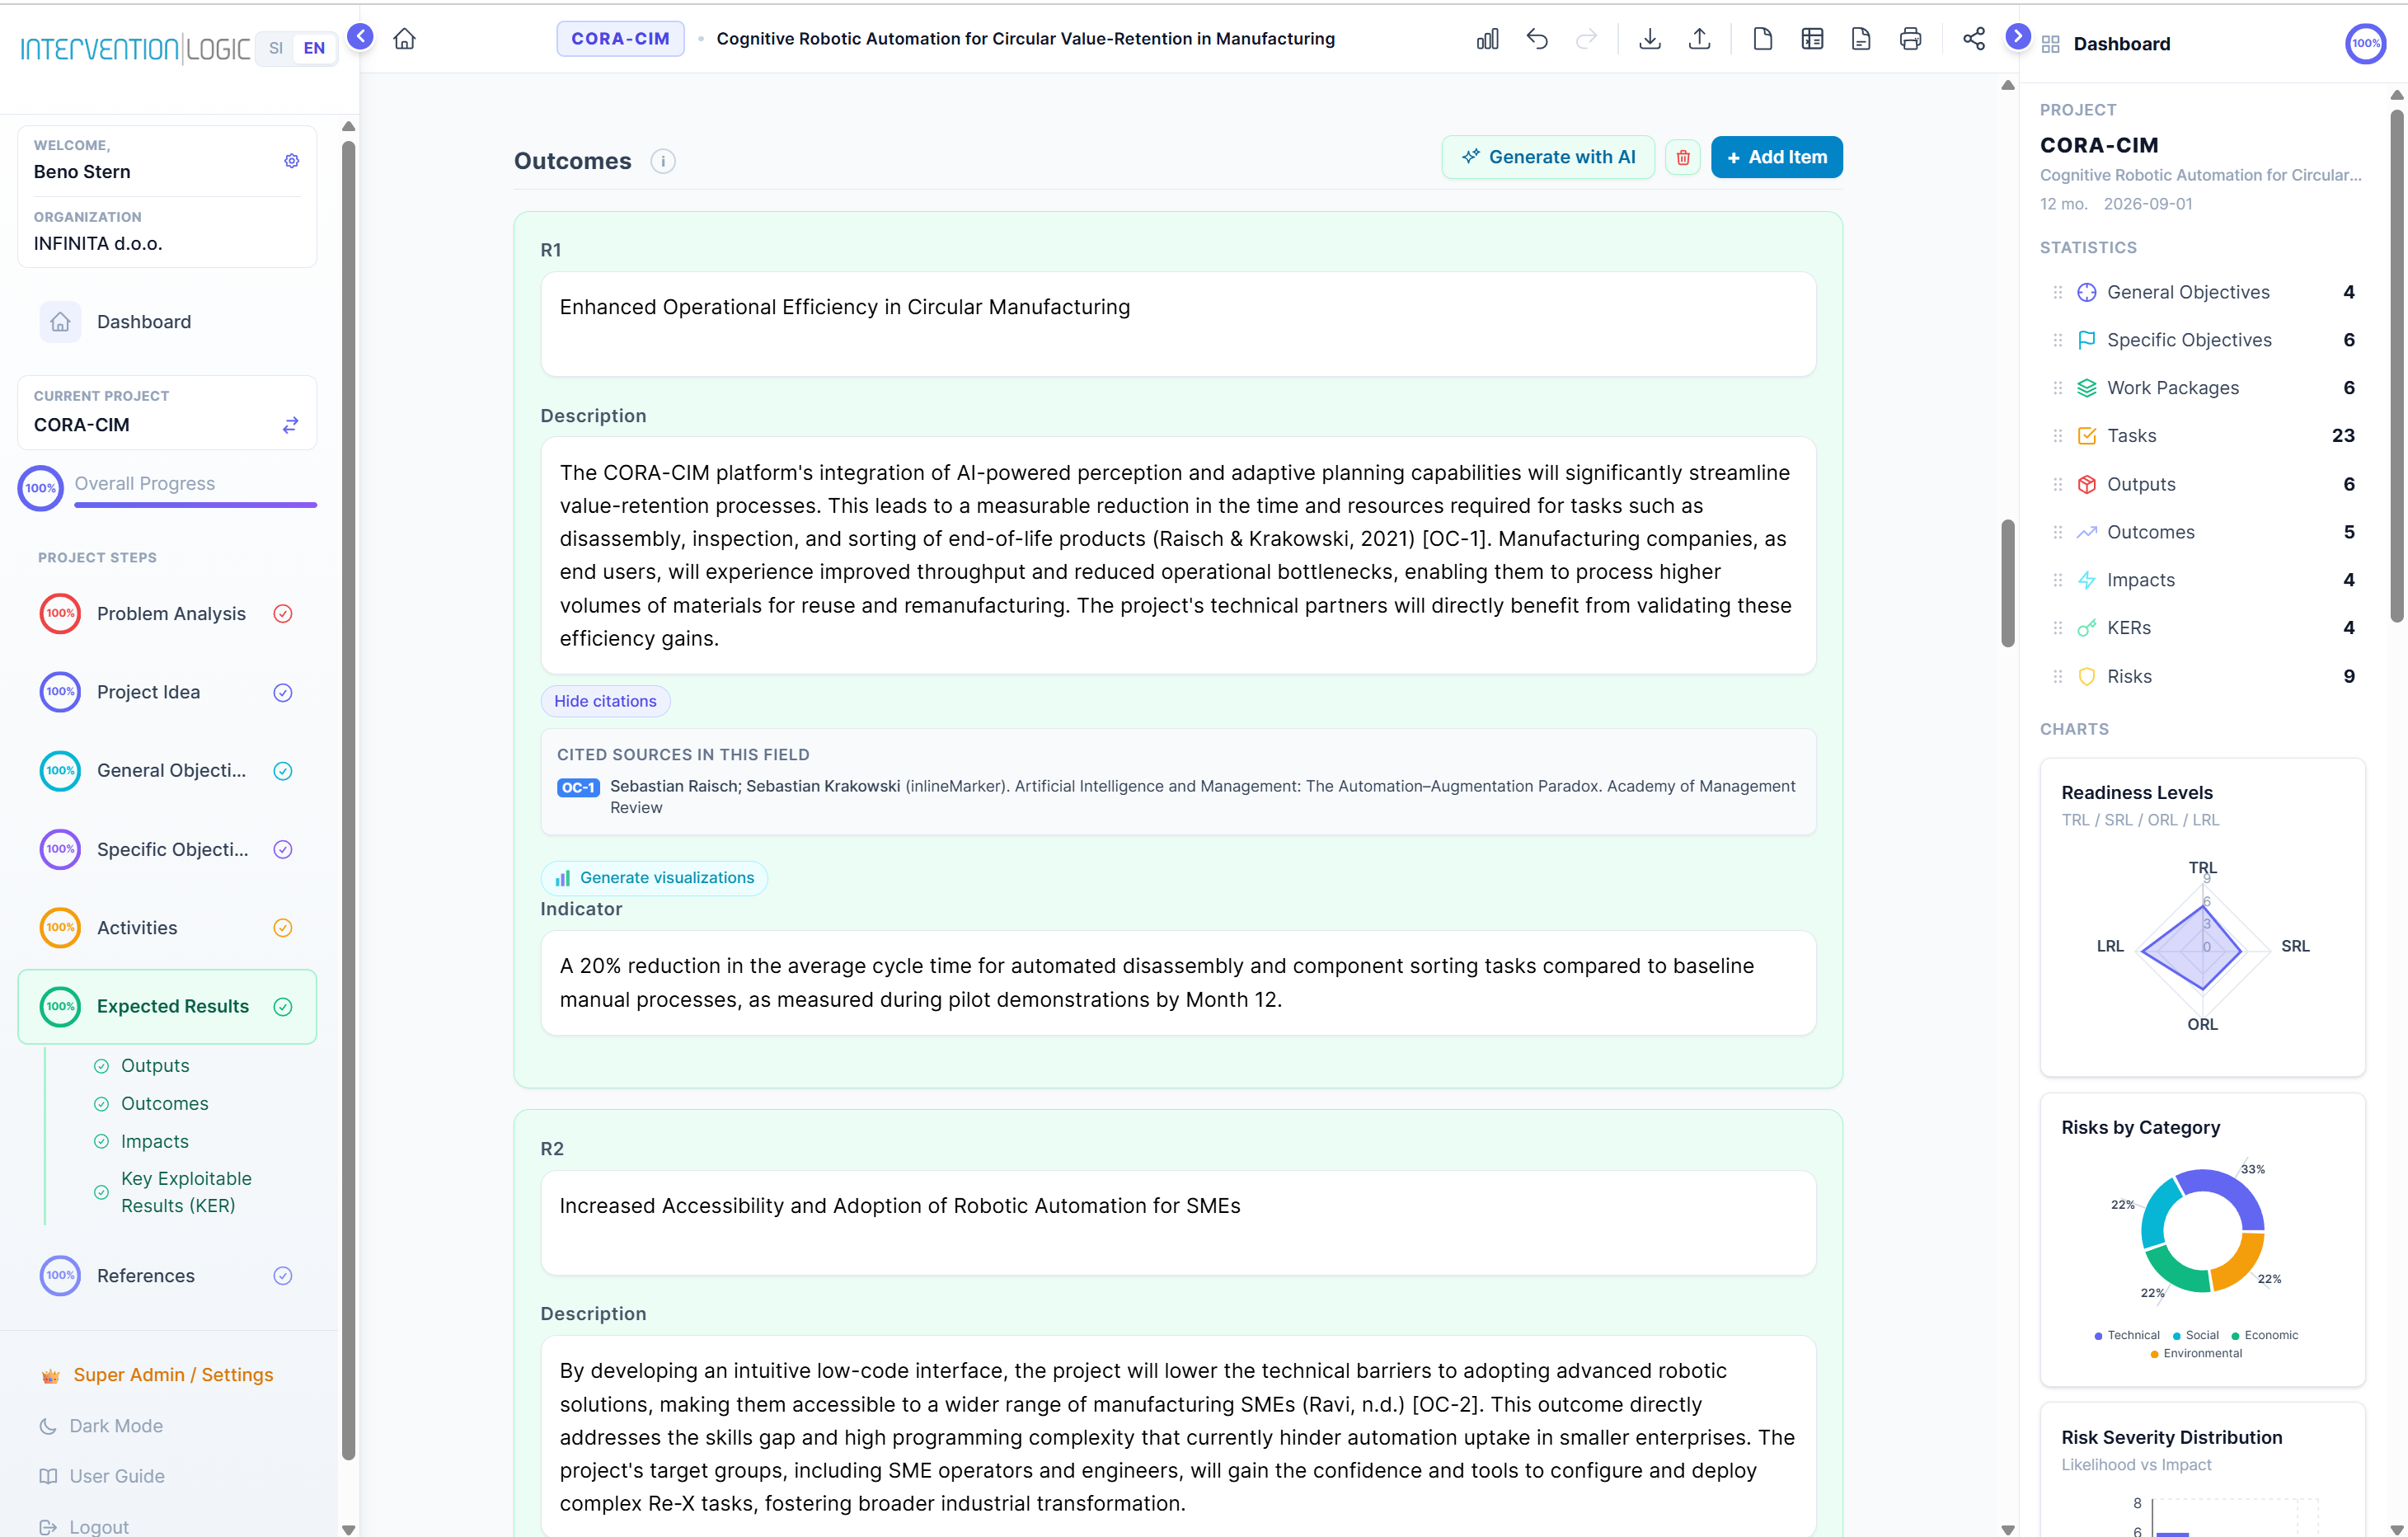
12.2 Outcomes — medium-term measurable changes
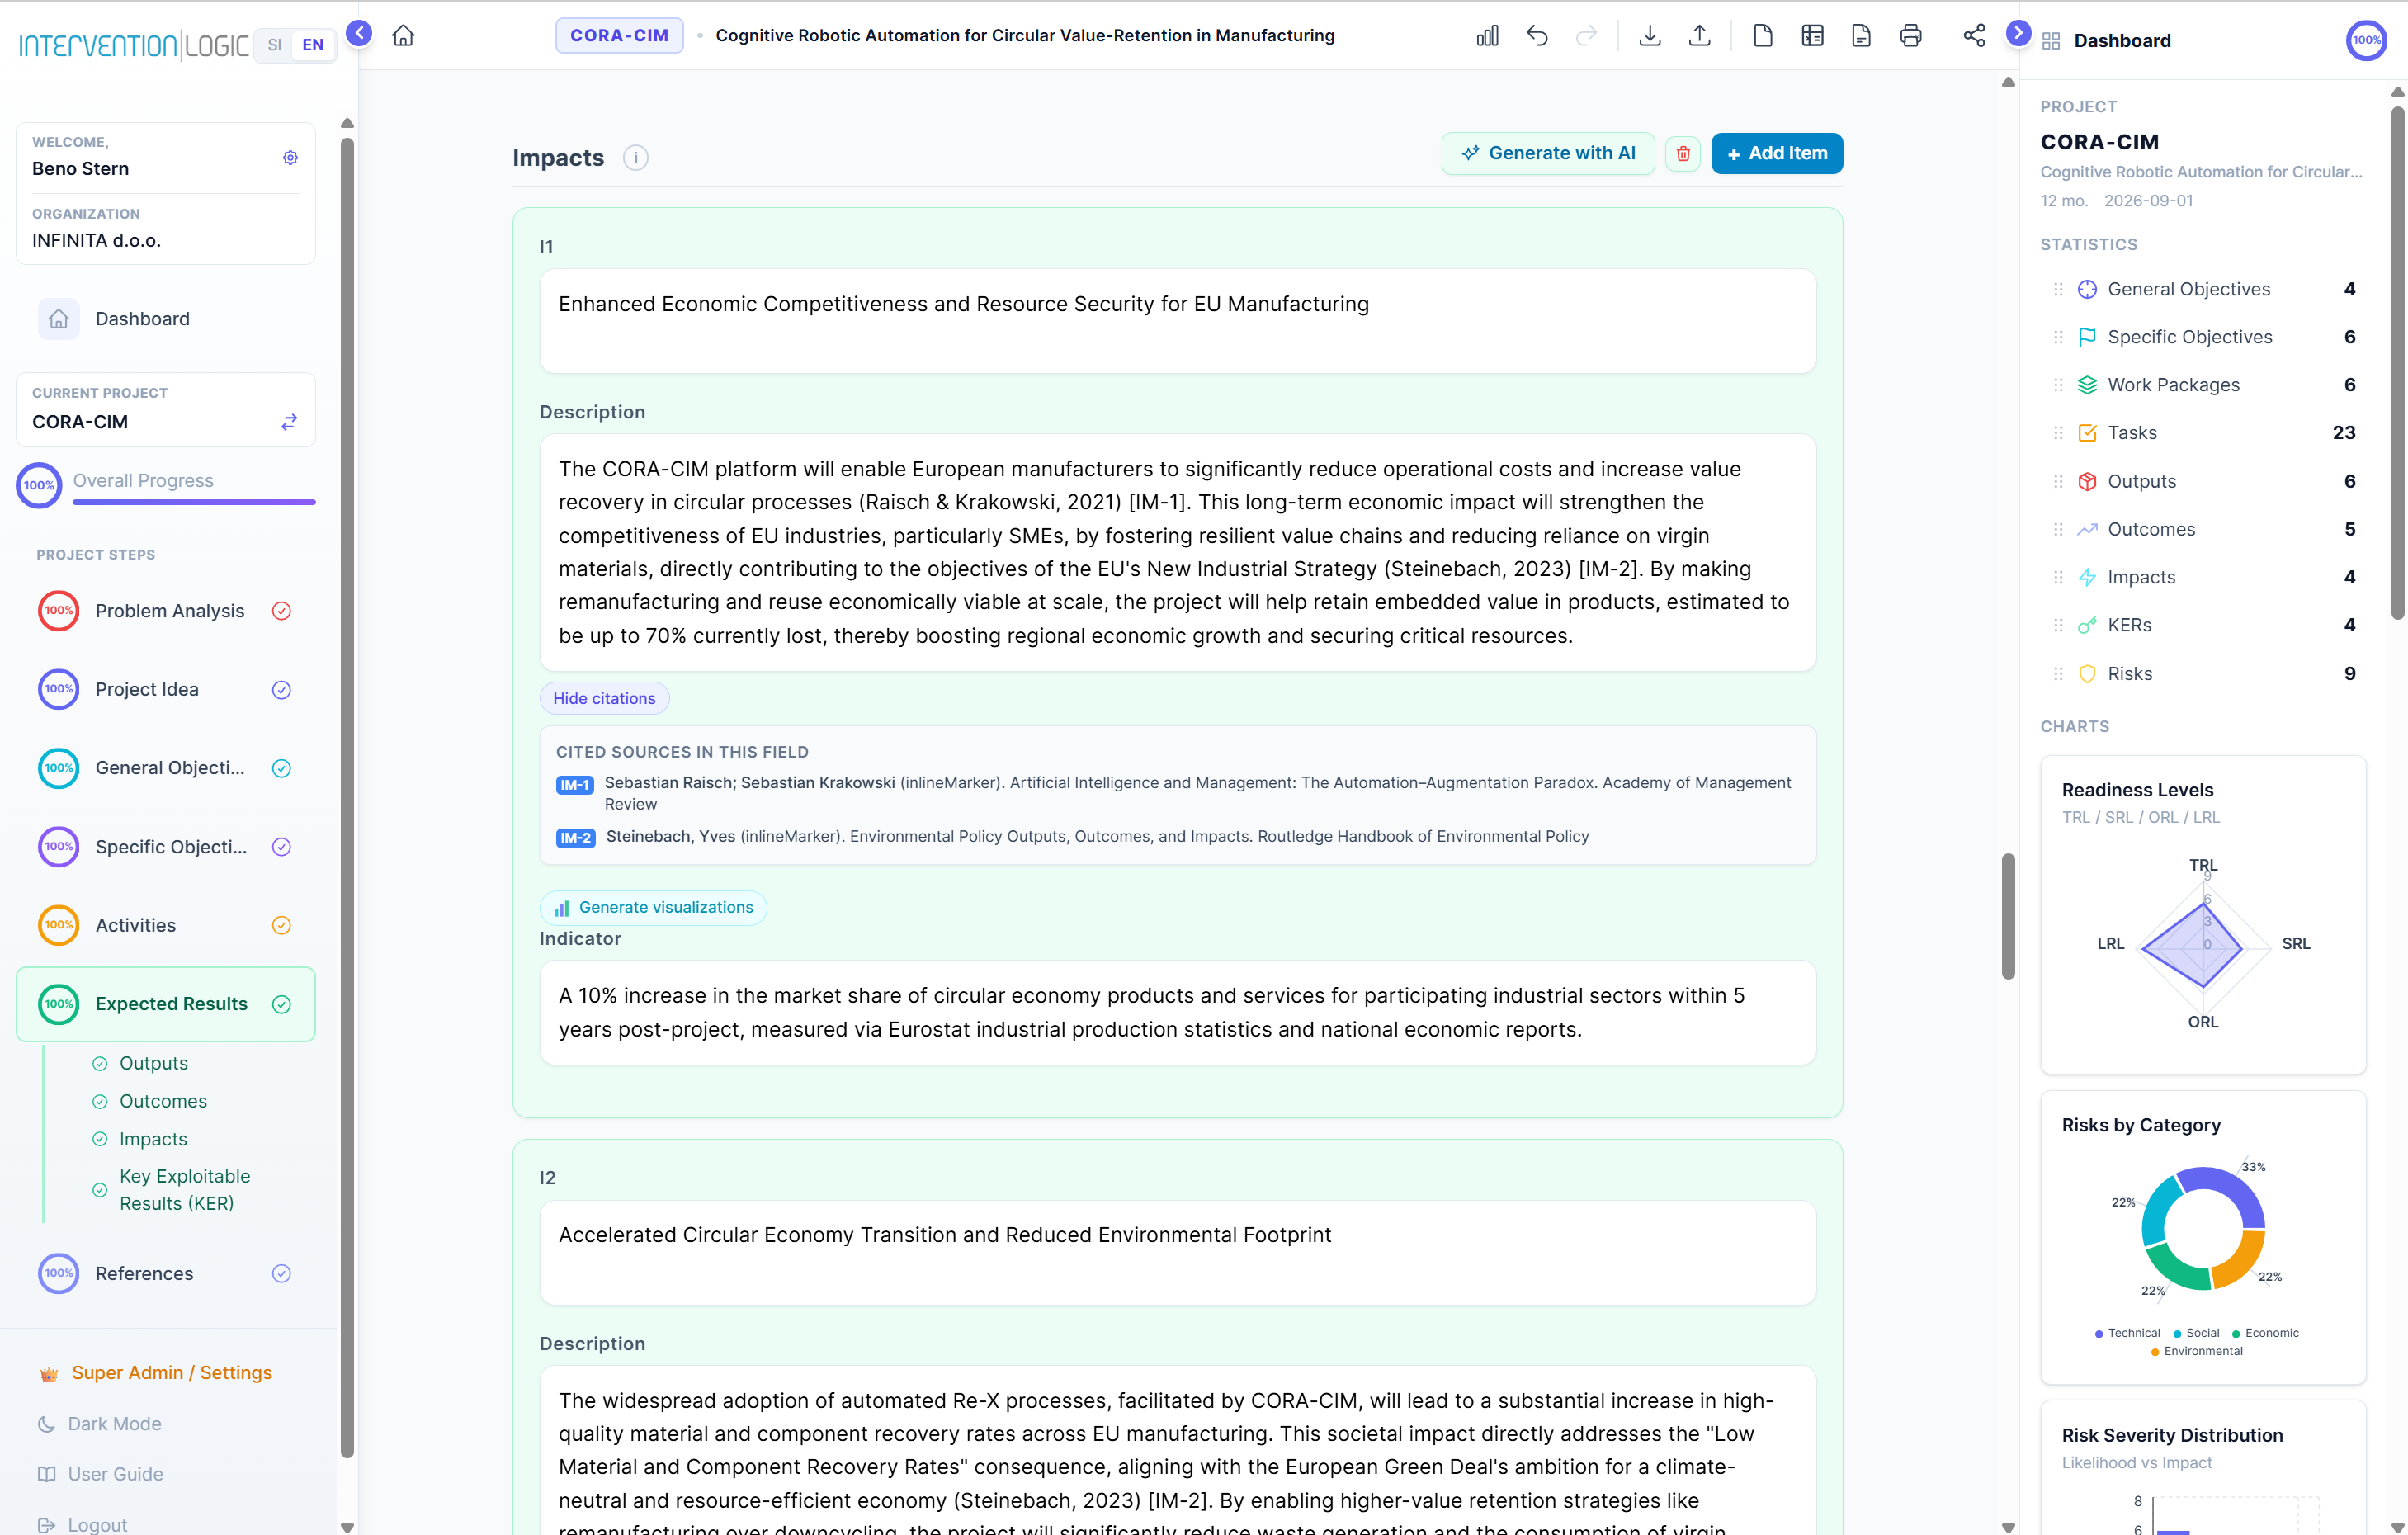
12.3 Impacts — long-term strategic shifts
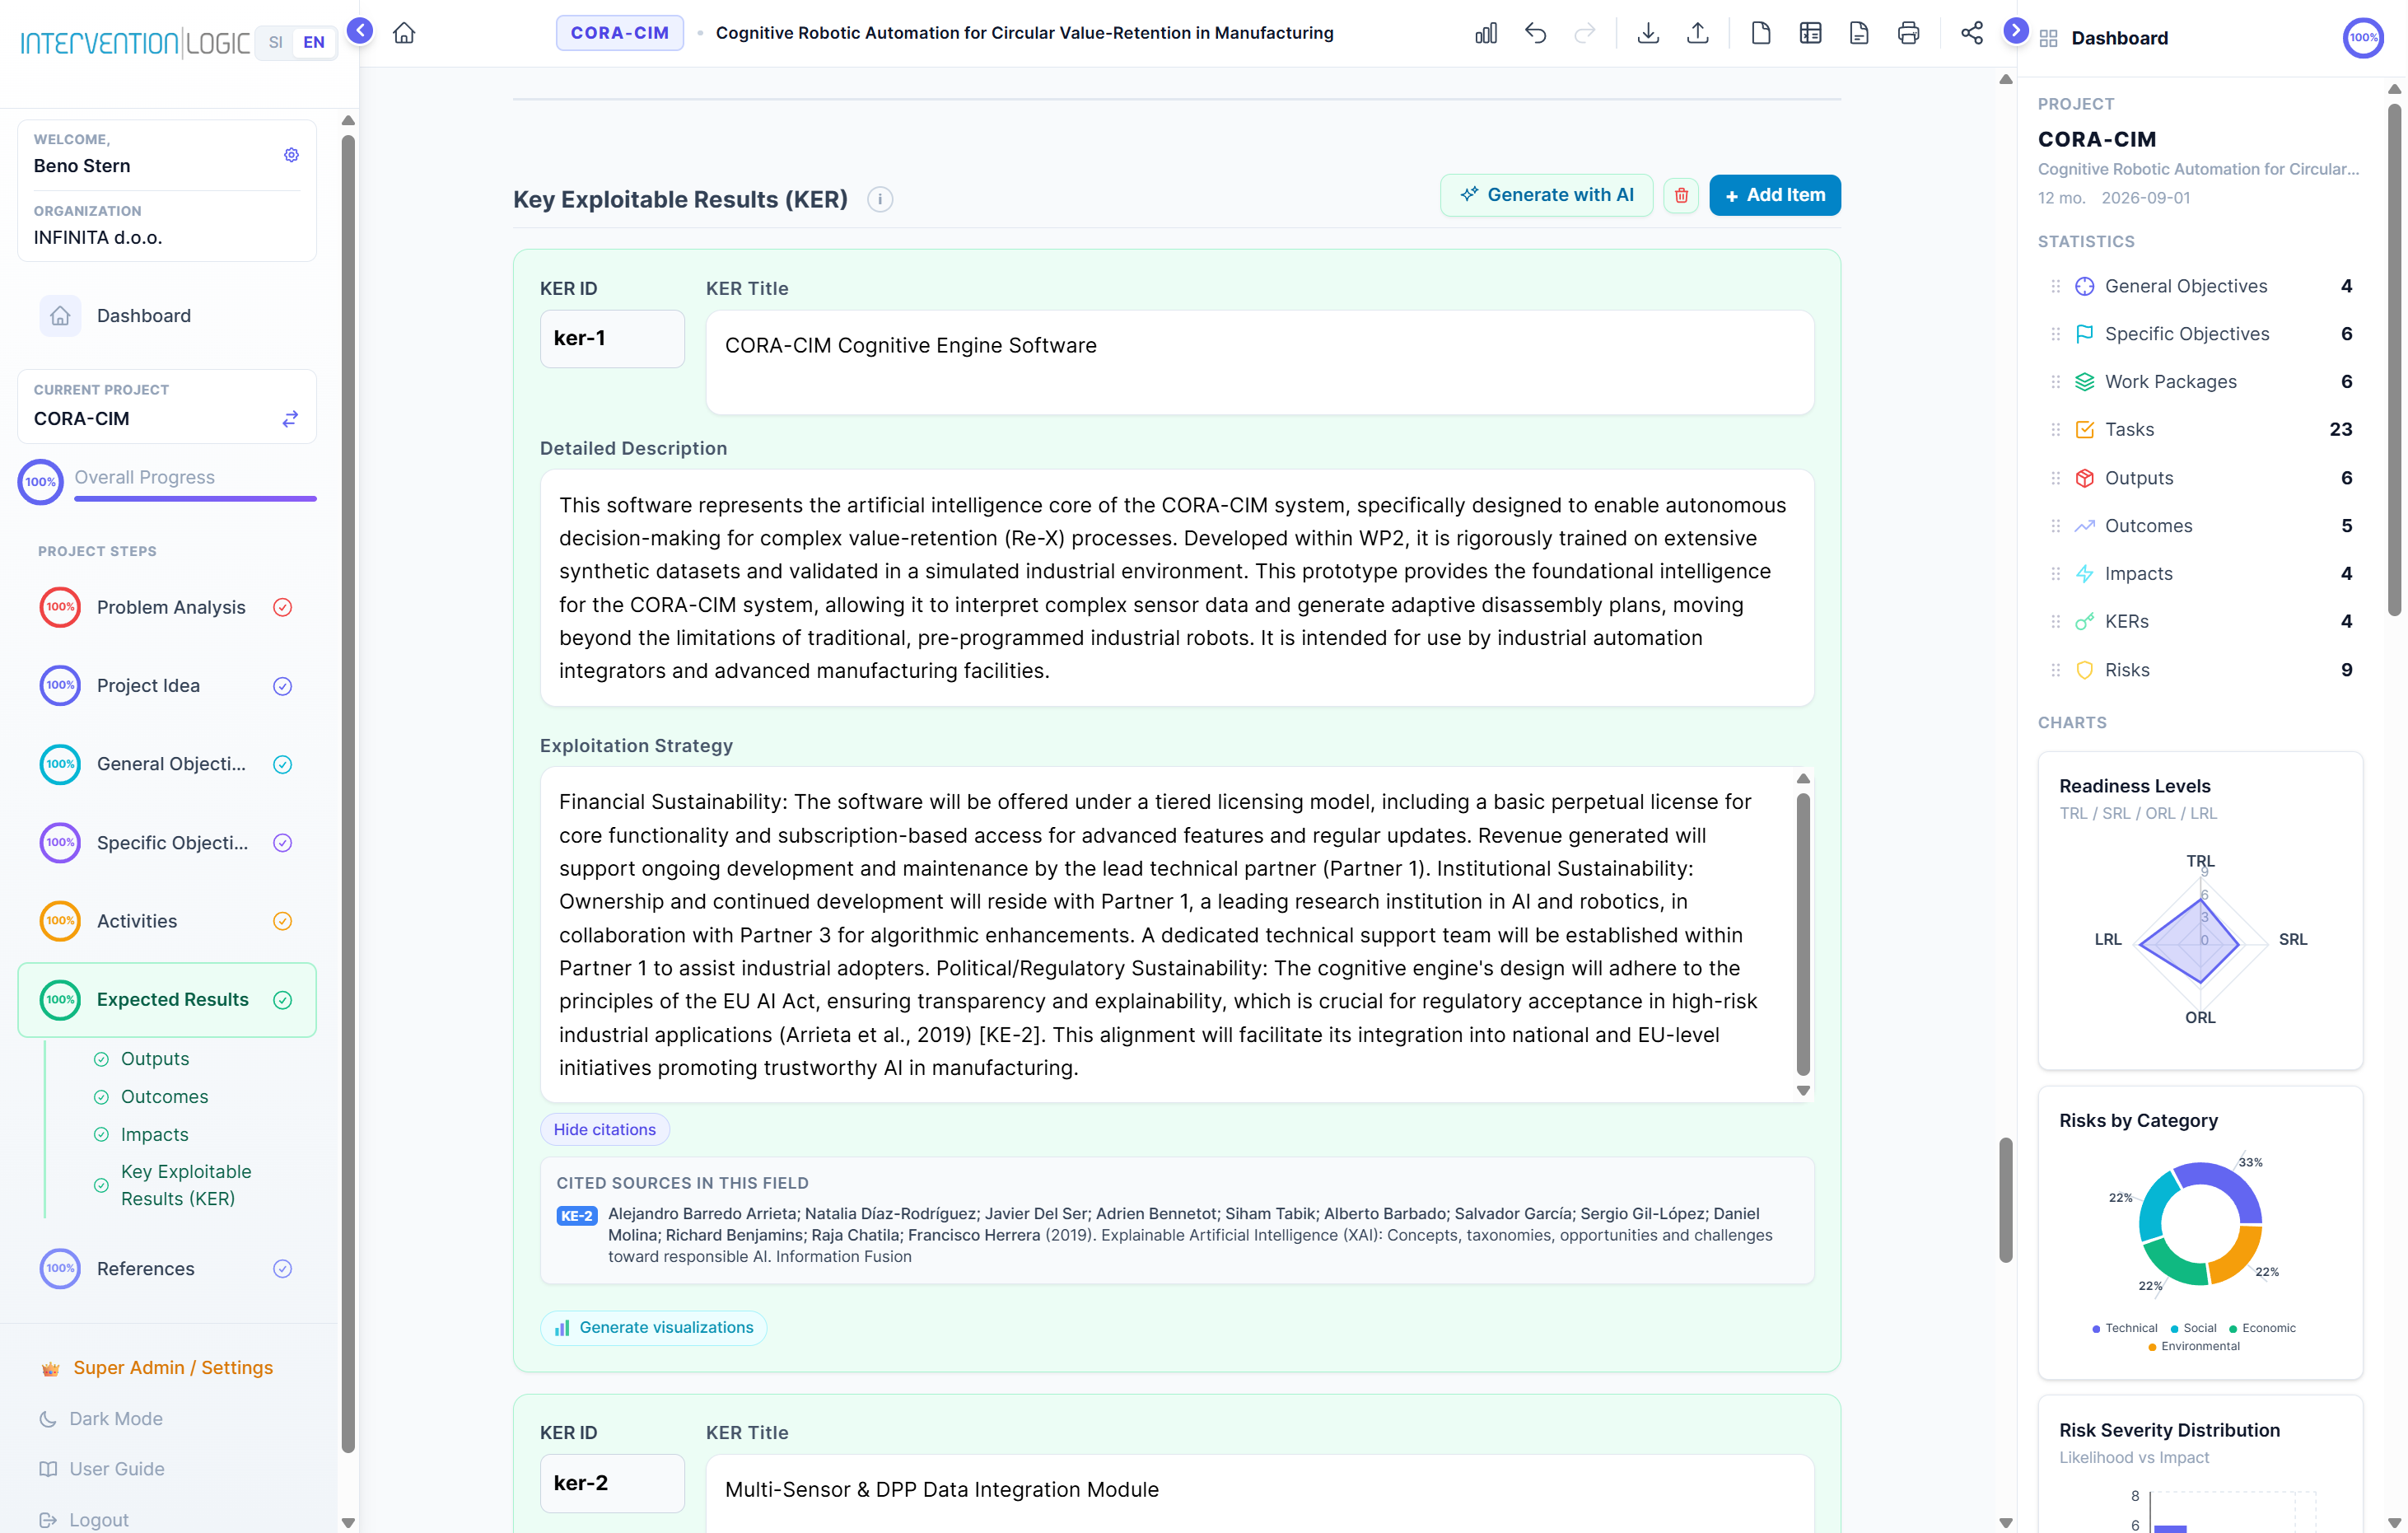
12.4 Key Exploitable Results (KERs) — sustainability pillars
References (Chapter 7) NEW
The References chapter is the seventh and final content step. It provides a full academic citation management system — citations are automatically extracted from the AI-generated content and can be manually enriched, verified, and re-ordered.
How References Are Generated
When AI generates analytical content (Problem Analysis, Project Idea, State of the Art, Objectives, Expected Results), it embeds inline citation markers [1], [2] etc. in the text. The References engine then:
- Extracts all embedded citations from all sections
- Looks up each citation via CrossRef DOI lookup, OpenAlex, and Google Scholar
- Verifies that authors, titles and years are real (hallucination filter)
- Populates the References chapter with verified, formatted entries
- Marks unverifiable citations so you can review or remove them
Citation Types
| Type | Required Fields |
|---|---|
| Journal Article | Authors, Title, Journal, Year, Volume, Issue, DOI |
| Book | Authors, Title, Publisher, Year, ISBN |
| Conference Paper | Authors, Title, Conference Name, Year, Pages, DOI |
| Report | Authors/Organisation, Title, Publisher, Year, URL |
| Website | Title, Organisation, URL, Access Date |
| Thesis | Author, Title, University, Year, Type |
| Other | Free-form entry |
Managing References
| Action | How |
|---|---|
| Add manually | Click "+ Add Reference" and select the citation type |
| Edit fields | Click any reference to expand it and edit fields inline |
| Verify URL | Click the verification icon to check if the source URL is live |
| Reorder | Drag references to change their numbering (affects inline markers) |
| Delete | Click the × button — the inline marker in the text is automatically updated |
| Regenerate | AI re-extracts and re-verifies all citations from the current content |
The AI is strictly forbidden from fabricating authors, DOIs, journal names or URLs. All citations go through a multi-step verification pipeline. Unverified citations are flagged in orange — review and remove them before submitting your proposal.
When you export your project to DOCX, the References chapter is automatically included as a properly formatted bibliography at the end of the document, with all inline [N] markers linked to the corresponding entry.
Reference (Poglavje 7) NOVO
Poglavje Reference je sedmi in zadnji vsebinski korak. Zagotavlja celoten sistem upravljanja akademskih citatov — citati se samodejno izvlečejo iz AI-generirane vsebine in jih je mogoče ročno obogatiti, preveriti in preurediti.
Kako se generirajo reference
Ko AI generira analitično vsebino, vstavi vrstične oznake citatov [1], [2] itd. v besedilo. Nato referenčni sistem:
- Izvleče vse vdelane citate iz vseh sekcij
- Poišče vsak citat prek CrossRef DOI, OpenAlex in Google Scholar
- Preveri, da so avtorji, naslovi in leta realni (filter halucinacij)
- Napolni poglavje Reference s preverjenimi, formatiranimi vnosi
- Označi nepreverljive citate za pregled
Tipi citatov
| Tip | Obvezna polja |
|---|---|
| Članek v reviji | Avtorji, Naslov, Revija, Leto, Volumen, Številka, DOI |
| Knjiga | Avtorji, Naslov, Založnik, Leto, ISBN |
| Konferenčni prispevek | Avtorji, Naslov, Konferenca, Leto, Strani, DOI |
| Poročilo | Avtorji/Organizacija, Naslov, Založnik, Leto, URL |
| Spletna stran | Naslov, Organizacija, URL, Datum dostopa |
| Teza | Avtor, Naslov, Univerza, Leto, Tip |
| Drugo | Prosti vnos |
Upravljanje referenc
| Dejanje | Kako |
|---|---|
| Ročno dodajanje | Kliknite "+ Dodaj referenco" in izberite tip citata |
| Urejanje polj | Kliknite referenco za razširitev in uredite polja neposredno |
| Preverjanje URL | Kliknite ikono za preverjanje, ali je URL vira aktiven |
| Prerazporeditev | Povlecite reference za spremembo številčenja (vpliva na vrstične oznake) |
| Brisanje | Kliknite × — vrstična oznaka v besedilu se samodejno posodobi |
| Regeneracija | AI znova izvleče in preveri vse citate iz aktualne vsebine |
AI-ju je strogo prepovedano izmišljevati avtorje, DOI, ime revij ali URL-je. Vsi citati gredo skozi večstopenjski postopek preverjanja. Nepreverljivi citati so označeni z oranžno — preglejte in jih odstranite pred oddajo predloga.
Ko izvozite projekt v DOCX, je poglavje Reference samodejno vključeno kot pravilno formatirana bibliografija na koncu dokumenta z vsemi vrstičnimi oznakami [N].
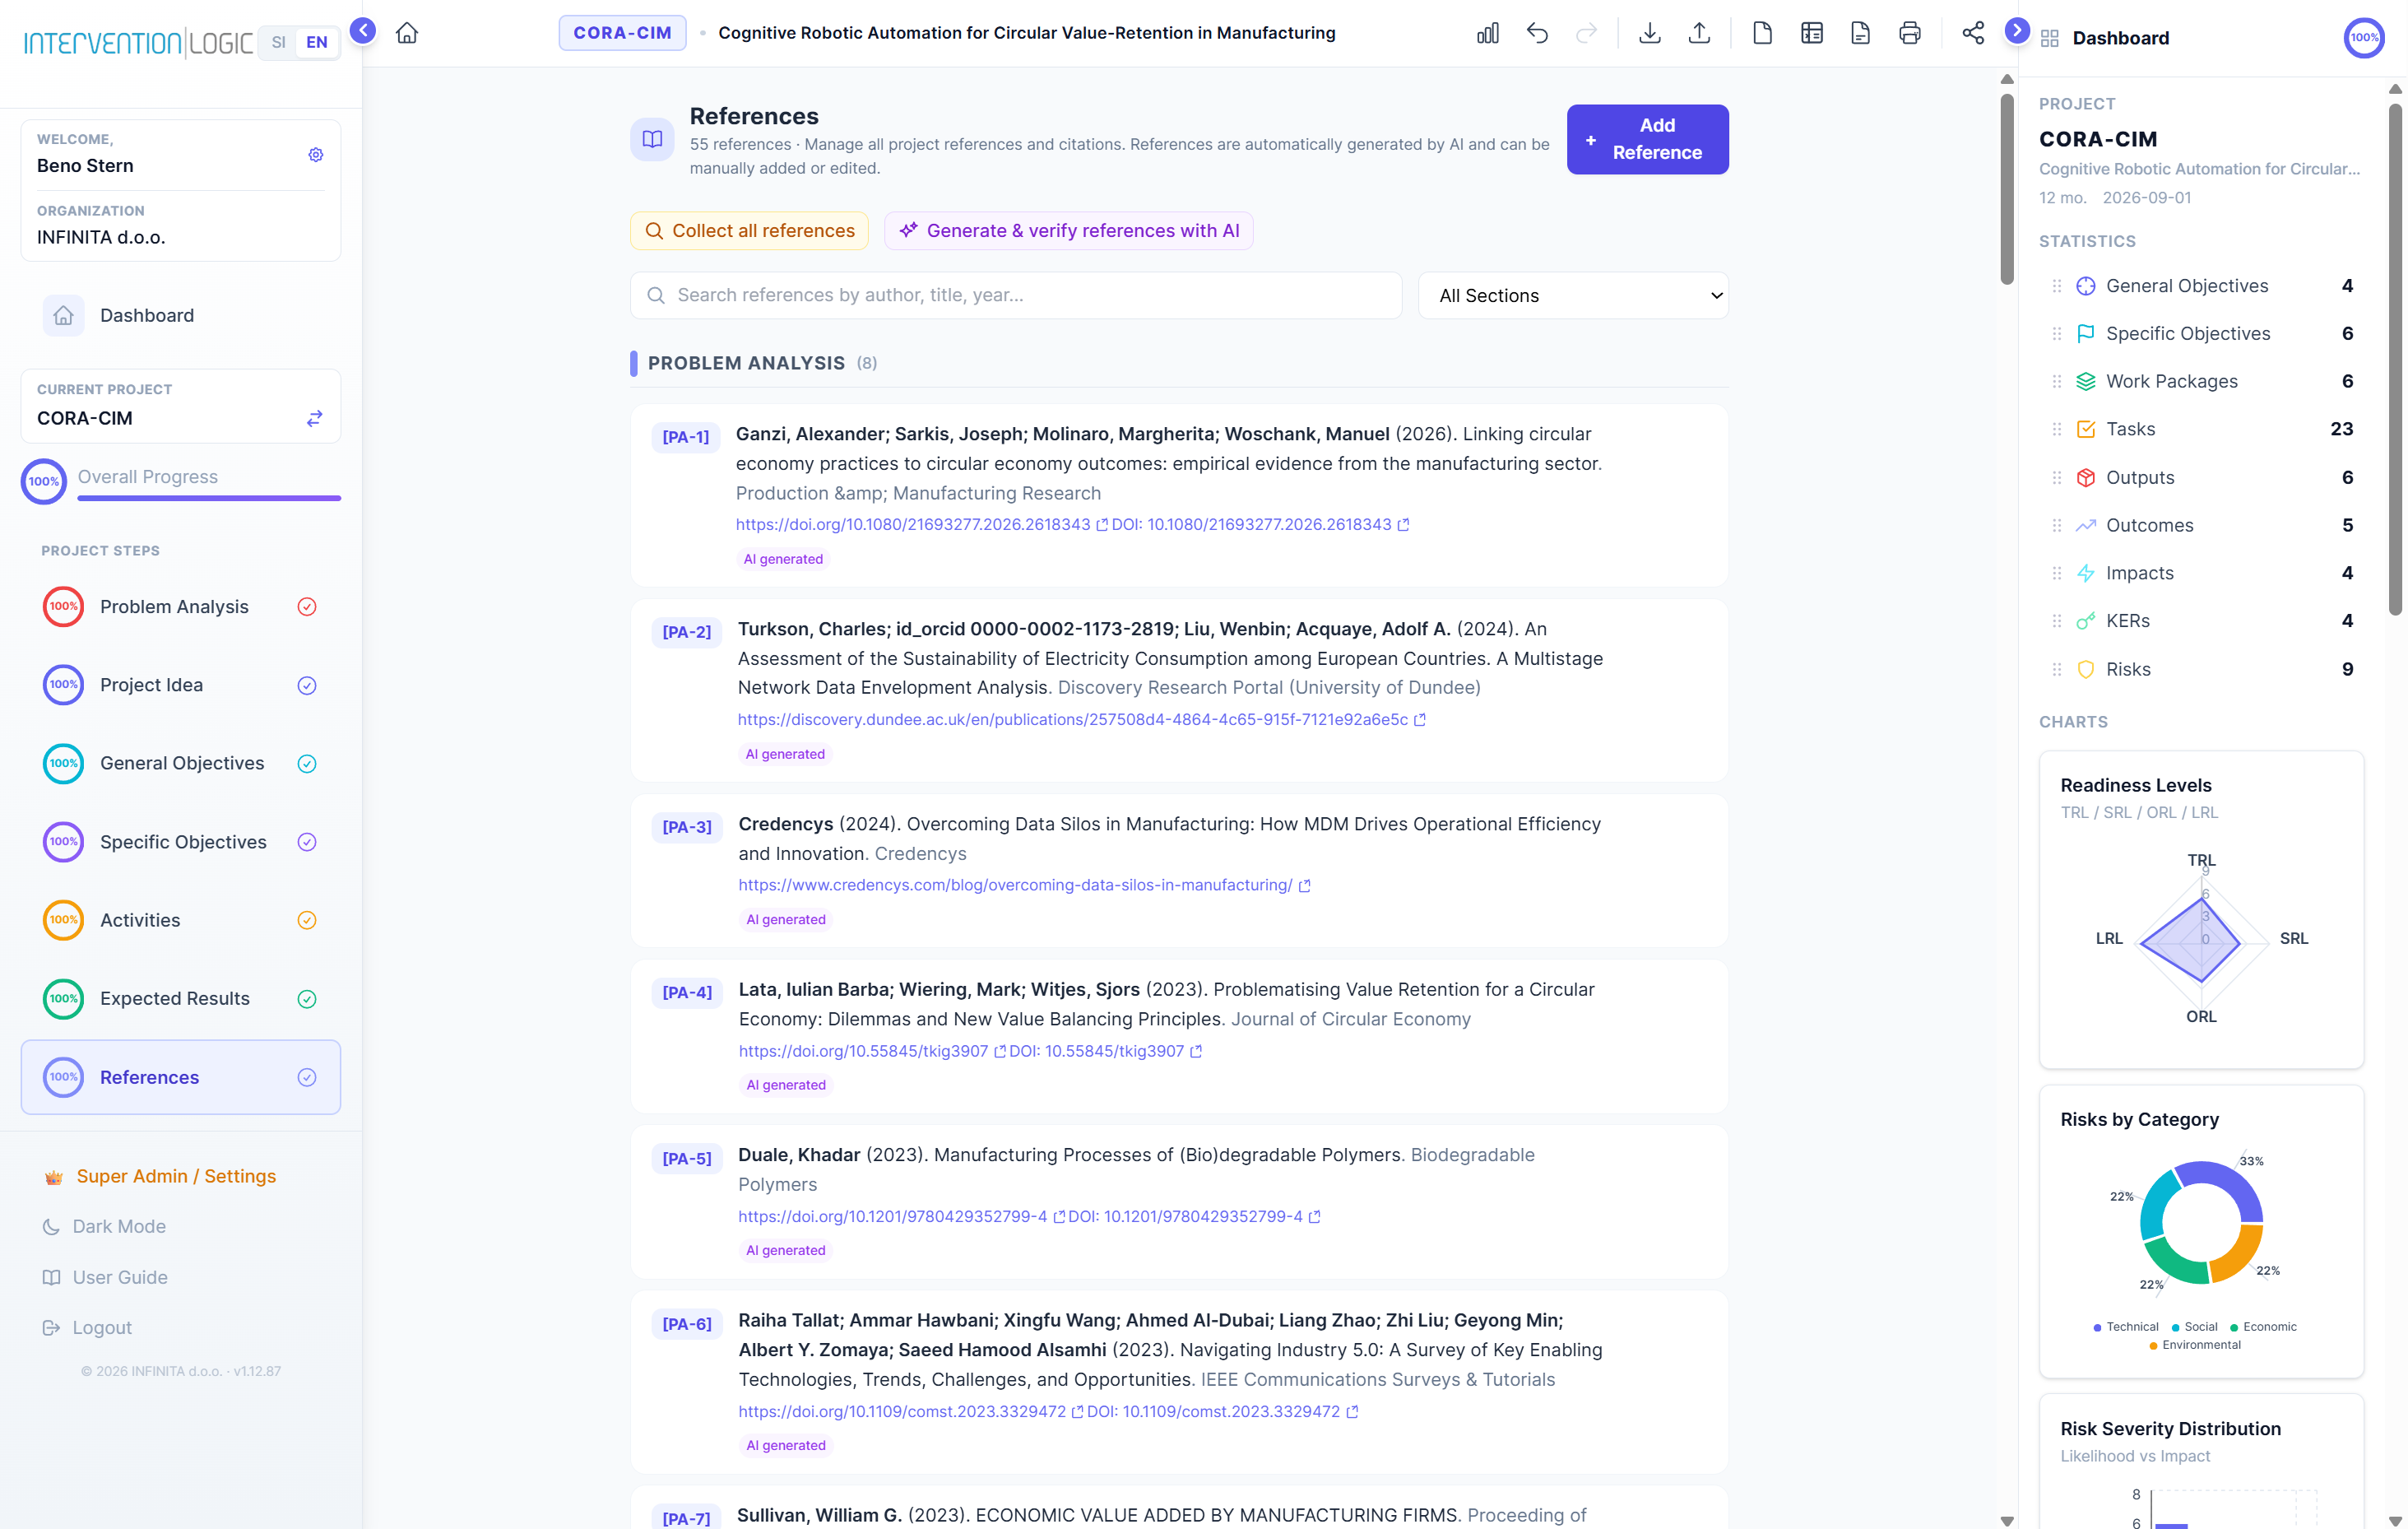
References — Chapter 7: verified academic citations with inline markers and type classification
13. Partnership (Consortium)
| Field | Description |
|---|---|
| Code | CO (coordinator), P2, P3, P4, etc. |
| Name | Organisation TYPE description — never real names |
| Partner Type | Dropdown: faculty, researchInstitute, sme, publicAgency, ngo, etc. |
| Expertise | What this partner brings and which WPs they contribute to |
| PM Rate | Person-month cost rate in EUR (2,500–7,000) |
Click Regenerate for a balanced consortium. Click "+ Add Partner" to add manually.
13. Partnerstvo (Konzorcij)
| Polje | Opis |
|---|---|
| Koda | CO (koordinator), P2, P3, P4 itd. |
| Ime | Opis TIPA organizacije — nikoli pravih imen |
| Tip partnerja | Fakulteta, raziskovalni inštitut, MSP, javna agencija, NVO itd. |
| Strokovno znanje | Kaj partner prinaša in katerim DS prispeva |
| PM stopnja | Stroški osebnega meseca v EUR (2.500–7.000) |
Kliknite Regeneriraj za uravnotežen konzorcij. "+ Dodaj partnerja" za ročno dodajanje.
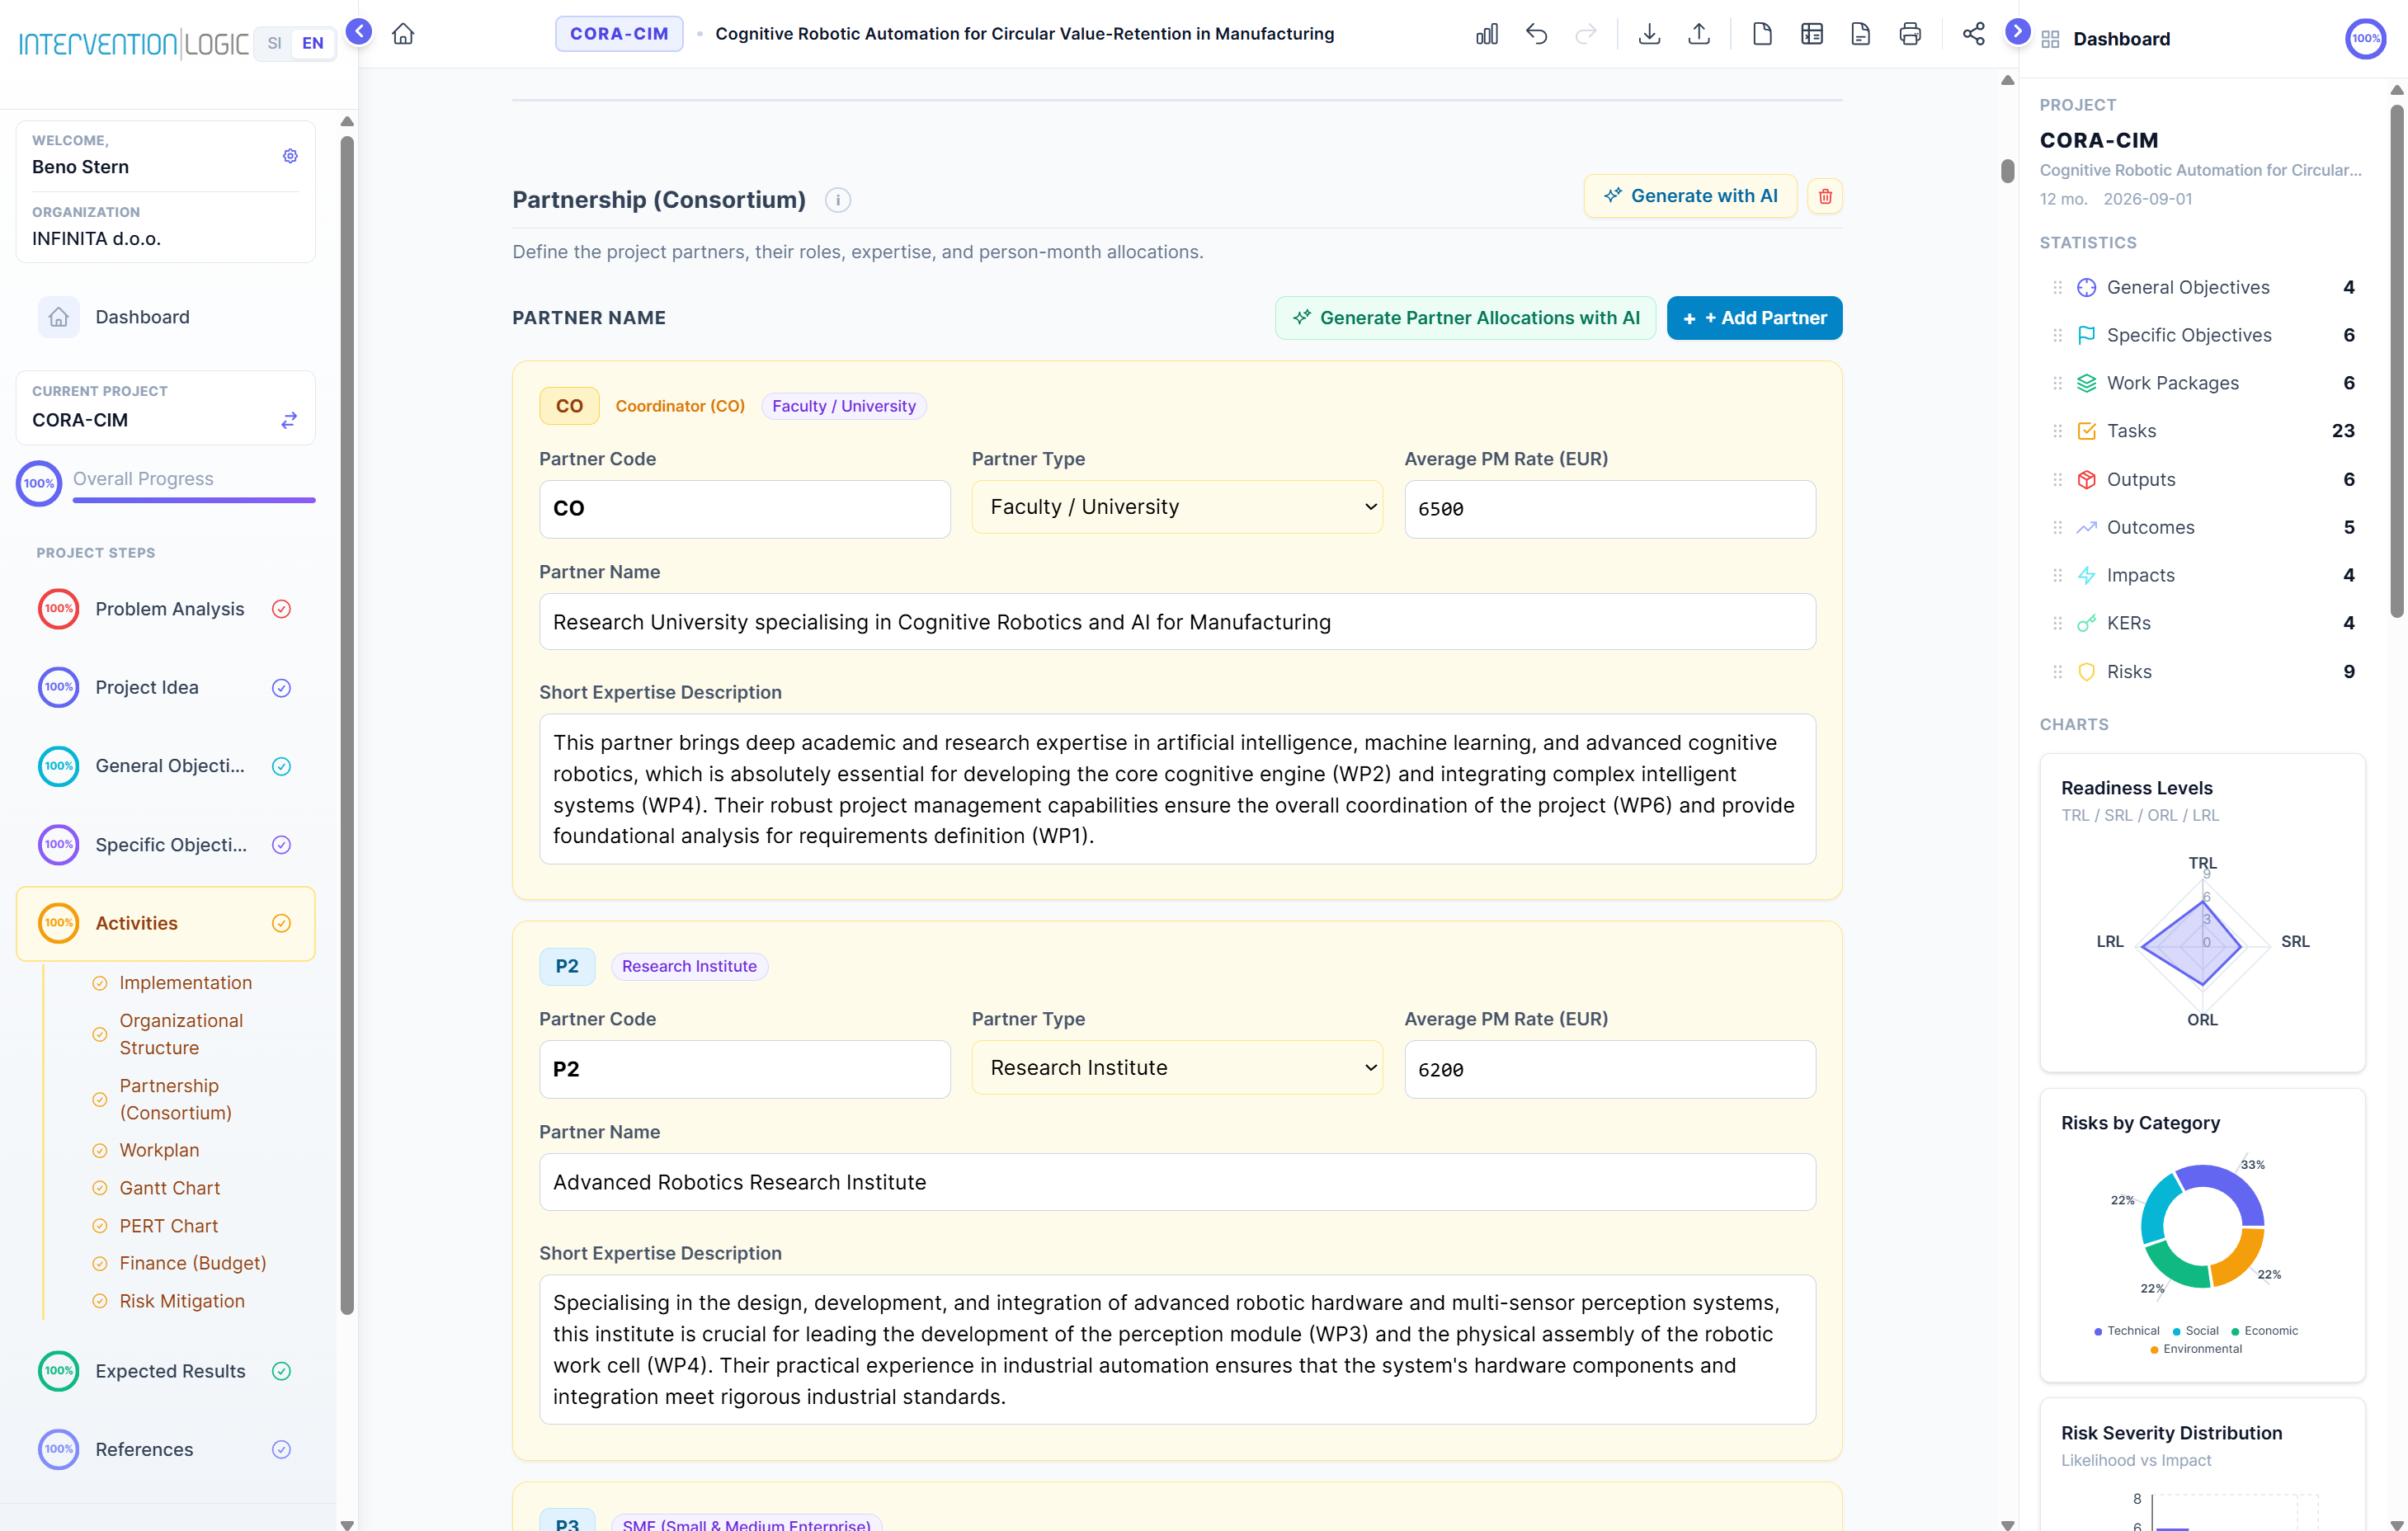
Partnership — consortium partners, roles, and PM rates
14. Finance (Budget Allocation)
14.1 Cost Category Configuration NEW
Before generating allocations, configure which cost categories are active for your project. This two-panel modal controls what the AI budgets and what columns appear in the breakdown table.
- Click "⚙ Cost Category Configuration" at the top of the Finance section
- Left panel — Direct cost categories: Enable/disable which categories apply to your project
- Right panel — Indirect costs: Set the flat-rate percentage and choose which direct categories it applies to
- Optionally set custom labels for categories (e.g. rename "Materials" to "Consumables")
- Click "Save" — your configuration is remembered for all future AI generations
Cost Categories by Funding Model
Centralized (EU)
- Labour / Staff (mandatory)
- Sub-contractor costs
- Travel costs
- Materials / Consumables
- Depreciation of equipment
- Other project costs
- Investment costs
Decentralized
- Salaries & reimbursements (mandatory)
- External service providers
- VAT
- Investments — intangible assets
- Depreciation of basic assets
- Information & communication
- Investments — tangible assets
The Labour/Salaries category cannot be disabled — it is required by EU regulations. All other categories are optional and depend on your specific call requirements.
Indirect Cost (Flat Rate) Settings
Configure how overhead/indirect costs are calculated in the right panel of the Cost Configuration modal:
| Setting | Description |
|---|---|
| Flat rate % | Percentage applied to selected direct costs (e.g. 7%, 15%, 25%) |
| Base categories | Which direct cost categories the % is applied to (checkboxes) |
| Result | Indirect cost = Sum of selected base × flat rate %. Auto-calculated in every row of the breakdown table. |
Most EU programmes allow 25% on direct personnel costs only as a standard flat rate. Some programmes (e.g. Erasmus+) use 7% on all direct costs. Always check your specific programme guide.
14.2 AI-Generated Allocations
Click "🤖 Generate Partner Allocations with AI" to let the AI distribute partners across all tasks with realistic hours, person-months, and costs that follow EU budget rules. The AI applies task-type-specific rules (e.g. Labour ≥ 60% of direct costs) and respects your cost category configuration.
- Complete Cost Category Configuration first (step 14.1 above)
- Click "🤖 Generate Partner Allocations with AI"
- Review results in the table below and adjust manually if needed
14.3 EU Budget Rules
| Total Budget | Max % for Project Management WP |
|---|---|
| up to 500,000 EUR | 15% |
| 500,001 – 1,000,000 | 10% |
| 1,000,001 – 3,000,000 | 10% |
| 3,000,001 – 5,000,000 | 7% |
| over 5,000,000 | 5–7% |
Dissemination WP ≈ 15%. Remaining budget distributed proportionally across content WPs. All values can be manually adjusted after generation.
14.4 Per-Task Cost Breakdown Table NEW
Below the summary charts is a spreadsheet-style editable table — the most powerful way to manage your budget. It shows every partner allocation per task, grouped by Work Package.
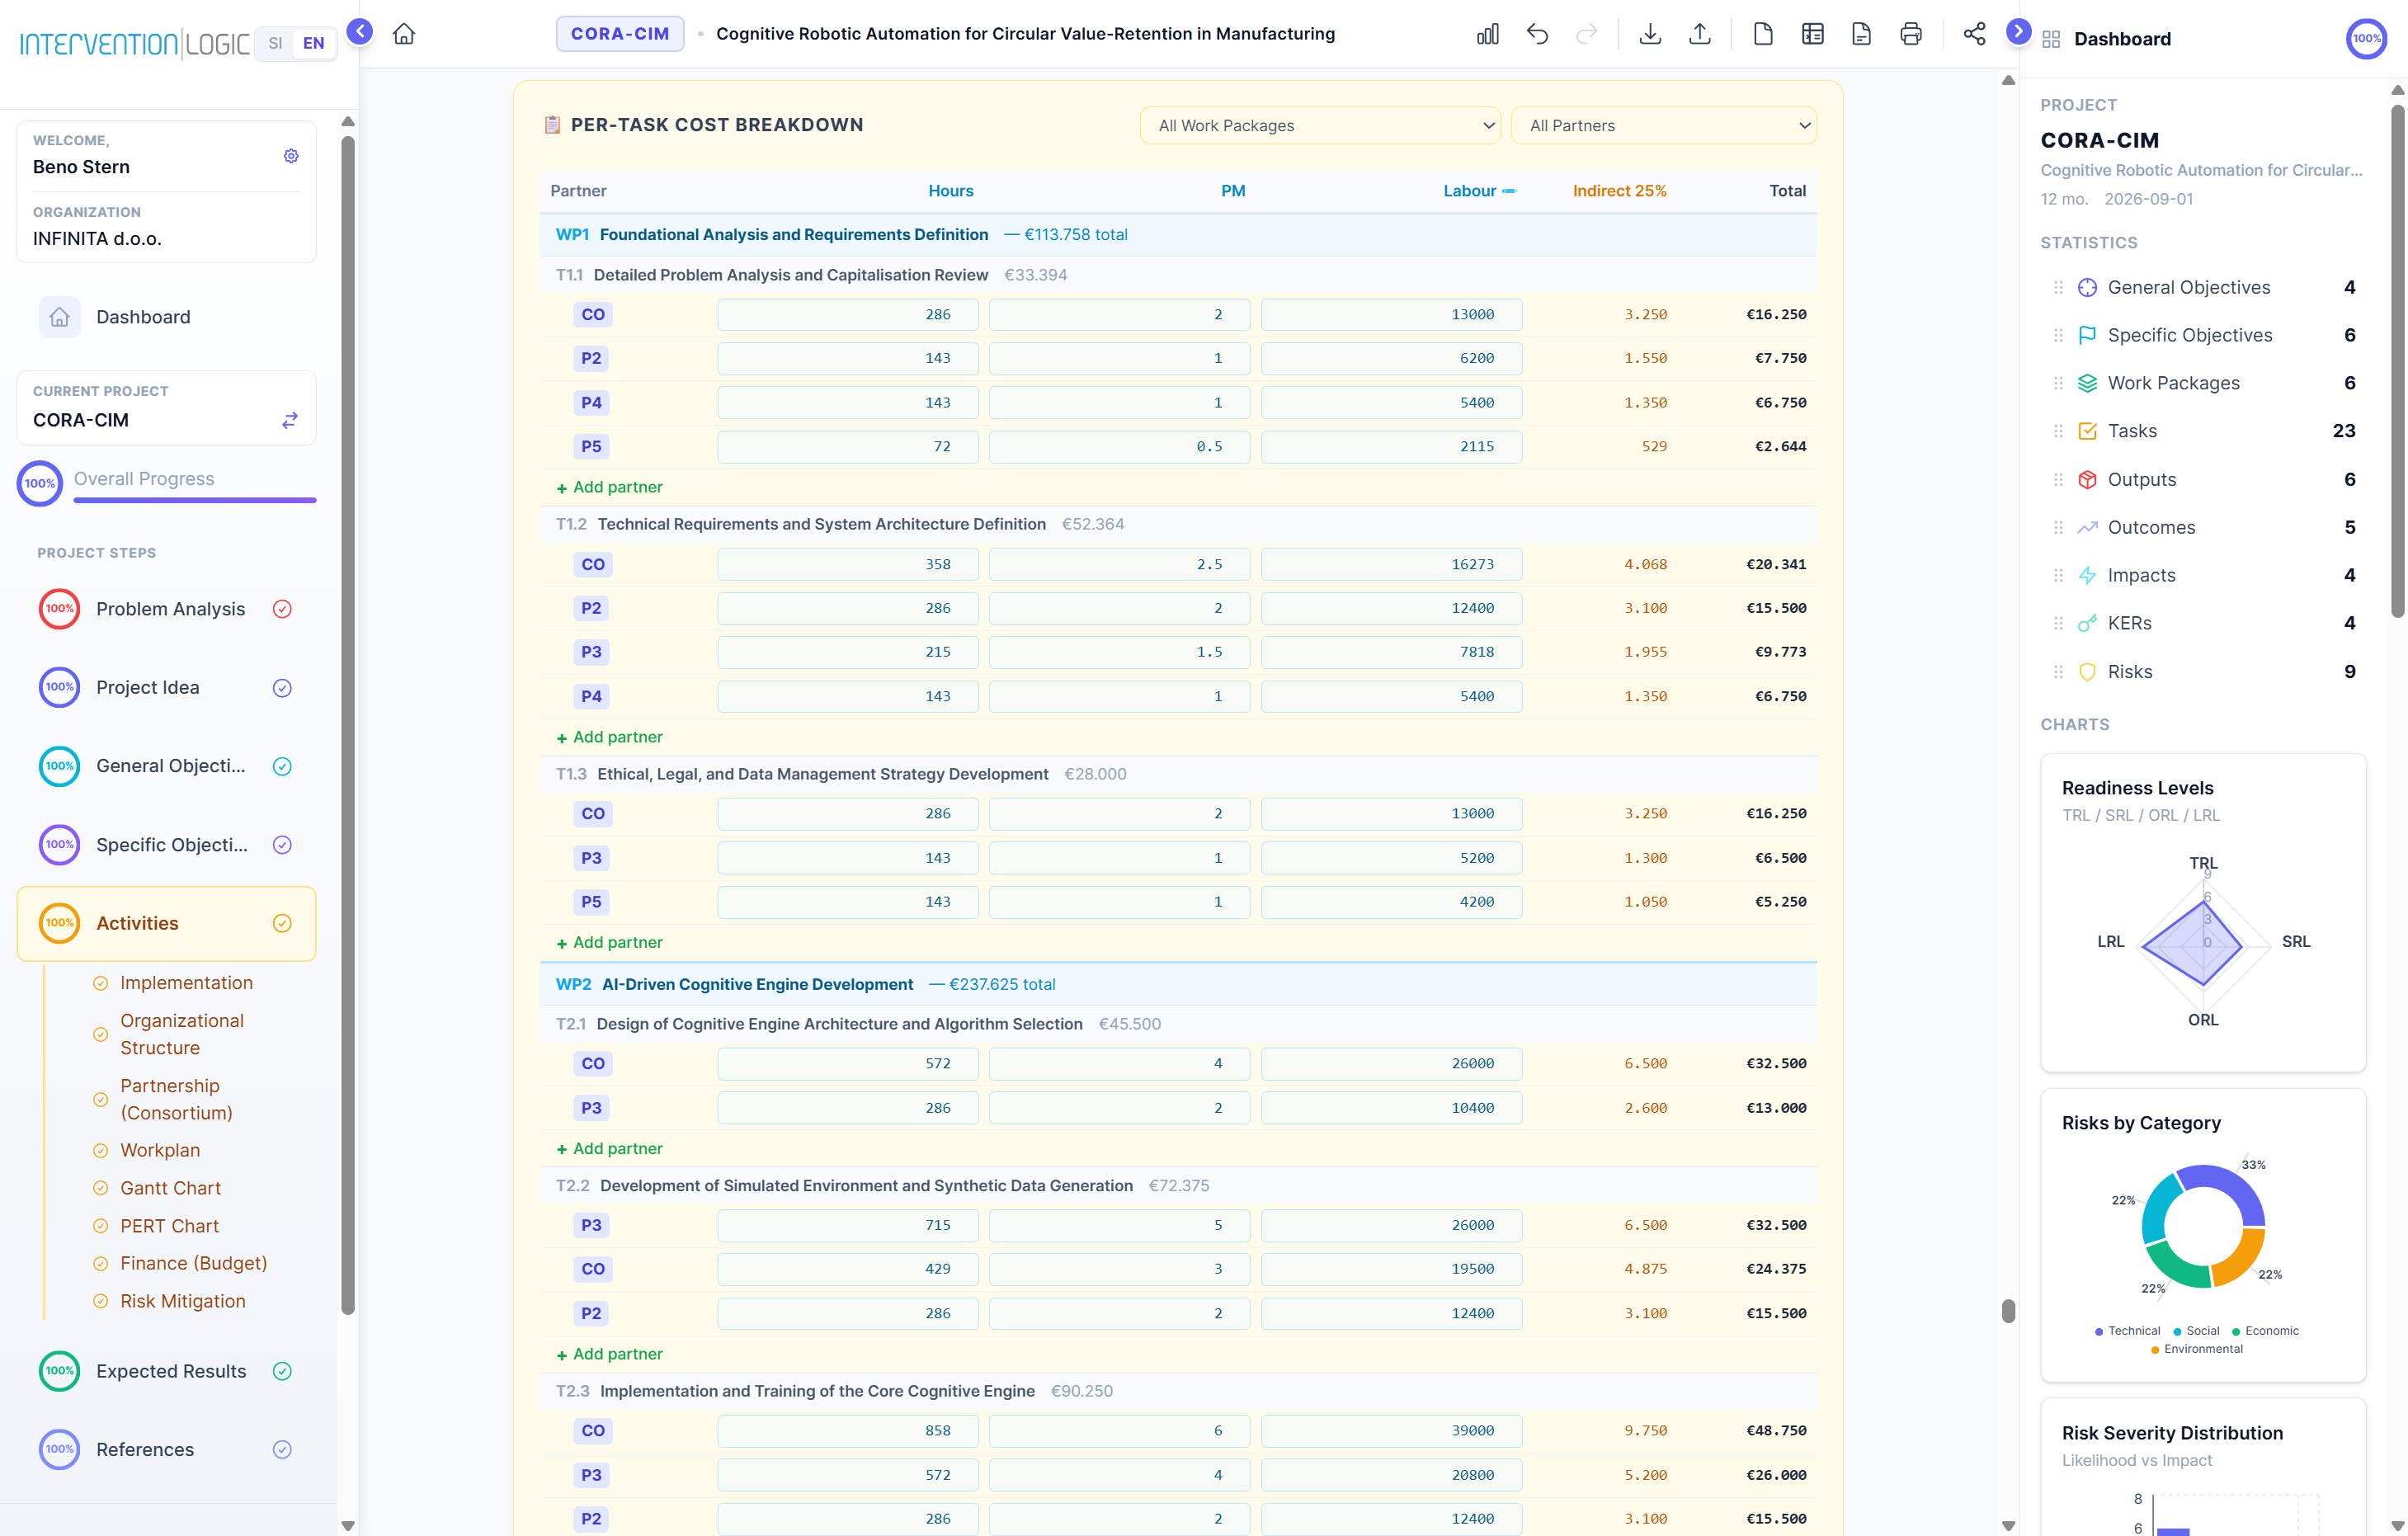
Per-Task Cost Breakdown Table — editable inline with partner allocations
| Column | Colour | Editable | Description |
|---|---|---|---|
| Partner | — | — | Partner code badge. Hover to show × remove button. |
| Hours | Sky blue | ✅ Yes | Person-hours. Changing recalculates PM and Labour amount. |
| PM | Sky blue | ✅ Yes | Person-months (1 PM = 143 h). Recalculates Hours and Labour. |
| Labour | Sky blue | ✅ Yes | Labour cost = Hours × (PM Rate / 143). Recalculates Hours and PM. |
| Other categories | Indigo | ✅ Yes | Travel, Materials, Equipment, etc. Edit inline. |
| Indirect | Amber | ❌ Auto | Calculated automatically from Indirect Cost Settings %. |
| Total | — | ❌ Auto | Direct + Indirect costs. |
Any of the three labour columns (Hours, PM, Amount) can be edited — the other two will automatically recalculate. Formula: Labour = Hours × (partnerRate / 143). This ensures budget consistency at all times.
14.5 Adding and Removing Partners per Task NEW
You can directly manage which partners work on each task inside the cost breakdown table — without regenerating everything with AI.
Adding a Partner
- Scroll to the task you want in the breakdown table
- At the bottom of the task's rows, click the green "+ Add partner" button
- A dropdown appears listing only partners not yet assigned to that task
- Select a partner — they are immediately added with Hours = 0, PM = 0
- Enter their hours, PM, or labour amount in the newly appeared row
If all project partners are already assigned to a task, the "+ Add partner" button does not appear for that task.
Removing a Partner
- Hover your mouse over the partner row you want to remove
- A red ✕ button appears to the left of the partner badge
- Click ✕ — the allocation is immediately removed
Tasks that have no partner allocations at all still appear in the table with a "No partners assigned" placeholder and the "+ Add partner" button, so you can build up allocations from scratch.
14.6 Filters
Use the Work Package and Partner dropdown filters at the top of the table to narrow the view. Useful for large projects with many WPs and partners.
14. Finance (Razdelitev proračuna)
14.1 Konfiguracija stroškovnih kategorij NOVO
Pred generiranjem razdelitev konfigurirajte, katere stroškovne kategorije so aktivne za vaš projekt. To dvopanelno modalno okno nadzira, kaj AI proračunira in kateri stolpci se prikažejo v tabeli.
- Kliknite "⚙ Konfiguracija stroškovnih kategorij" na vrhu sekcije Finance
- Levi panel — neposredne kategorije: Omogočite/onemogočite kategorije za vaš projekt
- Desni panel — posredni stroški: Nastavite pavšalni odstotek in izberite osnovne kategorije
- Po želji nastavite prilagojene oznake (npr. preimenujte "Materiali" v "Potrošni material")
- Kliknite "Shrani" — konfiguracija se ohrani za vsa prihodnja AI generiranja
Stroškovne kategorije po modelu financiranja
Centralizirani (EU)
- Dela / Osebje (obvezno)
- Stroški podizvajalcev
- Potni stroški
- Materiali / potrošni material
- Amortizacija opreme
- Drugi stroški projekta
- Investicijski stroški
Decentralizirani
- Plače in povračila (obvezno)
- Zunanji izvajalci
- DDV
- Investicije — neopredmetena sredstva
- Amortizacija osnovnih sredstev
- Informacije in komunikacije
- Investicije — opredmetena sredstva
Kategorije Dela/Plače ni mogoče onemogočiti — zahtevajo jo predpisi EU. Vse druge kategorije so neobvezne glede na zahteve razpisa.
Nastavitve posrednih stroškov (pavšalna stopnja)
| Nastavitev | Opis |
|---|---|
| Pavšalni % | Odstotek, ki se uporabi za izbrane neposredne stroške (npr. 7%, 15%, 25%) |
| Osnovne kategorije | Katere neposredne kategorije so osnova za izračun (potrditvena polja) |
| Rezultat | Posredni stroški = Vsota izbranih osnov × pavšalni %. Samodejni izračun v vsaki vrstici tabele. |
Večina EU programov dovoljuje 25% na neposredne stroške osebja kot standardno pavšalno stopnjo. Nekateri programi (npr. Erasmus+) uporabljajo 7% na vse neposredne stroške. Vedno preverite v programskem vodniku.
14.2 AI razdelitev
Kliknite "🤖 Generiraj razdelitve z AI" za razporeditev partnerjev na naloge z realističnimi urami, osebnimi meseci in stroški po pravilih EU. AI upošteva pravila za posamezne tipe nalog in konfiguracijo stroškovnih kategorij.
- Najprej dokončajte Konfiguracijo stroškovnih kategorij (korak 14.1 zgoraj)
- Kliknite "🤖 Generiraj razdelitve z AI"
- Preglejte rezultate v tabeli in po potrebi ročno prilagodite
14.3 EU proračunska pravila
| Celoten proračun | Maks % za DS Vodenje |
|---|---|
| do 500.000 EUR | 15% |
| 500.001 – 1.000.000 | 10% |
| 1.000.001 – 3.000.000 | 10% |
| 3.000.001 – 5.000.000 | 7% |
| nad 5.000.000 | 5–7% |
DS Razširjanje ≈ 15%. Preostalo razporejeno proporcionalno. Vse vrednosti so ročno prilagodljive.
14.4 Tabela stroškov po nalogah NOVO
Pod povzetnimi grafi je pregledničarska tabela za urejanje — najmočnejši način upravljanja proračuna. Prikazuje vse razdelitve partnerjev po nalogah, razvrščene po delovnih sklopih.
Tabela stroškov po nalogah — urejanje razdelitev partnerjev
| Stolpec | Barva | Urejljivo | Opis |
|---|---|---|---|
| Partner | — | — | Oznaka partnerja. Hover prikaže gumb × za odstranitev. |
| Ure | Nebeško modra | ✅ Da | Osebne ure. Sprememba preračuna ČM in znesek dela. |
| ČM | Nebeško modra | ✅ Da | Osebni meseci (1 ČM = 143 ur). Preračuna ure in delo. |
| Dela | Nebeško modra | ✅ Da | Strošek dela = Ure × (Stopnja / 143). Preračuna ure in ČM. |
| Druge kategorije | Vijolična | ✅ Da | Potni stroški, material, oprema itd. Uredite neposredno. |
| Posredni | Jantarna | ❌ Samodejno | Izračunano samodejno iz nastavitev % posrednih stroškov. |
| Skupaj | — | ❌ Samodejno | Neposredni + posredni stroški. |
Katerikoli od treh stolpcev dela (Ure, ČM, Znesek) je mogoče urediti — drugi dve vrednosti se samodejno preračunata. Formula: Dela = Ure × (stopnjaPartnerja / 143).
14.5 Dodajanje in odstranjevanje partnerjev na nalogo NOVO
Partnerje na posameznih nalogah lahko upravljate neposredno v tabeli stroškov — brez ponovnega generiranja z AI.
Dodajanje partnerja
- Poiščite nalogo v tabeli stroškov
- Na dnu vrstic naloge kliknite zeleni gumb "+ Dodaj partnerja"
- Prikaže se spustni meni s samo partnerji, ki še niso dodeljeni tej nalogi
- Izberite partnerja — takoj se doda z Ure = 0, ČM = 0
- Vnesite ure, ČM ali znesek dela v novo prikazano vrstico
Če so vsi partnerji projekta že dodeljeni nalogi, se gumb "+ Dodaj partnerja" za to nalogo ne prikaže.
Odstranjevanje partnerja
- Premaknite miško nad vrstico partnerja, ki ga želite odstraniti
- Levo od oznake partnerja se prikaže rdeči gumb ✕
- Kliknite ✕ — razdelitev je takoj odstranjena
Naloge brez razdelitev se prikažejo v tabeli z nadomestnim besedilom "Ni dodeljenih partnerjev" in gumbom "+ Dodaj partnerja".
14.6 Filtri
Uporabite spustna menija Delovni sklop in Partner na vrhu tabele za zožitev prikaza. Koristno za velike projekte z veliko DS in partnerji.
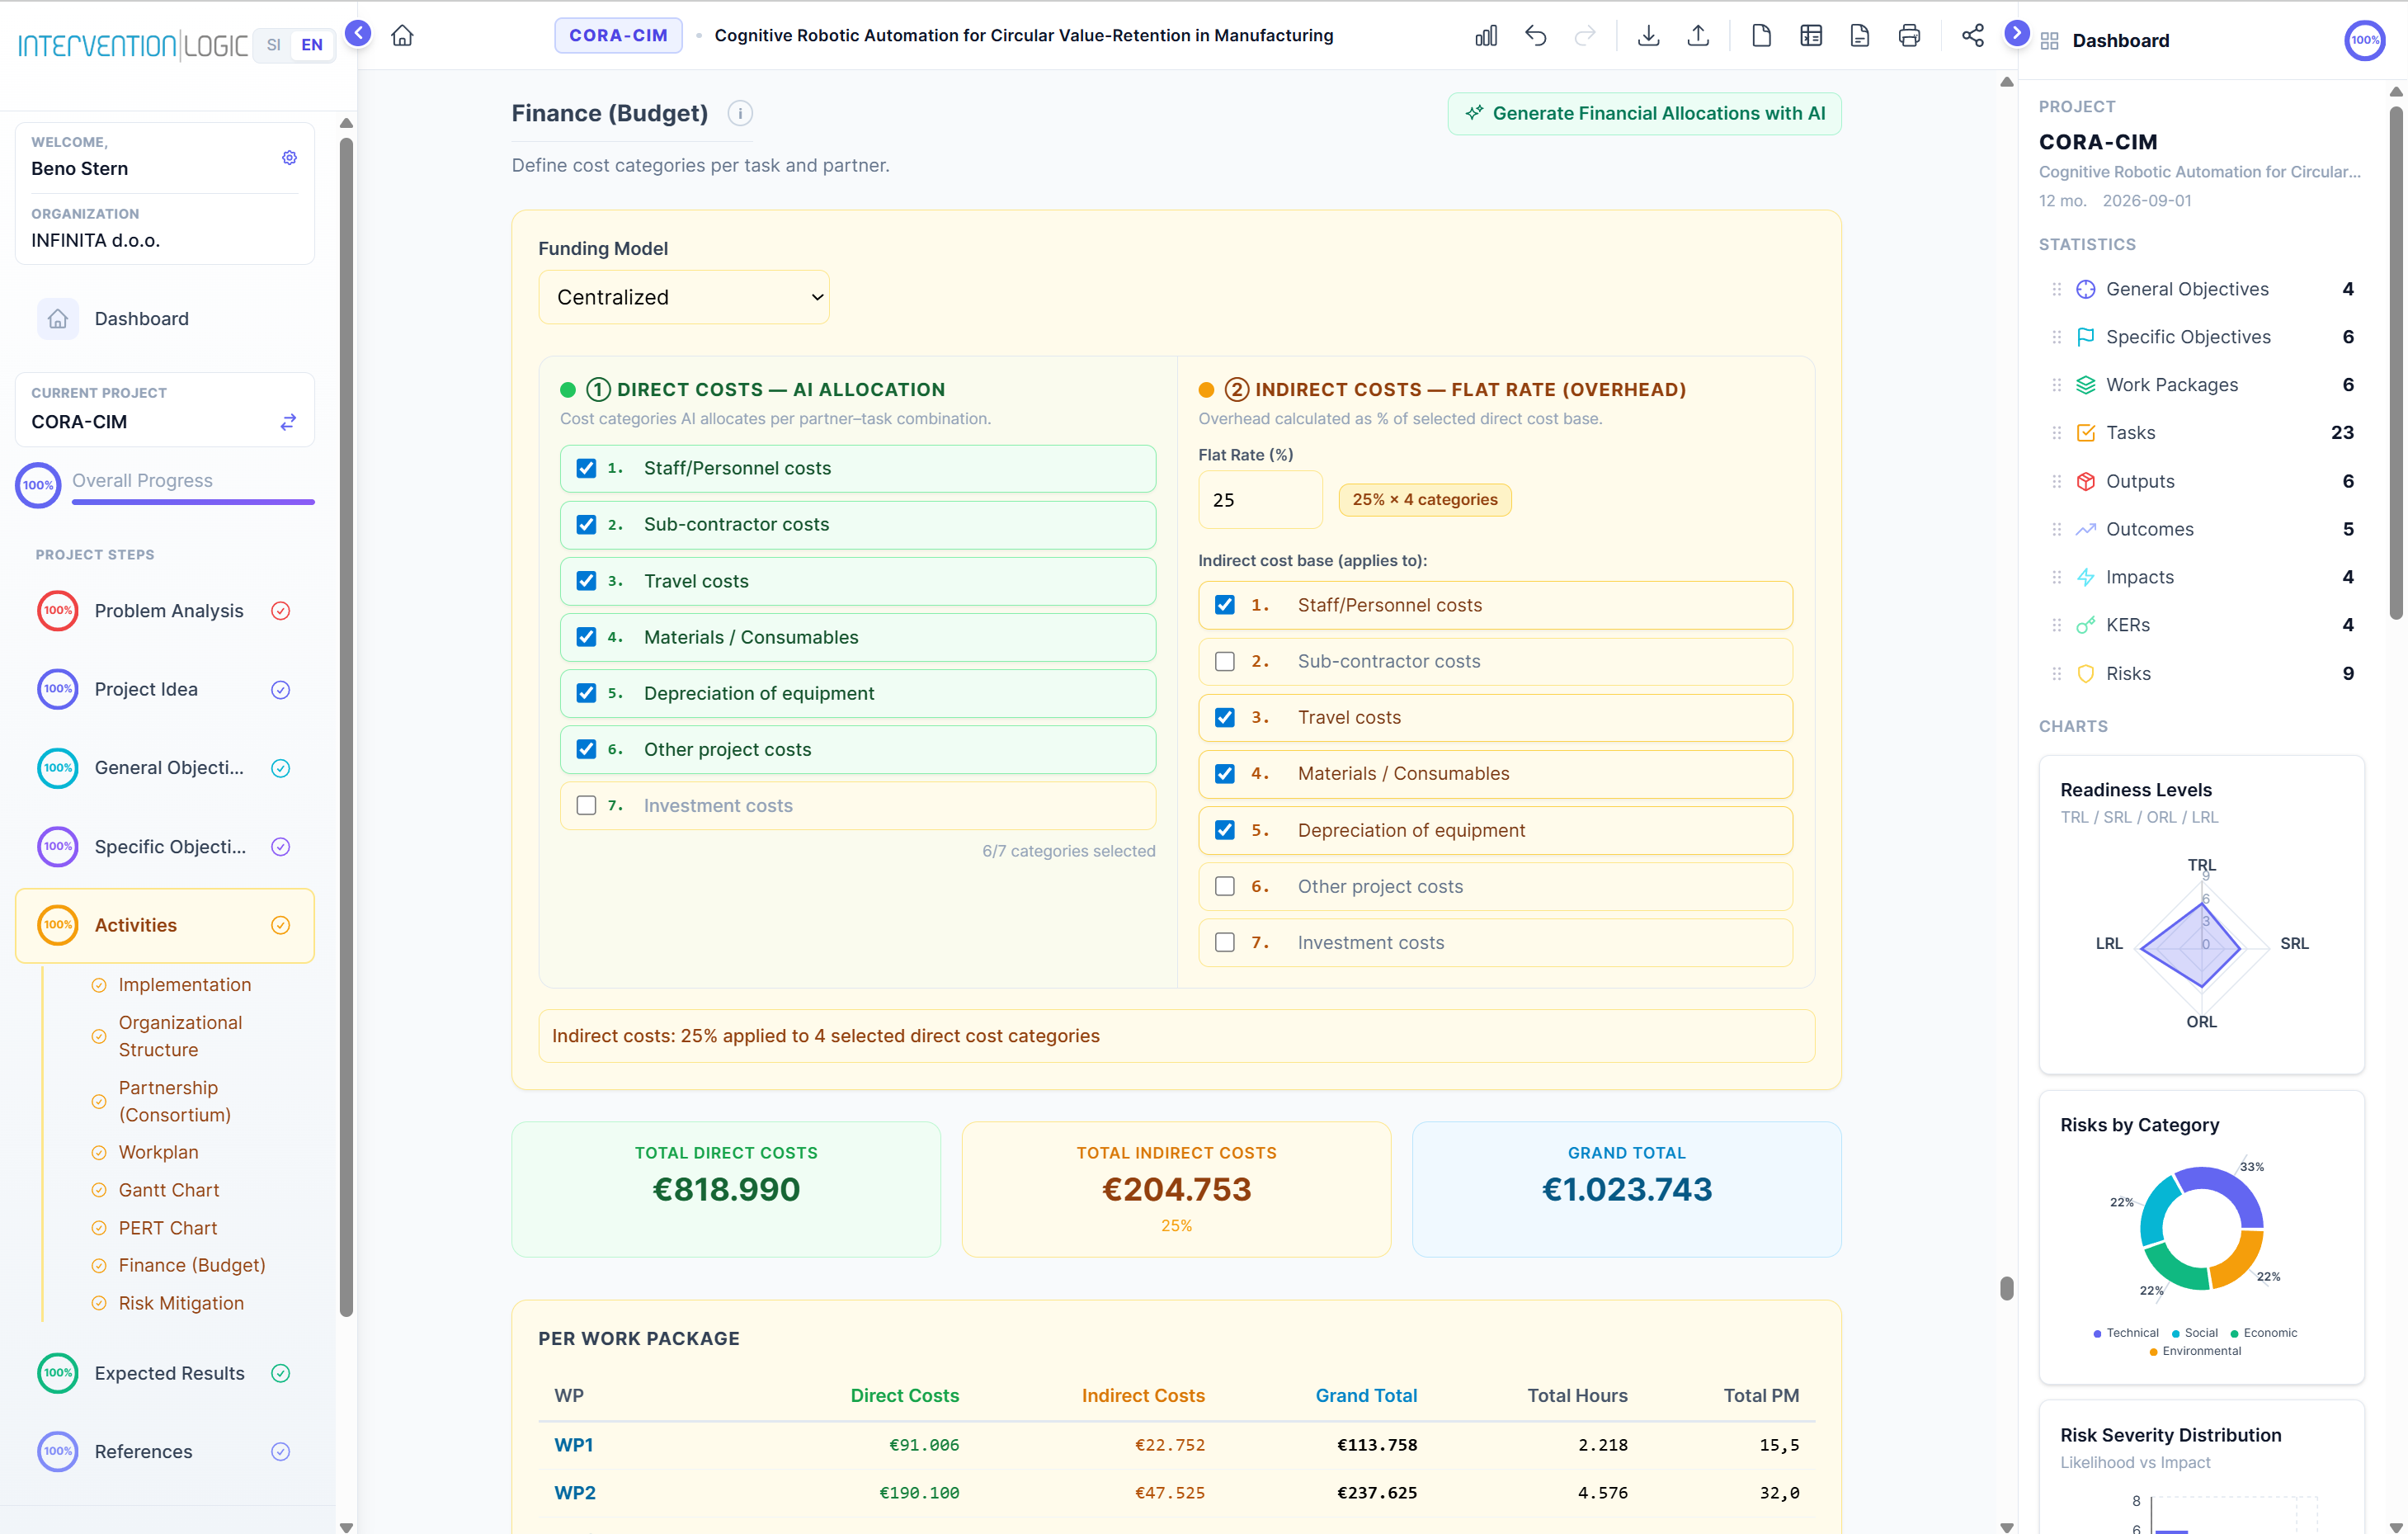
Finance — budget overview with partner allocation charts and cost table
15. Dashboard Panel
Click the Dashboard icon on the right side for a real-time visual overview. Auto-updates as you work.
| Chart | Shows |
|---|---|
| Project Completion | Percentage of sections filled |
| Problem Tree | Causes → Core Problem → Consequences |
| Objectives Hierarchy | General → Specific objectives |
| Partner Distribution | Donut chart of partner types |
| Budget per WP/Partner | Bar charts of costs |
| Person-Months/Hours | Resource distribution |
Dashboard cards can be reordered by drag-and-drop.
15. Nadzorna plošča
Kliknite ikono nadzorne plošče na desni za vizualni pregled v realnem času. Samodejno se posodablja.
| Graf | Prikazuje |
|---|---|
| Zaključenost projekta | Odstotek izpolnjenih sekcij |
| Drevo problemov | Vzroki → Problem → Posledice |
| Hierarhija ciljev | Splošni → Specifični cilji |
| Porazdelitev partnerjev | Kolobarni graf tipov |
| Proračun po DS/Partnerju | Stolpični grafi stroškov |
| Osebni meseci/Ure | Porazdelitev virov |
Kartice nadzorne plošče lahko prerazporedite z vlečenjem.
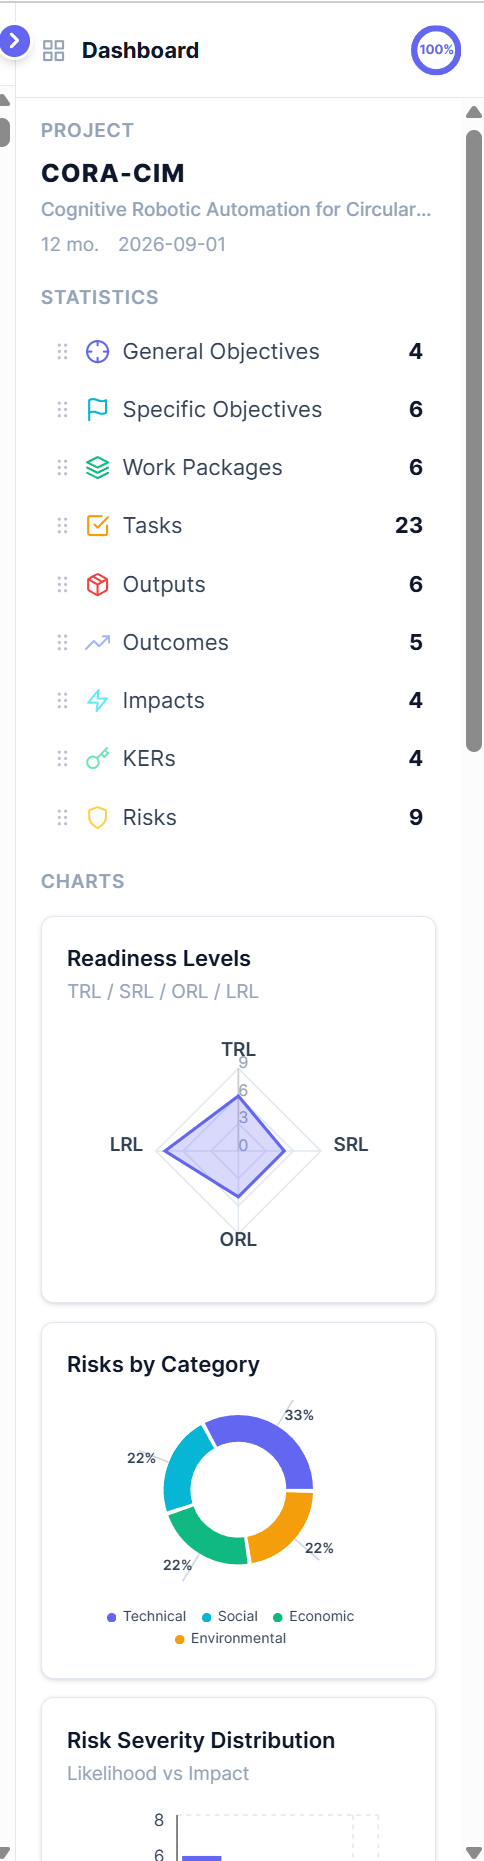
Dashboard — completion & partner statistics
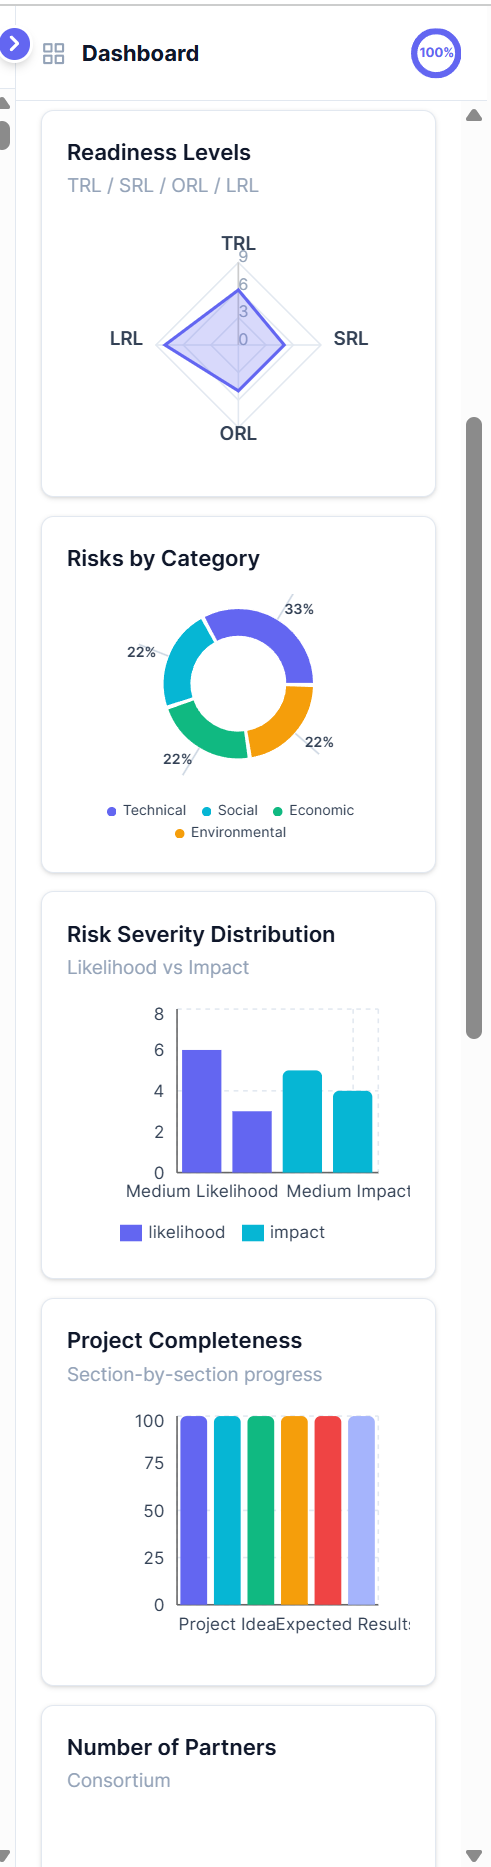
Dashboard — budget & resource charts
16. Gantt Chart, PERT Chart & Organigram
Found in the Activities chapter, the three visualization tabs give you a complete view of your project schedule and structure. Gantt and PERT are fully interactive — dates and dependencies can be edited directly on the diagram.
16.1 Gantt Chart — Drag & Drop Editing NEW
The Gantt chart is a fully interactive SVG timeline. Work packages are shown as section headers (dark bars), tasks as coloured bars, and milestones as black diamonds. Dependency arrows connect related tasks.
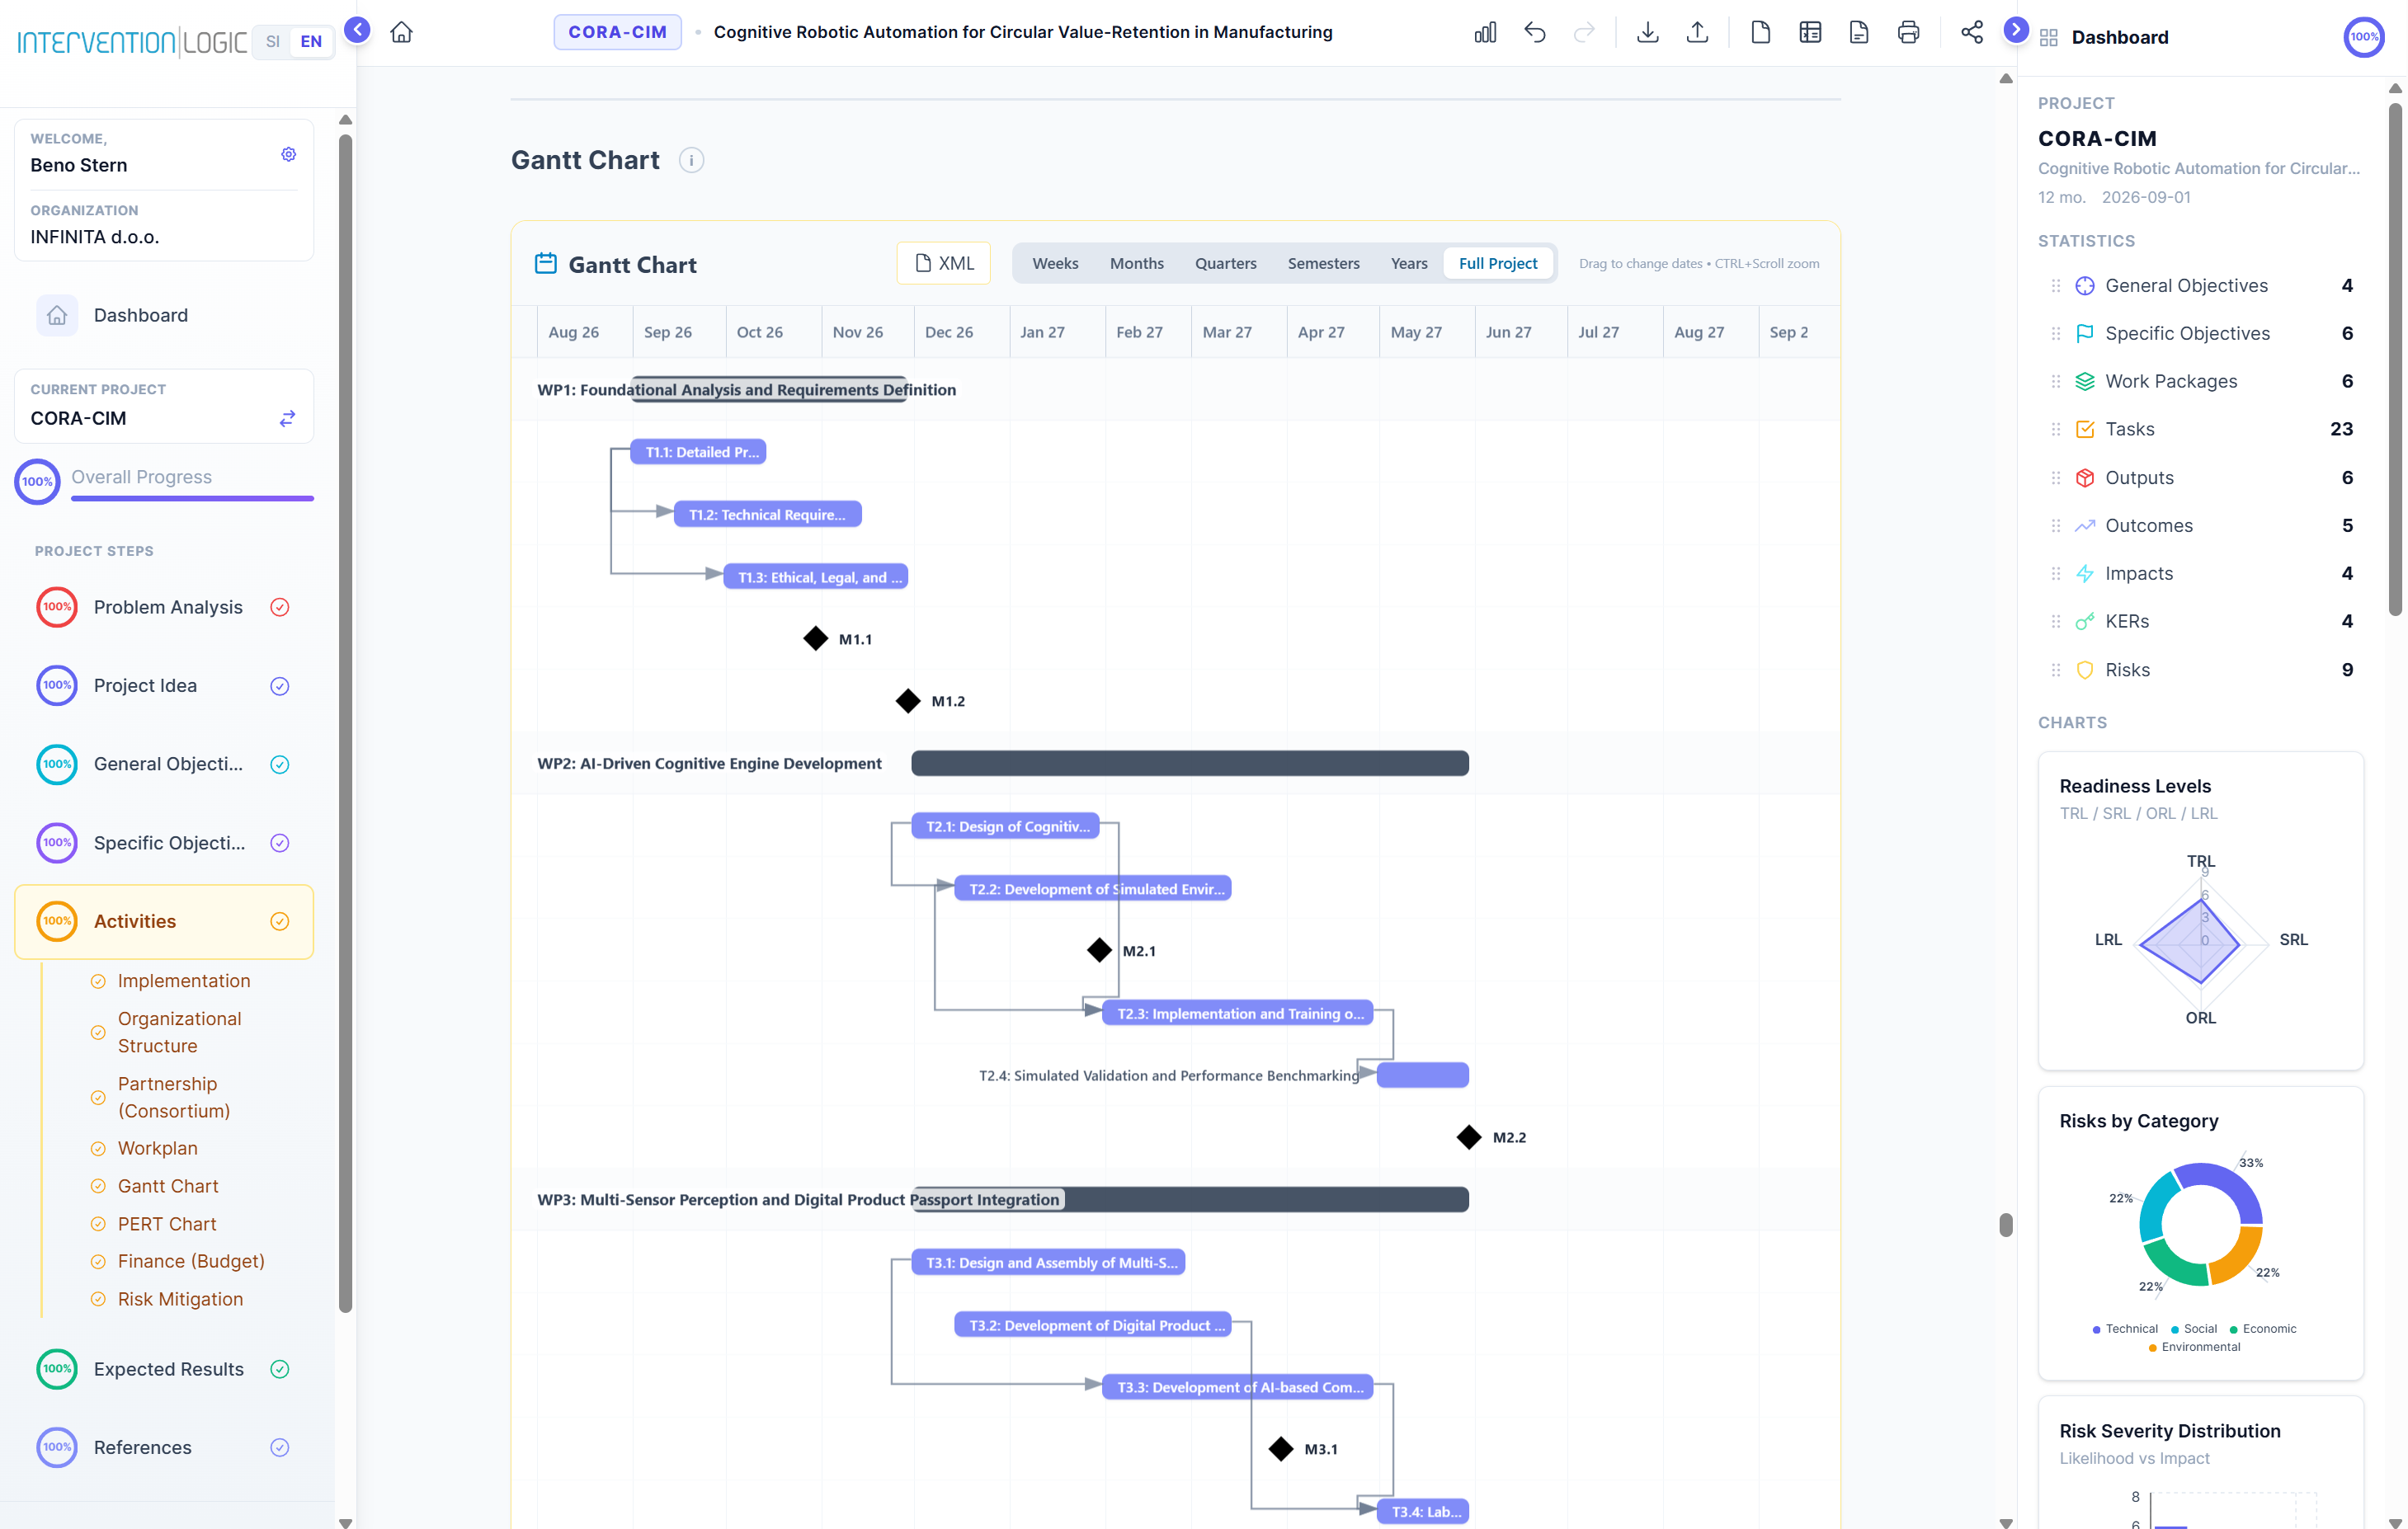
① Zoom selector ② Full Project view ③ Drag task bar ④ Milestone
| Action | How to do it | What changes |
|---|---|---|
| Move task | Click and drag the bar horizontally | Start Date and End Date both shift by the same number of days |
| Resize task | Drag the right edge of the bar (cursor changes to ⟺) | End Date only — start date stays fixed |
| Move milestone | Click and drag the diamond | Milestone date shifts |
| Navigate to task | Click the bar or diamond without dragging | Scrolls the Activities panel to that task and briefly highlights it |
While dragging, a small tooltip appears above the bar showing the new start and end date in real time. All changes are saved automatically to the project data.
Use the zoom buttons (+ / −) or scroll wheel to zoom in/out. Click and drag on empty chart space to pan. Zoom controls do not interfere with task dragging.
16.2 PERT Chart — Interactive Dependencies NEW
The PERT chart shows tasks as rectangular nodes connected by dependency arrows. You can navigate to any task by clicking its node, and in Connect Mode you can add or remove dependencies directly on the diagram.
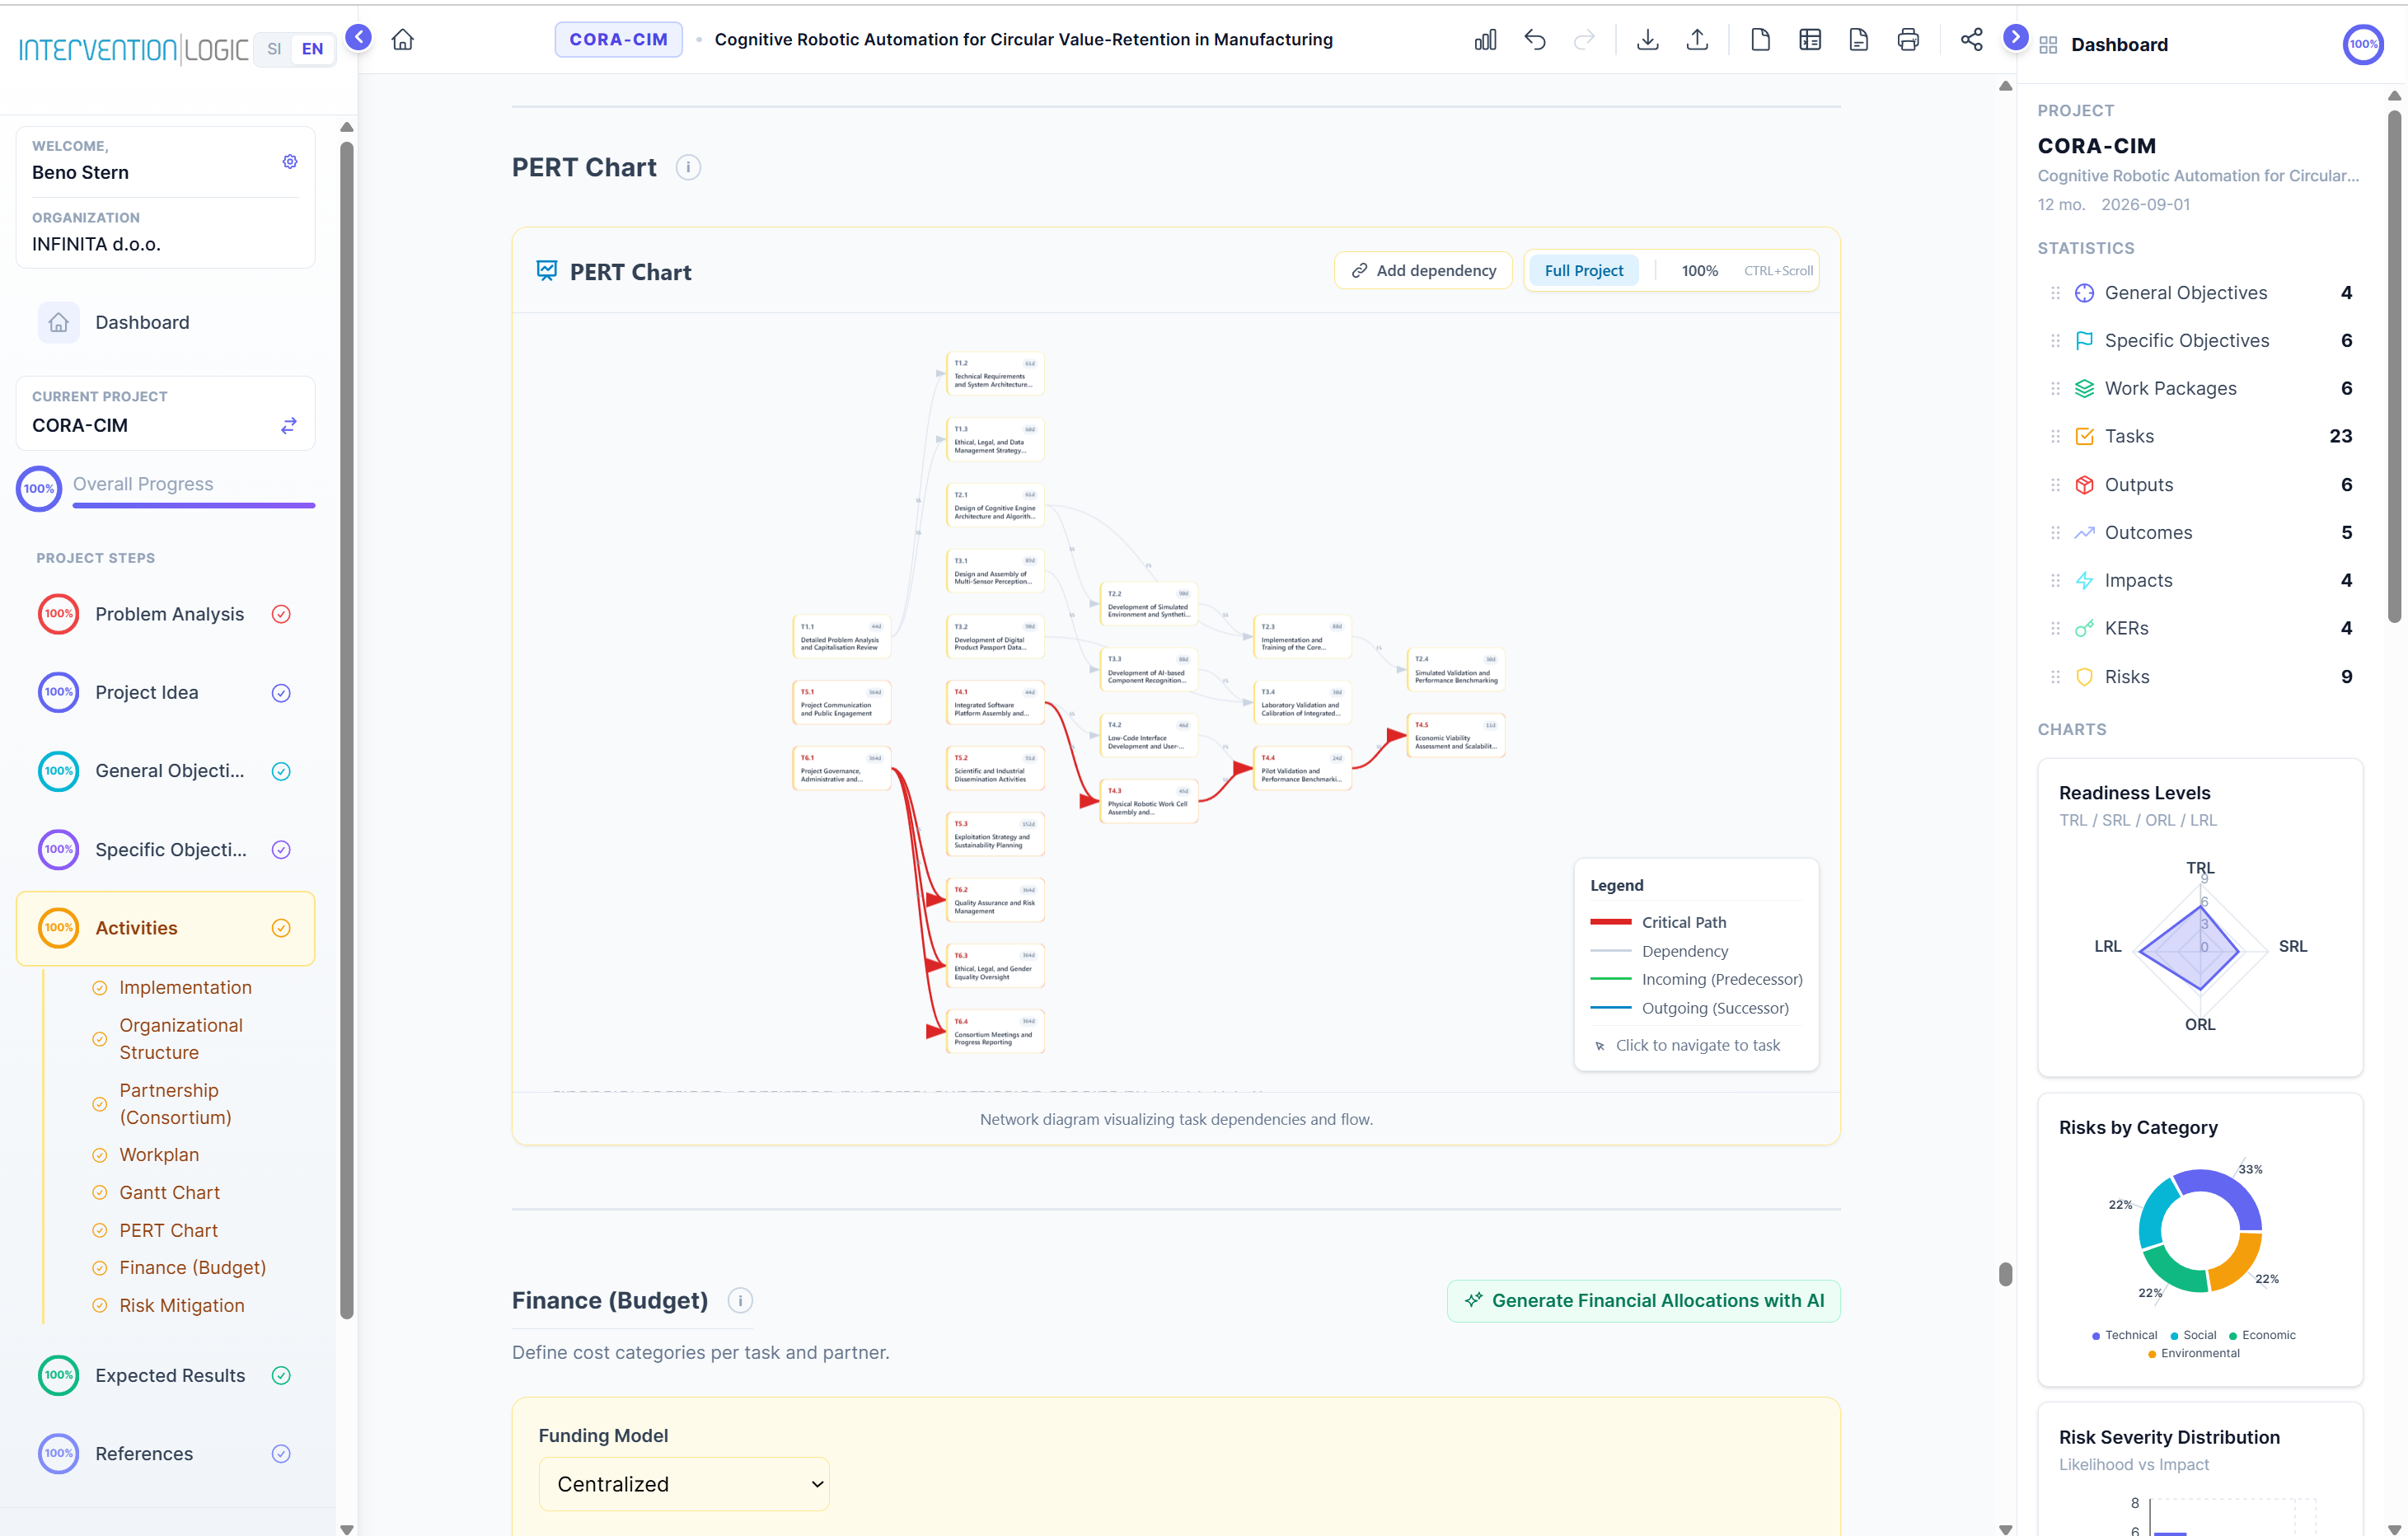
① Connect Mode ② Full Project ③ Task nodes ④ Legend
Click to navigate to a task
- Make sure Connect Mode is OFF (button not amber)
- Click any task node on the PERT diagram
- The Activities panel scrolls to that task and briefly highlights it with a blue border
Adding a Dependency (Connect Mode)
- Click the "🔗 Connect Mode" button in the PERT toolbar — it turns amber
- An amber hint bar appears at the top: "Click a SOURCE task"
- Click the predecessor (source) task node — it highlights with a yellow border and the hint changes to "Now click the TARGET"
- Click the successor (target) task node
- A popup appears — choose the dependency type:
FSFinish-to-Start — most common: target starts after source finishesSSStart-to-Start — both start at the same timeFFFinish-to-Finish — both finish at the same timeSFStart-to-Finish — target finishes when source starts - The dependency is immediately saved and an arrow appears on the chart
If the dependency you are trying to create would form a circular loop (A → B → A), the system rejects it with an error toast. This prevents impossible scheduling configurations.
Removing a Dependency
- You do not need Connect Mode to delete a dependency
- Hover your mouse over any dependency arrow on the chart
- A red ✕ button appears at the midpoint of the arrow
- Click ✕ — the dependency is immediately removed
Use Ctrl+Scroll or the +/− buttons to zoom. Drag empty chart space to pan. Panning is disabled during Connect Mode to prevent accidental navigation while clicking nodes.
16.3 Organigram
The organisational chart shows the consortium governance structure: Coordinator → Steering Committee → Advisory Board → WP Leaders → Partners. Generated automatically from Partnership data. Read-only — edit via the Partnership section.
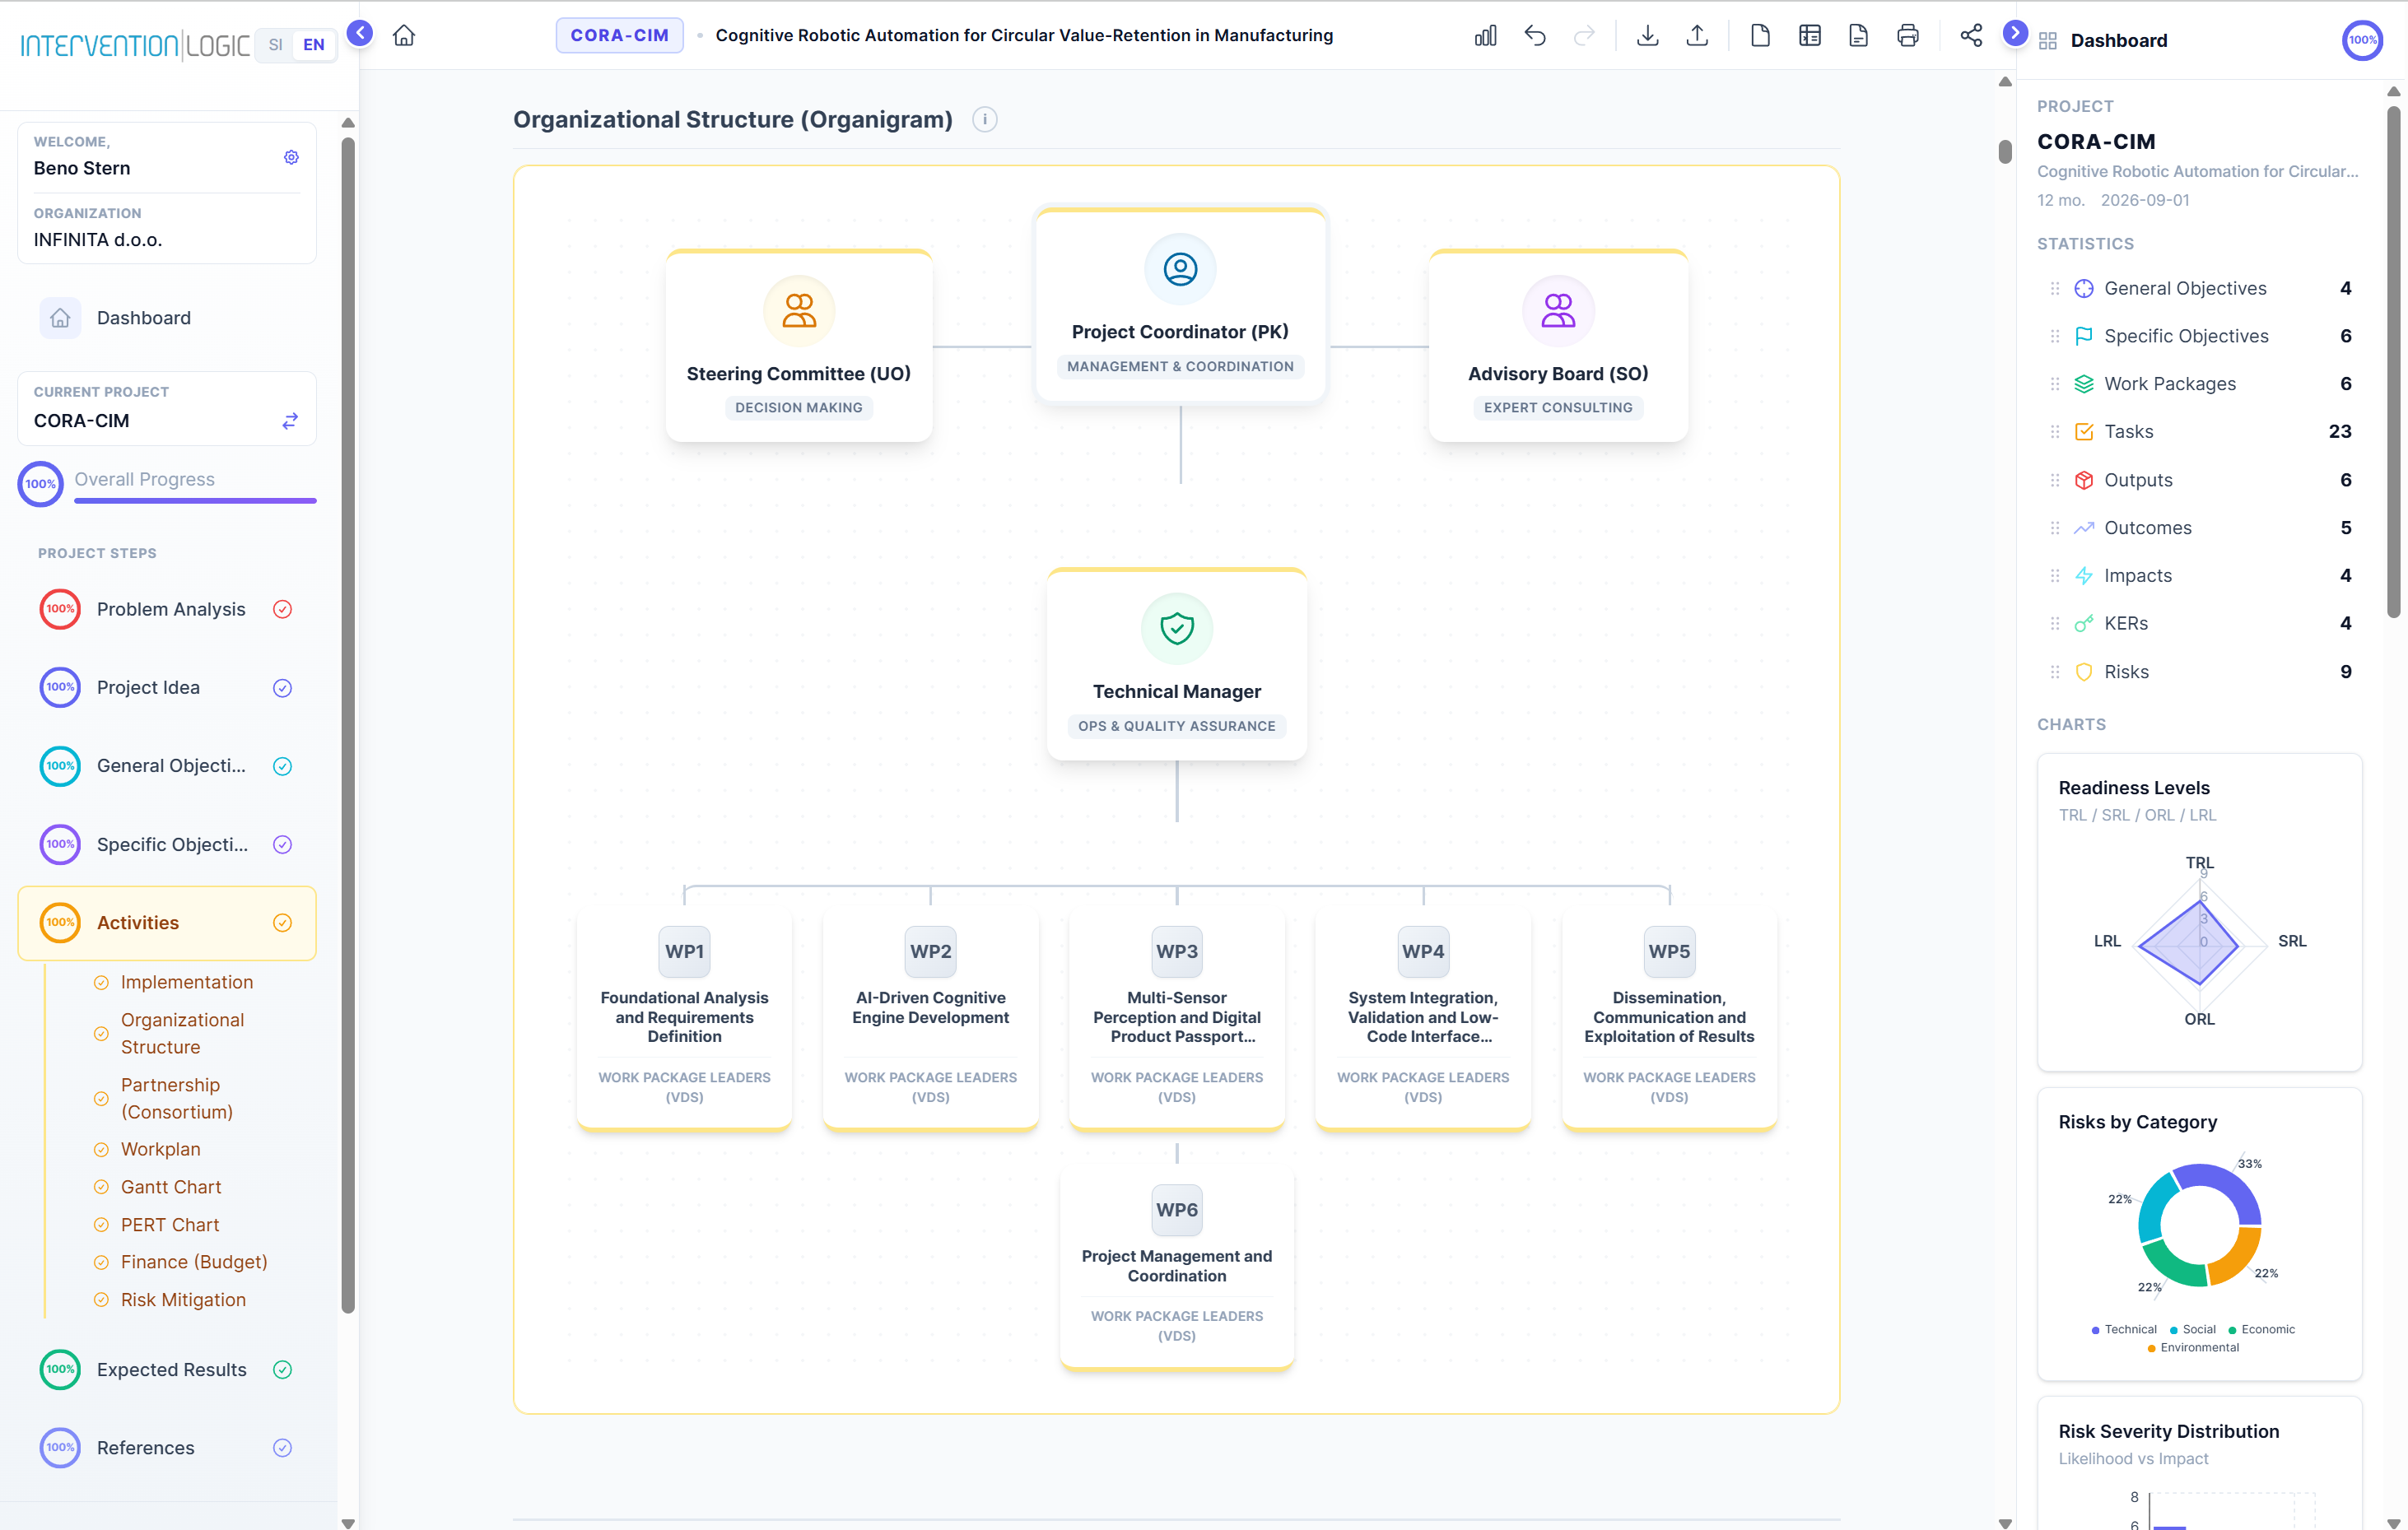
① Coordinator & Steering Committee ② WP Leaders (auto-generated from Activities)
16. Ganttov diagram, PERT diagram in organigram
V poglavju Aktivnosti trije zavihki vizualizacije dajejo popoln pregled urnika in strukture projekta. Gantt in PERT sta popolnoma interaktivna — datume in odvisnosti je mogoče urejati neposredno na diagramu.
16.1 Ganttov diagram — Povleci in spusti NOVO
Ganttov diagram je popolnoma interaktivna SVG časovnica. Delovni sklopi so prikazani kot temni pasovi, naloge kot barvni trakovi in mejniki kot črni diamanti. Puščice odvisnosti povezujejo sorodne naloge.
① Izbira obdobja (tedni/meseci) ② Povleci trak naloge ③ Mejnik (diamant)
| Dejanje | Kako narediti | Kaj se spremeni |
|---|---|---|
| Premik naloge | Kliknite in povlecite trak vodoravno | Datum začetka IN konca se premakneta za enako število dni |
| Sprememba trajanja | Povlecite desni rob traku (kazalec se spremeni v ⟺) | Samo datum konca — datum začetka ostane nespremenjen |
| Premik mejnika | Kliknite in povlecite diamant | Datum mejnika se premakne |
| Navigacija do naloge | Kliknite trak ali diamant brez vlečenja | Sekcija Aktivnosti se pomakne do te naloge in jo za trenutek označi |
Med vlečenjem se nad trakom prikaže majhen tooltip z novim datumom začetka in konca v realnem času. Vse spremembe se samodejno shranijo v projektne podatke.
16.2 PERT diagram — Interaktivne odvisnosti NOVO
PERT diagram prikazuje naloge kot pravokotna vozlišča, ki jih povezujejo puščice odvisnosti. S klikom na vozlišče se pomaknete do naloge, v načinu Povezave pa lahko dodajate ali brišete odvisnosti neposredno na diagramu.
① Gumb Način povezave ② Vozlišča nalog (klik za navigacijo) ③ Legenda odvisnosti
Klik za navigacijo do naloge
- Prepričajte se, da je Način povezave IZKLOPLJEN (gumb ni jantarne barve)
- Kliknite katerokoli vozlišče naloge na PERT diagramu
- Sekcija Aktivnosti se pomakne do te naloge in jo za trenutek označi z modro obrobo
Dodajanje odvisnosti (Način povezave)
- Kliknite gumb "🔗 Poveži" v orodni vrstici PERT — postane jantaren
- Na vrhu se prikaže jantarni napotek: "Kliknite IZVOR nalogo"
- Kliknite predhodno (izvorno) vozlišče — označi se z rumeno obrobo
- Kliknite nasledno (ciljno) vozlišče
- Prikaže se pojavno okno — izberite tip odvisnosti:
FSKonec-Začetek — najpogostejši: cilj se začne po koncu izvoraSSZačetek-Začetek — oba se začneta hkratiFFKonec-Konec — oba se končata hkratiSFZačetek-Konec — cilj se konča ko se izvor začne - Odvisnost se takoj shrani in na diagramu se prikaže puščica
Če bi odvisnost, ki jo poskušate ustvariti, tvorila krožno zanko (A → B → A), jo sistem zavrne z opozorilom. To preprečuje nemogoče konfiguracij urnika.
Brisanje odvisnosti
- Za brisanje odvisnosti ni potreben Način povezave
- Premaknite miško nad katerokoli puščico odvisnosti na diagramu
- Na sredini puščice se prikaže rdeči gumb ✕
- Kliknite ✕ — odvisnost je takoj odstranjena
16.3 Organigram
Organizacijski grafikon prikazuje strukturo upravljanja konzorcija: Koordinator → Usmerjevalni odbor → Svetovalni odbor → Vodje DS → Partnerji. Generira se samodejno iz podatkov Partnerstva. Samo za branje — urejajte prek sekcije Partnerstvo.
① Koordinator & Usmerjevalni odbor ② Vodje DS (samodejno iz Aktivnosti)
Gantt Chart — drag & drop timeline
PERT Chart — dependency network
17. Export & Print
17.1 DOCX Export
Click Export/Download → DOCX → professional Word document with all chapters, tables, headings.
17.2 Print Layout
Use Ctrl+P (or Cmd+P) for print-optimized layout with proper page breaks.
17.3 Project Summary
Click "Summary" for an AI-powered executive summary (max 800 words).
17.4 Finance Export to Excel (.xlsx) NEW
When you are in the Finance (Budget) section, a dedicated Excel export button appears in the top toolbar. Click it to download a structured .xlsx spreadsheet containing:
- All cost categories (Direct AI Costs, Staff, Travel, Equipment, etc.)
- Per-partner breakdowns with person-months and cost totals
- Flat-rate and overhead calculations
- EU budget compliance summary
Navigate to Activities → Finance (Budget). The "Export Finance to Excel (.xlsx)" icon appears in the toolbar at the top of the page — it looks like a spreadsheet/table icon.
17. Izvoz in tisk
17.1 DOCX izvoz
Kliknite Izvoz/Prenos → DOCX → profesionalen Word dokument.
17.2 Tisk
Uporabite Ctrl+P (ali Cmd+P) za optimizirano postavitev za tisk.
17.3 Povzetek projekta
Kliknite "Povzetek" za AI generiran izvršni povzetek (maks. 800 besed).
17.4 Izvoz financ v Excel (.xlsx) NOVO
Ko ste v sekciji Finance (Proračun), se v zgornji orodni vrstici prikaže gumb za izvoz v Excel. Kliknite nanj za prenos strukturirane datoteke .xlsx:
- Vse kategorije stroškov (Neposredni AI stroški, Osebje, Potovanja, Oprema itd.)
- Razčlenitev po partnerjih s človeškimi meseci in skupnimi stroški
- Izračuni pavšalnih stopenj in splošnih stroškov
- Povzetek skladnosti s proračunskimi pravili EU
Pojdite na Aktivnosti → Finance (Proračun). Gumb "Izvozi finance v Excel (.xlsx)" se prikaže v orodni vrstici na vrhu strani.
Top toolbar — ① DOCX export ② Excel export (Finance section) ③ Summary ④ Print
18. Administration Panel
Available to organisation administrators only.
| Feature | Description |
|---|---|
| User Management | View and manage users within your organisation |
| Knowledge Base | Upload PDFs/Word files as mandatory AI context |
| AI Instructions Override | Customize AI rules for any section |
| Global Instructions | Organisation-wide generation preferences |
| 2FA Management | Configure Two-Factor Authentication |
| Changelog | View application version history with filtering |
| Logo & Branding NEW | Upload organisation logo and set custom app name — instantly visible to all users everywhere |
Go to Admin Panel → Organisation Settings. Upload your logo (PNG or SVG, recommended max width 400px). Set a custom app name. All users — including the login screen, sidebar, home screen, and this guide — will immediately display the new logo. There is no hardcoded fallback logo: if no logo is uploaded, no logo is shown.
18.1 Knowledge Base
- Go to Admin Panel → Knowledge Base
- Click "Upload Document"
- Select a PDF or Word file (call text, programme guide, policy document)
- The system extracts and stores text content
- AI will automatically consider these documents when generating content
Upload the actual call text for your target funding programme. AI will align content with specific requirements, terminology, and evaluation criteria.
18.2 AI Instructions Override
Administrators can override: quality gates, task instructions, global rules, academic rigor, humanization rules. Click "Reset to defaults" to restore originals.
18.3 API Cost Tracking NEW
Every AI generation call is logged with token usage and cost. Administrators can monitor API spending per project and per section.
| Tracked Item | Detail |
|---|---|
| Input tokens | Tokens sent to the model (prompt + context + knowledge base) |
| Output tokens | Tokens generated by the model (the response) |
| Cost (USD) | Calculated per model pricing table (Gemini, OpenAI, OpenRouter rates) |
| Per-chapter log | Stored in project data under _usage — visible in Admin Panel |
Activities generation (all WPs at once) is the most expensive call — typically 3,000–8,000 output tokens. Using Gemini Flash keeps this under $0.01 per full project generation. Using GPT-4o can be 20× more expensive for the same output.
18. Administracijska plošča
Na voljo samo administratorjem organizacije.
| Funkcija | Opis |
|---|---|
| Upravljanje uporabnikov | Pregled in upravljanje uporabnikov |
| Baza znanja | Nalaganje PDF/Word datotek kot obveznega AI konteksta |
| Preglasitev AI navodil | Prilagoditev AI pravil za katerokoli sekcijo |
| Globalna navodila | Nastavitve generiranja na ravni organizacije |
| 2FA upravljanje | Konfiguracija dvostopenjske avtentikacije |
| Dnevnik sprememb | Pregled zgodovine verzij s filtriranjem |
| Logotip in znamčenje NOVO | Nalaganje logotipa organizacije in nastavitev imena aplikacije — takoj vidno vsem uporabnikom povsod |
Pojdite v Administracijsko ploščo → Nastavitve organizacije. Naložite logotip (PNG ali SVG, priporočena max. širina 400px). Nastavite ime aplikacije. Vsi uporabniki — vključno s prijavnim zaslonom, stransko vrstico, domačo stranjo in tem vodnikom — takoj vidijo novi logotip. Ni trdo kodiranega logotipa: če logotip ni naložen, se ne prikaže noben.
18.1 Baza znanja
- Pojdite v Administracijsko ploščo → Baza znanja
- Kliknite "Naloži dokument"
- Izberite PDF ali Word datoteko (besedilo razpisa, programski vodnik)
- Sistem izvleče in shrani besedilno vsebino
- AI bo avtomatsko upošteval te dokumente pri generiranju
Naložite dejansko besedilo razpisa. AI bo uskladil vsebino s specifičnimi zahtevami in merili.
18.2 Preglasitev AI navodil
Administratorji lahko preglasite: kakovostna vrata, navodila za naloge, globalna pravila, akademsko strogost, pravila humanizacije. Kliknite "Ponastavi na privzete" za obnovitev originalnih nastavitev.
18.3 Sledenje stroškov API NOVO
Vsak klic AI generiranja se zabeleži z uporabo žetonov in stroškom. Administratorji lahko spremljajo porabo API po projektu in sekciji.
| Sledeni element | Podrobnost |
|---|---|
| Vhodni žetoni | Žetoni, poslani modelu (poziv + kontekst + baza znanja) |
| Izhodni žetoni | Žetoni, ki jih je generiral model (odgovor) |
| Strošek (USD) | Izračunan po cenovni tabeli modela (Gemini, OpenAI, OpenRouter) |
| Dnevnik po poglavjih | Shranjen v podatkih projekta pod _usage — viden v Administracijski plošči |
Generiranje aktivnosti je najdražji klic — tipično 3.000–8.000 izhodnih žetonov. Z modelom Gemini Flash ostanete pod 0,01 $ za generiranje celotnega projekta. GPT-4o je za enak izhod do 20× dražji.
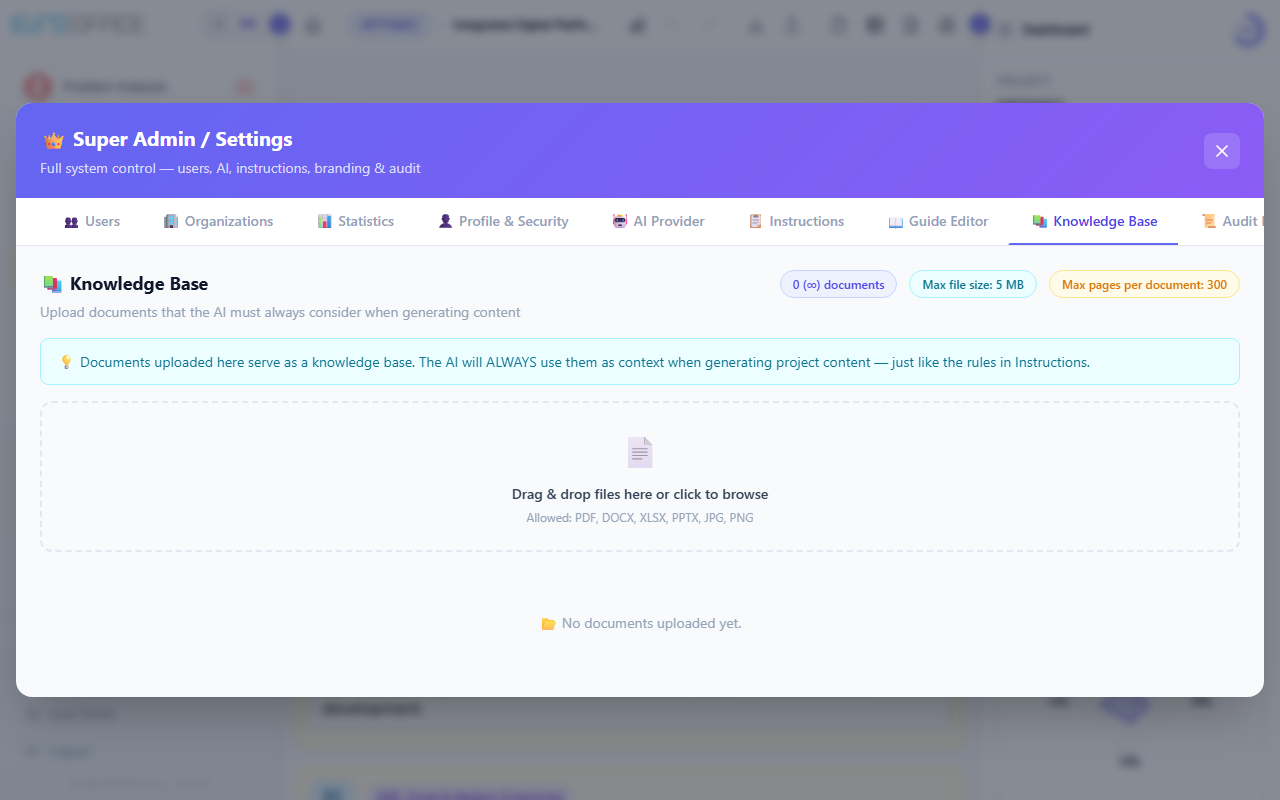
Admin Panel — ① Tab navigation ② Knowledge Base tab ③ Document upload area
19. Tips & Troubleshooting
19.1 Recommended Workflow
Problem Analysis
Write core problem → Regenerate → Review → Enhance → AI Assistant on fields
Project Idea
Regenerate for title, acronym, state of the art, solution, policies, readiness
Objectives
Generate general objectives, then specific S.M.A.R.T. objectives with KPIs
Activities
Generate work packages (1–3 min) → Review dates, dependencies → Adjust Gantt drag & drop
PM & Risks
Generate management narrative and risk register
Results & KERs
Composite generation for consistent outputs, outcomes, impacts
References
Regenerate → AI extracts & verifies all citations → Review flagged entries → Remove unverified
Partnership
Generate balanced consortium with partner types and PM rates
Finance
Configure cost categories → AI-allocate partners → Adjust in breakdown table → Export to Excel
Review & Export
Enhance weak areas, generate executive summary, export full project to DOCX
19.2 Common Issues
| Issue | Solution |
|---|---|
| Missing API key | Go to Settings (⚙) and enter your API key |
| Rate limit error | Wait 1–2 minutes and try again; switch to secondary model if available |
| Generation takes long | Activities take 1–3 min for 6–10 WPs — normal |
| Charts not appearing | Click "Generate visualizations" after content generation |
| Cannot login | Check email for confirmation link; password requires 8+ chars with symbol, number, upper & lowercase |
| Web search not working | Ensure checkbox is ON in Settings; only Gemini & OpenRouter support web search |
| AI Assistant hidden | Hover over any text field — ✨ button appears top-right of the field |
| References show orange flags | Citation could not be verified — check the DOI/URL manually or remove it before submitting |
| Collaborator edits overwrite mine | Last save wins — coordinate via the "Active now" sidebar panel to avoid editing the same field simultaneously |
| Logo not showing | SuperAdmin must upload logo in Admin Panel → Organisation Settings; no fallback logo exists |
| Finance table empty after AI | Configure Cost Categories first (⚙ button) before running AI allocation |
19.3 Keyboard Shortcuts
| Shortcut | Action |
|---|---|
Ctrl + P | Print / Print-optimized layout |
Ctrl + Enter | Generate in AI Assistant popup NEW |
Esc | Close modals and popups |
Tab | Move between form fields |
19.4 Supported Browsers
Google Chrome (recommended), Mozilla Firefox, Microsoft Edge, Safari.
All project data is stored securely in the cloud (Supabase). Your projects are accessible from any device and saved automatically. No manual saving required.
19. Namigi in odpravljanje težav
19.1 Priporočen potek dela
Analiza problema
Napišite problem → Regeneriraj → Preglejte → Izboljšaj → AI Asistent na poljih
Projektna ideja
Regeneriraj za naslov, akronim, stanje tehnike, rešitev, politike, pripravljenost
Cilji
Generirajte splošne, nato specifične S.M.A.R.T. cilje s KPI-ji
Aktivnosti
Generirajte DS (1–3 min) → Preglejte datume in odvisnosti → Prilagodite Gantt z vlečenjem
Vodenje in tveganja
Generirajte pripoved vodenja in register tveganj
Rezultati in KER-ji
Sestavljeno generiranje za dosledne proizvode, učinke in vplive
Reference
Regeneriraj → AI izvleče in preveri citate → Preglejte označene → Odstranite nepreverljive
Partnerstvo
Generirajte uravnotežen konzorcij s tipi partnerjev in PM stopnjami
Finance
Konfigurirajte kategorije → AI razporedi partnerje → Prilagodite v tabeli → Izvozite v Excel
Pregled in izvoz
Izboljšajte šibke sekcije, generirajte povzetek, izvozite v DOCX
19.2 Pogoste težave
| Težava | Rešitev |
|---|---|
| Manjka API ključ | Pojdite v Nastavitve (⚙) in vnesite ključ |
| Omejitev zahtevkov | Počakajte 1–2 minuti; preklopite na sekundarni model, če je nastavljen |
| Počasno generiranje | Aktivnosti trajajo 1–3 min za 6–10 DS — normalno |
| Grafi manjkajo | Kliknite "Generiraj vizualizacije" po generiranju vsebine |
| Prijava ne deluje | Preverite e-pošto za potrditveno povezavo; geslo zahteva 8+ znakov s simbolom, številko, velikimi in malimi črkami |
| Spletno iskanje ne deluje | Preverite, da je VKLOPLJENO v nastavitvah; deluje samo z Gemini in OpenRouter |
| AI Asistent skrit | Pomaknite miško nad polje — gumb ✨ se prikaže zgoraj desno od polja |
| Reference z oranžnimi zastavicami | Citata ni mogoče preveriti — ročno preverite DOI/URL ali ga odstranite pred oddajo |
| Urejanje sodelavca prepiše moje | Zmaga zadnje shranjevanje — uskladite prek panela "Aktivni zdaj", da ne urejate istega polja hkrati |
| Logo se ne prikaže | SuperAdmin mora naložiti logotip v Admin plošči → Nastavitve organizacije; privzetega logotipa ni |
| Tabela Finance je prazna po AI | Najprej konfigurirajte stroškovne kategorije (gumb ⚙) pred zagonom AI razdelitve |
19.3 Bližnjice
| Bližnjica | Dejanje |
|---|---|
Ctrl + P | Tiskanje |
Ctrl + Enter | Generiranje v AI Asistentu NOVO |
Esc | Zapre okna |
Tab | Premik med polji |
19.4 Podprti brskalniki
Google Chrome (priporočeno), Mozilla Firefox, Microsoft Edge, Safari.
Vsi projektni podatki so varno shranjeni v oblaku (Supabase). Dostopni z vsake naprave in se samodejno shranjujejo.
InterventionLogic — EU Intervention Logic AI Assistant
© 2026 INFINITA d.o.o. • interventionlogic.eu • beno.stern@infinita.si